Massoth reverse loop module 8157001. How can I test it out of the layout?

railaddict

Registered
Country flag
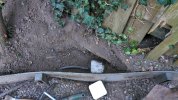
I have removed from the ground my reverse loop module. It has been buried for the last 12 years and worked ok until the last time I used it but that was before the problems on the track.
I would like to know if there is a possibility to test the module but I cannot connect it to the layout because it is not possible for the moment to connect anything the whole layout being rebuilt.
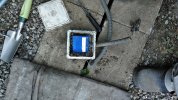
IMG_20260925_165553.jpgIMG_20260925_183214_6.jpgIMG_20260929_121142.jpg

In the meantime, I’ve sprayed on some WD-40 Specialist quick-drying contact cleaner.

It’s not urgent, but if the module stops working, I can always buy another one if necessary.
 
I guess that if you put DCC into the input, you should be able to measure an AC voltage out.

You won't be able to check the polarity, but on the premise that there is an AC reading, rather than nothing, then the module hasn't failed totally....
 
PLEASE DON'T DO THIS UNTIL SOMEBODY ELSE CONFIRMS IF IT IS RIGHT.... but as the module works (in one of its modes) by sensing a momentary short as the loco wheels cross the return loop break, is it possible just to temporarily wire it up and then cause a momentary short, just to see if the module's relay(s) click...?

Have you been using it in "short-circuit mode", or using the sensor track pieces?

Jon.
 
I would like to know if there is a possibility to test the module

The module is triggered by a wheel closing the isolating gap between rail sections. The result of the trigger is the polarity of one if the track sections being inverted (in respect to the other track section) on one side of the isolating gap. You just need to replicate the trigger, while measuring the polarity of the feed on the isolated track section.
 
Last edited:
The module is triggered by a wheel closing the isolating gap between rail sections. The result of the trigger is the polarity of one if the track sections being inverted (in respect to the other track section) on one side of the isolating gap. You just need to replicate the tigger, while measuring the polarity of the feed on the isolated track section.

I think that's pretty much what I was trying to say above, but you've put it much more succinctly and technically!

Try not to replicate the Tigger though, or you'll be inundated by the annoying bouncy black-and-orange things... :D

Jon.
 
I have removed from the ground my reverse loop module. It has been buried for the last 12 years and worked ok until the last time I used it but that was before the problems on the track.
I would like to know if there is a possibility to test the module but I cannot connect it to the layout because it is not possible for the moment to connect anything the whole layout being rebuilt.
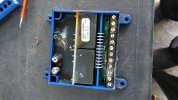
View attachment 361671View attachment 361672View attachment 361673

In the meantime, I’ve sprayed on some WD-40 Specialist quick-drying contact cleaner.

It’s not urgent, but if the module stops working, I can always buy another one if necessary.
Not being electronically minded, but, unless I'm missing something, there's definitely something burnt out in that picture
 
Not being electronically minded, but, unless I'm missing something, there's definitely something burnt out in that picture
They are the jumpers for configuration, which appear to have corroded. - This may stop it working?

If it has been damp and powered, then tracks on the pcb may no longer be present, as well.

PhilP.
 
If you have enough track you could set up a test wye like I did here. Though this was an LGB one simikar setup would work for a Massoth one or possibly not if it is trashed.

 
PLEASE DON'T DO THIS UNTIL SOMEBODY ELSE CONFIRMS IF IT IS RIGHT.... but as the module works (in one of its modes) by sensing a momentary short as the loco wheels cross the return loop break, is it possible just to temporarily wire it up and then cause a momentary short, just to see if the module's relay(s) click...?

Have you been using it in "short-circuit mode", or using the sensor track pieces?

Jon.
The module is triggered by a wheel closing the isolating gap between rail sections. The result of the trigger is the polarity of one if the track sections being inverted (in respect to the other track section) on one side of the isolating gap. You just need to replicate the trigger, while measuring the polarity of the feed on the isolated track section.
They are the jumpers for configuration, which appear to have corroded. - This may stop it working?

If it has been damp and powered, then tracks on the pcb may no longer be present, as well.

PhilP.
If you have enough track you could set up a test wye like I did here. Though this was an LGB one simikar setup would work for a Massoth one or possibly not if it is trashed.

I think Jon's advice is the one I'll follow. I'm not sure I have enough spare track but being in the process of rebuilding the layout, I can borrow a point and track from the layout to reproduce the situation.
As I’ve been posting on the forum, I’ve come to realise that there’s more wisdom in two heads (or more) than in one. Thank you all for your views.
 
Question to Philp (or anyone else):

Can I use the module on an H0 layout? I could build a reverse loop. Can I use my Massooth central to feed it and use either an analog or a digital loco? And in that case do I have to change the voltage on my central?

That would save me building the loop in LGB.
 
Theoretically, yes.

But HO would normally be 12V to the track.
So :
1. Will the Massoth CS go down to 12V output?
2. Will the reverse loop module work at 12V? - The Relays might not operate fully, at such a 'low' voltage?

PhilP.
 
Question to Philp (or anyone else):

Can I use the module on an H0 layout? I could build a reverse loop. Can I use my Massooth central to feed it and use either an analog or a digital loco? And in that case do I have to change the voltage on my central?

That would save me building the loop in LGB.
I guess it could work if you build a dedicated loop but as PhilP says, will the relays work at that voltage?

Massoth operates from 18 to 24V I believe....
 
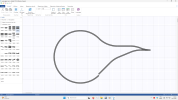
I followed the idea Jon had come up with, but with a loop. As I didn’t know how many rails I needed, I used the Any Rail software, which I first had to reinstall on my computer. As I wasn’t very familiar with the software, I wasted two days drawing a loop and had to cut corners when setting it up.

Capture d’écran (51).png

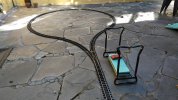
A race against time then began, as the forecast predicted a few days without rain. I had to borrow practically everything from my layout, and finally, by Monday, the loop was in place.


IMG_20261005_123400.jpg

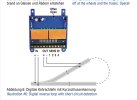
Now I just had to connect the Massoth module.


The positive side of this whole experience is that I was able to run all my rolling stock and thus realised that the railcar runs in the opposite direction to the other locomotives. My shunting locomotive (RhB 25) would set off on its own once it was on the tracks, and I couldn’t control it until it reached the switch point and came to a halt. When I gave it a push, it recognised the command and started working properly again. One of my two Stainz locomotives wouldn’t move, but the next day it was working properly again; finally, the LGB 2067 cleaning locomotive has stopped working – I tried using the switch in the cab and the potentiometer on the roof, but to no avail
 
I followed the idea Jon had come up with, but with a loop. As I didn’t know how many rails I needed, I used the Any Rail software, which I first had to reinstall on my computer. As I wasn’t very familiar with the software, I wasted two days drawing a loop and had to cut corners when setting it up.

View attachment 361855

A race against time then began, as the forecast predicted a few days without rain. I had to borrow practically everything from my layout, and finally, by Monday, the loop was in place.


View attachment 361856

Now I just had to connect the Massoth module.


The positive side of this whole experience is that I was able to run all my rolling stock and thus realised that the railcar runs in the opposite direction to the other locomotives. My shunting locomotive (RhB 25) would set off on its own once it was on the tracks, and I couldn’t control it until it reached the switch point and came to a halt. When I gave it a push, it recognised the command and started working properly again. One of my two Stainz locomotives wouldn’t move, but the next day it was working properly again; finally, the LGB 2067 cleaning locomotive has stopped working – I tried using the switch in the cab and the potentiometer on the roof, but to no avail
2 parts to this, clearly computer software not necesarily the best vehicle to do track laying. Been much quicker just laying it. But am a little confused, where railcar stopped in first vid was it proof that the reverse loop module is indeed non working?
 
I used the software because I did not know how many tracks I would need and that these have been taken from the layout which means a lot of kneeling which I wanted to limit as much as possible.
I tried also with my other locs and all stopped at the track cut. I pushed one Stainz into the isolated section but nothing happened.
 
I followed the idea Jon had come up with, but with a loop. As I didn’t know how many rails I needed, I used the Any Rail software, which I first had to reinstall on my computer. As I wasn’t very familiar with the software, I wasted two days drawing a loop and had to cut corners when setting it up.


A race against time then began, as the forecast predicted a few days without rain. I had to borrow practically everything from my layout, and finally, by Monday, the loop was in place.


Now I just had to connect the Massoth module.


The positive side of this whole experience is that I was able to run all my rolling stock and thus realised that the railcar runs in the opposite direction to the other locomotives. My shunting locomotive (RhB 25) would set off on its own once it was on the tracks, and I couldn’t control it until it reached the switch point and came to a halt. When I gave it a push, it recognised the command and started working properly again. One of my two Stainz locomotives wouldn’t move, but the next day it was working properly again; finally, the LGB 2067 cleaning locomotive has stopped working – I tried using the switch in the cab and the potentiometer on the roof, but to no avail
Where exactly do you have it isolated in the loop? Its hard to tell from the pic. Is it where the loco is stopping?

If the loco is stopping then either you dont have the input hooked up properly or its not working anymore.

Are you using sensor or short circuit mode? It can be a bit of pain to hook up sensor on a test track. When I first installed mine I was getting hesitation at one of the crossover points as it came out of the reverse track. Turns out I had the track input reversed from what it should be.
 
The positive side of this whole experience is that I was able to run all my rolling stock and thus realised that the railcar runs in the opposite direction to the other locomotives. My shunting locomotive (RhB 25) would set off on its own once it was on the tracks, and I couldn’t control it until it reached the switch point and came to a halt. When I gave it a push, it recognised the command and started working properly again. One of my two Stainz locomotives wouldn’t move, but the next day it was working properly again; finally, the LGB 2067 cleaning locomotive has stopped working – I tried using the switch in the cab and the potentiometer on the roof, but to no avail
Yep, surely there can't be a more realistic scenerio when modelling British Railways :rofl: :rofl: :rofl:
 
Back
Top Bottom