Hi all,
Please see the attached link to a Google Photos album showing the build progress for a West Clare Railway six-wheel brake van. This is what I would consider my first really serious effort at scratchbuilding a scale model, I have had several attempts over the years which have had varying degrees of success. This is still not exactly a finescale effort but it will look just dandy at the rear of the rest of my West Clare stock.

I have cheated in a couple of places, most lazily with the use of a Bachmann Emily Coach to provide the chassis. I spotted one for sale in a store local to me and I thought that it might work without any modifications until I measured the wheelbase but oh well! The real vehicles were equipped with Cleminson articulated chassis when they were delivered, but eventually this was removed. I had every intention of replicating this feature until I got started with the build and it became clear to me that I would much rather a car that runs and looks right than a car that probably never gets finished. I may at some point build another of the numerous West Clare cars that had Cleminson running gear with a working representation of the articulation.
The second big cheat was with the use of 3D printing for the outer carbody framing. From previous aborted efforts, cutting wood to consistent lengths and keeping everything square is beyond me at this point in my modeling progression. I enjoy working with wood but I do not have the facilities or the skill to maintain the precision necessary to frame a car from scratch. So I drew up the outer frames on SketchUp and had a colleague print them at home. For the price of lunch at the food truck around the corner from work I had a complete set of outer frames.
I made use of the HMRS drawings available here:

 hmrs.org.uk
And used the image found in Patrick Taylor's book as well as a colour version to be found here:
The sharp eyed among you will spot that these are of different vehicles. The drawing is of the Ennis built vehicles which had clerestory roof sections and full length footboards. The photo is of the earlier Bristol built vehicles. From what I can tell the only difference between them is the lack of a clerestory roof, the end framing being slightly different, an extra window on each side and the footboard only extending beneath the door and the ducket on the earlier vehicle.
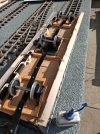
The chassis started out as a green Emily coach which was then cut into three pieces. A piece of wood was then drilled out to give the correct axle spacing. The three pieces were fixed to this piece of wood. Next I swapped out the larger original wheels for replacement 31mm diameter wheels (slightly oversize but nobody least of all me will care about a scale 0.8" on the diameter!). I ground down the ends of the axles to try and maximise their lateral play. If there is not enough lateral play I will make the centre wheelset blind. Other work included the removal of all of the footboard and brake rigging on each chassic segment, except for the centre axle as I wanted to retain the footboard under the doors and the duckets. I added a second footboard to each centre section.
Iron work is all just aluminium cut and filed to shape. I wish I had punched rivet heads in them to give some texture but I am not sure I could have done that without deforming them too much. Couplers are Accucraft choppers. I would spend some more time next time designing the end frames to accept these from the inside rather than the outside, they increase the overall length a little too much for my liking.
The wood paneling is just 1/16 bass wood that has been scored with a box cutter and cut to length to fit the openings in the frame. I tried to group as many openings as possible.
The duckets are the second iteration, I unfortunately made them too tall on the first go round. I gritted my teeth and started again and I am much happier with them now. They still need a roof fitted to each along with lamps and glazing. The rest of the glazing will probably be tackled this evening.
The roof is aluminium, bent to shape around a PVC pipe with a smaller radius than the final roof. I gently manipulated it by hand until it was fitting nicely. Copious amounts of superglue and lots of patience resulted in a neat install.
The floor is non-existant. I am still making determinations on the need for interior access once the car is finished. I might install working marker lights at some point so it would be useful to preserve interior access. My initial plan had been to simply glue to the car body to the chassis along its outside but that may change.
If I was to do it all again I would wait until I had attached the wood paneling to each frame section before assembling each section together. I would also make provisions for a more sophisticated joint between the outside frame sections than a glued butt joint. These joints eventually got help in the form of the wood paneling and the support for the coupler assembly which will hopefully transfer the longitudinal buff and draft forces into the rest of the car body.
The windows were incredibly fiddly but I am very pleased with how they turned out so far. A bit of glazing and they will look even better. My favourite detail is the angled sections at the bottom of each wood panel. This was finicky to do but I think it completely transformed the look of the car once finished.
Hopefully this is of some interest to the folks here.
Best regards,
Eoin
Please see the attached link to a Google Photos album showing the build progress for a West Clare Railway six-wheel brake van. This is what I would consider my first really serious effort at scratchbuilding a scale model, I have had several attempts over the years which have had varying degrees of success. This is still not exactly a finescale effort but it will look just dandy at the rear of the rest of my West Clare stock.

I have cheated in a couple of places, most lazily with the use of a Bachmann Emily Coach to provide the chassis. I spotted one for sale in a store local to me and I thought that it might work without any modifications until I measured the wheelbase but oh well! The real vehicles were equipped with Cleminson articulated chassis when they were delivered, but eventually this was removed. I had every intention of replicating this feature until I got started with the build and it became clear to me that I would much rather a car that runs and looks right than a car that probably never gets finished. I may at some point build another of the numerous West Clare cars that had Cleminson running gear with a working representation of the articulation.
The second big cheat was with the use of 3D printing for the outer carbody framing. From previous aborted efforts, cutting wood to consistent lengths and keeping everything square is beyond me at this point in my modeling progression. I enjoy working with wood but I do not have the facilities or the skill to maintain the precision necessary to frame a car from scratch. So I drew up the outer frames on SketchUp and had a colleague print them at home. For the price of lunch at the food truck around the corner from work I had a complete set of outer frames.
I made use of the HMRS drawings available here:
HMRS 5593: 6 Wheel Brake Van - West Clare - 9ft 6ins/9ft 6ins w/b
6 Wheel Brake Van - West Clare - 9ft 6ins/9ft 6ins w/b
And used the image found in Patrick Taylor's book as well as a colour version to be found here:
The sharp eyed among you will spot that these are of different vehicles. The drawing is of the Ennis built vehicles which had clerestory roof sections and full length footboards. The photo is of the earlier Bristol built vehicles. From what I can tell the only difference between them is the lack of a clerestory roof, the end framing being slightly different, an extra window on each side and the footboard only extending beneath the door and the ducket on the earlier vehicle.
The chassis started out as a green Emily coach which was then cut into three pieces. A piece of wood was then drilled out to give the correct axle spacing. The three pieces were fixed to this piece of wood. Next I swapped out the larger original wheels for replacement 31mm diameter wheels (slightly oversize but nobody least of all me will care about a scale 0.8" on the diameter!). I ground down the ends of the axles to try and maximise their lateral play. If there is not enough lateral play I will make the centre wheelset blind. Other work included the removal of all of the footboard and brake rigging on each chassic segment, except for the centre axle as I wanted to retain the footboard under the doors and the duckets. I added a second footboard to each centre section.
Iron work is all just aluminium cut and filed to shape. I wish I had punched rivet heads in them to give some texture but I am not sure I could have done that without deforming them too much. Couplers are Accucraft choppers. I would spend some more time next time designing the end frames to accept these from the inside rather than the outside, they increase the overall length a little too much for my liking.
The wood paneling is just 1/16 bass wood that has been scored with a box cutter and cut to length to fit the openings in the frame. I tried to group as many openings as possible.
The duckets are the second iteration, I unfortunately made them too tall on the first go round. I gritted my teeth and started again and I am much happier with them now. They still need a roof fitted to each along with lamps and glazing. The rest of the glazing will probably be tackled this evening.
The roof is aluminium, bent to shape around a PVC pipe with a smaller radius than the final roof. I gently manipulated it by hand until it was fitting nicely. Copious amounts of superglue and lots of patience resulted in a neat install.
The floor is non-existant. I am still making determinations on the need for interior access once the car is finished. I might install working marker lights at some point so it would be useful to preserve interior access. My initial plan had been to simply glue to the car body to the chassis along its outside but that may change.
If I was to do it all again I would wait until I had attached the wood paneling to each frame section before assembling each section together. I would also make provisions for a more sophisticated joint between the outside frame sections than a glued butt joint. These joints eventually got help in the form of the wood paneling and the support for the coupler assembly which will hopefully transfer the longitudinal buff and draft forces into the rest of the car body.
The windows were incredibly fiddly but I am very pleased with how they turned out so far. A bit of glazing and they will look even better. My favourite detail is the angled sections at the bottom of each wood panel. This was finicky to do but I think it completely transformed the look of the car once finished.
Hopefully this is of some interest to the folks here.
Best regards,
Eoin
Last edited: