Having recently started to do my Black one of these and run into problems I decided to get started with this one. Problems with the Black One Link:-

 www.gscalecentral.net
I have successfully turned my TL Pfiffi to Battery DCC, as this had a Zimo Decoder A’s has this Green one I hoped for more success. Pfiffi Job Link:-
www.gscalecentral.net
I had hoped to be able to link here the Backdating work I had carried out on the Green one, but I sometimes no mostly find that the search is not helped by forgetting what I called or where I put my Posts. My only option is to try to remember to Watch them.
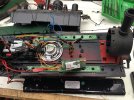
So yesterday as it was raining I decided to make a start on 99 5902-3 as backdated to 1981 condition. Here is the inside just after starting the work. The Smoke Generator has been removed as with the Pfiffi Conversion, I need the space for Batteries. Those 2 remaining weights will have to go as well for the same reason. The Weights that would fit inside the Side Tanks have been removed for working around. Some will return but others will not. Oh if you do something like this remember the way round that they came out. They have unequal lengths between the screws and the end.

Here you can see the Chip in closeup, the 2 Blue Wires go to the Pot to lower or increase the noise.

Here you can see that I have put the Charging Socket on the Cab Floor, I got it in the wrong place hence the empty hole. No worries this will not be seen. I have used a Fosworks Wiring Loom, makes things so much easier but this one will be getting a little mod details later.


Here I have cut and joined the 2 sets of Red and Yellow Wires from the Track Pickups together. I did check that they were orientated correctly with a Meter just in case. You do not want to cross those feeds at any stage. I erroneously coupled these to a socket for Power ... Doh needs to go via the Fosworks Battery DCC Board. Idiot! Note that I have also Heat Shrunk the spare cut offs of wire just in case of any stray feeds. I should have just pulled the wires from the Pins as I did with Pfiffi and have done with the Black Mallett! Doh again.

Still were are getting somewhere now, the two sets of feeds (red and yellow) to the Chip that were from Track Power now in the DCC sockets on the Fosworks Board. The Power from Battery (red and black) to the outside completes the installation. Now it can be tested out with my Test Battery Pack.

Great no problems with the Hall Sensor, 4 beats to the revolution of the Wheels. But I have not removed any Plunger or Slider Pickups from this baby as yet!
Here you can see where I fitted the On/Off Switch from the Wiring Loom. Driver Herr Wuick will need to move out of the way some. What I have not shown is how the twin Battery Pack fits. The 4 section fits into the Boiler and the 8 section just behind. The Fosworks Board sits just on top of the Chip after erroneously plonking it on the Speaker. I think that is may have been better to place the Speaker in the Smokebox thus leaving more Room for the Batteries and Fosworks Chip ... perhaps?

I needed to make some more space in the Smokebox for the Batteries. There were some protruding Lugs atbtne Front of those that remain. There are 12 AA’s in this Loco, 4 in the Smokebox and 8 just behind. All carefully worked out on the Black Mallett when I dismantled that. I ordered enough bits from Fosworks to do both Locomotives.

Here I have tidied up the wiring and secured it with old GPO Phone Wire. That flap of Pondliner is to stop the screw rubbing on the Battery Pack.

Not seen is the amount of plastic that had to be hacked at the front of the Cab to get the Wiring Loom in place, also some from the back of the same side tanks to get the Fuse Out of the Tank. Also some Weigts have been returned, 3 each side. You should be able to notice the difference in length from the screw at each end.
At this stage ell was stuffed back into the Boiler and the Engine made good again.
Here below is the recited Fuse. I cut the Red Wire on the Wiring Loom and extended it so that the Fuse is easily accessible as shown. The gap was cut out using the Mini Drill with a Round Saw Blade.

Finally I made a Toolbox to replace the smaller one to hide the Fuse. Scraped off Paint touch up and she is now ready to go. Started on Saturday 1300-1730, finished today 0900-1200.

Trainline Mallett an early Black one ref 2011002 not Zimo but had an onboard LGB plug in, now Batteryfied with LBG XlS
Long shot I know but I have just started on this Loco to convert it to Battery DCC. As it has 2 Bogies each with their own link to the Chip I decided to see if Power via one Bogie would run the beast. Effectively pulling out the Track Power Plugs on the Front Bogie and Powering it from DCC on...
www.gscalecentral.net
I have successfully turned my TL Pfiffi to Battery DCC, as this had a Zimo Decoder A’s has this Green one I hoped for more success. Pfiffi Job Link:-
NOW THE BATTERY WORK BEGINS Train Line Pffifi 6101 and Mallett Break Down Diagrams any one have a link please? Link provided thanks.
I will soon all being well be Batteryising some of my DCC Locomotives, to that end have been looking at Pfiffi's underneath anatomy as shown below:- I see 6 relevant black screws, 2 either side by the cylinders, 2 more by the Couplings and 2 more below the front of the cab. I think these should...
www.gscalecentral.net
I had hoped to be able to link here the Backdating work I had carried out on the Green one, but I sometimes no mostly find that the search is not helped by forgetting what I called or where I put my Posts. My only option is to try to remember to Watch them.
So yesterday as it was raining I decided to make a start on 99 5902-3 as backdated to 1981 condition. Here is the inside just after starting the work. The Smoke Generator has been removed as with the Pfiffi Conversion, I need the space for Batteries. Those 2 remaining weights will have to go as well for the same reason. The Weights that would fit inside the Side Tanks have been removed for working around. Some will return but others will not. Oh if you do something like this remember the way round that they came out. They have unequal lengths between the screws and the end.
Here you can see the Chip in closeup, the 2 Blue Wires go to the Pot to lower or increase the noise.
Here you can see that I have put the Charging Socket on the Cab Floor, I got it in the wrong place hence the empty hole. No worries this will not be seen. I have used a Fosworks Wiring Loom, makes things so much easier but this one will be getting a little mod details later.
Here I have cut and joined the 2 sets of Red and Yellow Wires from the Track Pickups together. I did check that they were orientated correctly with a Meter just in case. You do not want to cross those feeds at any stage. I erroneously coupled these to a socket for Power ... Doh needs to go via the Fosworks Battery DCC Board. Idiot! Note that I have also Heat Shrunk the spare cut offs of wire just in case of any stray feeds. I should have just pulled the wires from the Pins as I did with Pfiffi and have done with the Black Mallett! Doh again.
Still were are getting somewhere now, the two sets of feeds (red and yellow) to the Chip that were from Track Power now in the DCC sockets on the Fosworks Board. The Power from Battery (red and black) to the outside completes the installation. Now it can be tested out with my Test Battery Pack.
Great no problems with the Hall Sensor, 4 beats to the revolution of the Wheels. But I have not removed any Plunger or Slider Pickups from this baby as yet!
Here you can see where I fitted the On/Off Switch from the Wiring Loom. Driver Herr Wuick will need to move out of the way some. What I have not shown is how the twin Battery Pack fits. The 4 section fits into the Boiler and the 8 section just behind. The Fosworks Board sits just on top of the Chip after erroneously plonking it on the Speaker. I think that is may have been better to place the Speaker in the Smokebox thus leaving more Room for the Batteries and Fosworks Chip ... perhaps?
I needed to make some more space in the Smokebox for the Batteries. There were some protruding Lugs atbtne Front of those that remain. There are 12 AA’s in this Loco, 4 in the Smokebox and 8 just behind. All carefully worked out on the Black Mallett when I dismantled that. I ordered enough bits from Fosworks to do both Locomotives.
Here I have tidied up the wiring and secured it with old GPO Phone Wire. That flap of Pondliner is to stop the screw rubbing on the Battery Pack.
Not seen is the amount of plastic that had to be hacked at the front of the Cab to get the Wiring Loom in place, also some from the back of the same side tanks to get the Fuse Out of the Tank. Also some Weigts have been returned, 3 each side. You should be able to notice the difference in length from the screw at each end.
At this stage ell was stuffed back into the Boiler and the Engine made good again.
Here below is the recited Fuse. I cut the Red Wire on the Wiring Loom and extended it so that the Fuse is easily accessible as shown. The gap was cut out using the Mini Drill with a Round Saw Blade.
Finally I made a Toolbox to replace the smaller one to hide the Fuse. Scraped off Paint touch up and she is now ready to go. Started on Saturday 1300-1730, finished today 0900-1200.
Attachments

Last edited:


