Progress on The Orchard Line - posts in. Next up, cable trays!

8 Mar 2014
7,806
972
San Diego
Country
Armenia
www.elmassian.com
Best answers
0
Country flag
A short note, use black silicon sealer for anything exposed to sunlight. The colors of sealer follow the same rules as colors of plastic outdoors. Only black will survive... try clear zip ties vs black ones and see how quickly the clear ones fall apart.

Greg
 
  • Like
Reactions: 1 user

DGE-Railroad

The Orchard Line
26 Jan 2020
607
89
52
United Kingdom
Best answers
0
Country flag
A short note, use black silicon sealer for anything exposed to sunlight. The colors of sealer follow the same rules as colors of plastic outdoors. Only black will survive... try clear zip ties vs black ones and see how quickly the clear ones fall apart.

Greg
I never knew that!
Thanks Greg. Every day's a school day :)
 

GAP

G Scale Trains, HO Trains, 1:1 Sugar Cane trains
14 Jun 2011
4,057
940
Bundaberg Queensland, Australia
Country
Australia
ringbalin-light-railway.blogspot.com
Best answers
0
Country flag
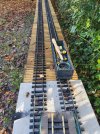
I forgot to add, because the cable trays are the pre-galvanised type and I'm cutting some of them too, I thought it worth giving them some extra protection.

They're fairly well protected being underneath the boards, but every little helps and I found a cheap and very quick way to do it.

A 1L tin of cold galvanising paint was £20 and easily did all of the trays, top and bottom. Using a mini roller made for incredibly quick and effective coverage.
View attachment 275095

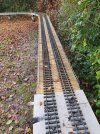
Once the cement boards were fixed all joins and holes were given a smear of clear silicone sealant, the idea being to limit the amount of water finding its way into the sides of the cement boards or worse, sitting between them and the cable trays
View attachment 275115
Another tip for fixing the boards try dipping the screws into some silicone prior to fixing that way the hole is sealed (idea stolen from the fleet air arm helicopter builds).
 
  • Like
Reactions: 1 user

DGE-Railroad

The Orchard Line
26 Jan 2020
607
89
52
United Kingdom
Best answers
0
Country flag
I've got a bit further now in making the top of the loop, which over doubles the length now, of the existing track.

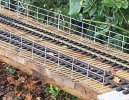
I had some timber left over from a shed we are building, so I made a quick and cheerful bridge from it. It's not the best thing ever it it will serve for now!

A gondola was pressed in to service as the MOW car, since it made pushing the tools around the track a bit easier :)

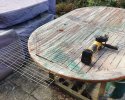
A galvanised mesh panel was used for the railings on the sides of the bridge. One sheet was easily enough to do both sides. I found a slitting disk in the angle grinder made cutting it up very quick and easy without bending the 'legs' which simply push in to a snug hole drilled in the decking
20201123_001320.jpg
20201123_001254.jpg
20201123_095458.jpg
20201123_095126.jpg
 
  • Like
Reactions: 1 user

DGE-Railroad

The Orchard Line
26 Jan 2020
607
89
52
United Kingdom
Best answers
0
Country flag
The track is about 2/3 done but I managed to get a ride around it today.

Like Santa, I had a 'little helper' although mine barked instructions and insisted on 'filling' the camera-gondola. Still, it's a bit of a milestone :D

A Railpro-controlled Lil Critter was chosen as the guinea pig, since it's the loco I minded least plummeting to the ground if it all went wrong.

Ride around part of the Orchard Line
 
  • Like
Reactions: 1 user

DGE-Railroad

The Orchard Line
26 Jan 2020
607
89
52
United Kingdom
Best answers
0
Country flag
Yet more progress as funding is gradually obtained for more track and cementboard.

The layout is tantalisingly close to being a completed circuit, which is a Good Thing as my 4yo enjoys using it and although he has been really good about Stopping In Time as he approaches the end of the track, theres always a heart stopping moment as the loco he is controlling careers towards a quite literally terminal destination at full tilt, while his 4 year old brain ponders the controller and tries to remember which direction makes it stop.

So...
We have a gap to complete the circuit. It's there to allow access for people, mowers and other non-rail-based things. The plan is to have a lift out section which takes two tracks.

It needs to be as light strong as possible due to the span. And to probably be a bit bridge-y. I have some LGB small and big bridge sections i could use for one of the tracks

I'd initially though of amputating an unsuspecting aluminium ladder as a way of getting a cheap, light track base and to have it drop into some U brackets at each end for positive location, but after seeing a post today, wondered if aluminium box or L sections could themselves be used as the track. Probably not as i think the relatively small size of a piece of say, 10x10mm over that sort of length is going to droop without the aid of a significant amount trussing, bracing and whatnot.

Any sugggestions?
 

a98087

Registered
8 Nov 2009
1,846
199
36
Wiltshire
Best answers
0
Country flag
What’s the size of the gap you want to bridge?

this person does bridges of assorted sizes, and will make to order.


alternatively could you use a piece of cable tray, with either cosmetic or real sides to prevent any sagging?

hope this gives you something to ponder over

Dan
 
  • Like
Reactions: 1 user

Rhinochugger

Retired Oik
27 Oct 2009
36,710
4,240
North West Norfolk
Best answers
0
Country flag
The track is about 2/3 done but I managed to get a ride around it today.

Like Santa, I had a 'little helper' although mine barked instructions and insisted on 'filling' the camera-gondola. Still, it's a bit of a milestone :D

A Railpro-controlled Lil Critter was chosen as the guinea pig, since it's the loco I minded least plummeting to the ground if it all went wrong.

Ride around part of the Orchard Line
Nice one, I saw the little helper bark out the instruction to go faster :clap::clap:
 
  • Like
Reactions: 1 user

DGE-Railroad

The Orchard Line
26 Jan 2020
607
89
52
United Kingdom
Best answers
0
Country flag
I think I’ve found a solution (thanks Dan, for the suggestions)

I think I need something versatile to use as a base on its own or to mount things to it.
Having used cable trays for the rest, I’m loathe to use one for this - even a narrow one will be quiet large and unwieldy with, I think, a fair bit of unnecessary material adding to the weight.

I’m looking at some aluminium 2020 section. A couple of these can be joined with steel 180 degree joiners to make an incredibly strong yet light bearer under each track....
 

GAP

G Scale Trains, HO Trains, 1:1 Sugar Cane trains
14 Jun 2011
4,057
940
Bundaberg Queensland, Australia
Country
Australia
ringbalin-light-railway.blogspot.com
Best answers
0
Country flag
I think I’ve found a solution (thanks Dan, for the suggestions)

I think I need something versatile to use as a base on its own or to mount things to it.
Having used cable trays for the rest, I’m loathe to use one for this - even a narrow one will be quiet large and unwieldy with, I think, a fair bit of unnecessary material adding to the weight.

I’m looking at some aluminium 2020 section. A couple of these can be joined with steel 180 degree joiners to make an incredibly strong yet light bearer under each track....
I made a lift up bridge out of aluminium it is strong and light (SWMBO can lift it with ease) slightly under 1 metre long (about 900mm from memory).
The box section is very rigid and the angle adds strength it is all pop riveted together.
Even though one picture shows it propped open, it does stay open by itself. I just used the prop for the photo as it was windy on the day.
The sides are cut from the bottom of an old bread crate, with a piece of al angle around the edge.
Blog has more details
Ringbalin Light Railway G Division: 9. Stage 2-June 2020 Lift Up Bridge Finished; Stage 2 is Complete (ringbalin-light-railway.blogspot.com)

Merged_document (1).jpg

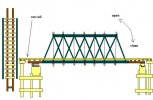
The hinge configuration is the opposite to convention in that the hinge is below the track level, this a drawing (drawn by Korm Kormsen) showing the method used.
The sides of this one are from an old bread crate, with a piece of al angle around the edge.

korm's lift up bridge.JPG
 
Last edited:
  • Like
Reactions: 1 user

DGE-Railroad

The Orchard Line
26 Jan 2020
607
89
52
United Kingdom
Best answers
0
Country flag
That's really interesting. I think i will try a slight variation of that. My span is around the 3m mark. I'm not sure I can realistically get it narrower than that but im going to see if i can get it closer to 1.5m-2m

I hadn't thought of hinging it because of width. I suppose i could go that route if i have it as 2 parts which hinge at each end and lock in the middle. Im wary though that is introducing a third rail break in the middle. I must say I like Korms hinge design. That's impressive. I'd always thought a hinge above track level was needed for it to work. This just shows how a good engineer can design around the problem :)
 
Last edited:

DGE-Railroad

The Orchard Line
26 Jan 2020
607
89
52
United Kingdom
Best answers
0
Country flag
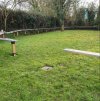
Here's my gap. The 'floating' righthand end wil get a post underneath it. That concrete pad is to far to the left and needs to go
20210122_170045.jpg
 

dunnyrail

DOGS, Garden Railways, Steam Trains, Jive Dancing,
Staff member
GSC Moderator
25 Oct 2009
26,164
4,989
75
St.Neots Cambridgeshire UK
Best answers
0
Country flag
I made a lift up bridge out of aluminium it is strong and light (SWMBO can lift it with ease) slightly under 1 metre long (about 900mm from memory).
The box section is very rigid and the angle adds strength it is all pop riveted together.
Even though one picture shows it propped open, it does stay open by itself. I just used the prop for the photo as it was windy on the day.
The sides are cut from the bottom of an old bread crate, with a piece of al angle around the edge.
Blog has more details
Ringbalin Light Railway G Division: 9. Stage 2-June 2020 Lift Up Bridge Finished; Stage 2 is Complete (ringbalin-light-railway.blogspot.com)

View attachment 279375

The hinge configuration is the opposite to convention in that the hinge is below the track level, this a drawing (drawn by Korm Kormsen) showing the method used.
The sides of this one are from an old bread crate, with a piece of al angle around the edge.

View attachment 279382
Remembering what was said a few posts back about plastic, would be worth while to spray Halfords (or another make) of matt black spray, then a second coat of Halfords red primer (actually a brown) as an undercoat then your choice of final colour on top of this. The black stops plastic from degenerating, the brown will work nicely as a rust look if any of the top coat comes off.

Nice looking lift bridge.
 

GAP

G Scale Trains, HO Trains, 1:1 Sugar Cane trains
14 Jun 2011
4,057
940
Bundaberg Queensland, Australia
Country
Australia
ringbalin-light-railway.blogspot.com
Best answers
0
Country flag
Remembering what was said a few posts back about plastic, would be worth while to spray Halfords (or another make) of matt black spray, then a second coat of Halfords red primer (actually a brown) as an undercoat then your choice of final colour on top of this. The black stops plastic from degenerating, the brown will work nicely as a rust look if any of the top coat comes off.

Nice looking lift bridge.
The plastic has 3 coats of primer and 2 coats of silver paint, it was recycled for my previous layout where it spent 10 years in the garden in Australian weather.
Here's my gap. The 'floating' righthand end will get a post underneath it. That concrete pad is to far to the left and needs to go
View attachment 279392

If you put a post on the pad and extended the base to it how much of a gap is left?

What sort of equipment is going through the gap a ride on mower, wheelbarrow a 2M opening should allow most garden equipment through?
Mine is 900mm wide and I can get a builders wheelbarrow and a push mower through with no problem.
 

DGE-Railroad

The Orchard Line
26 Jan 2020
607
89
52
United Kingdom
Best answers
0
Country flag
Ive brought the gap down to the concrete pad, which puts it at 1.8m, which i think is doable with the lift up bridge and Korms hinge method. That allows the ride on mower through, with a bit of safety each side.

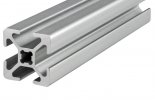
I'm thinking of using a piece of this extrusion under each track - light, very strong and the channels which can accommodate captive nuts would work as fixing points for side guards, hinges, track itself, bridge models or whatever.
Screenshot_20210124-130317_Chrome.jpg
I could keep the weight down and make it easier to lift by hinging each track independently and then look to lock them.to lift together at a later point if i wanted to.
 

PhilP

G Scale, 7/8th's, Electronics
5 Jun 2013
33,561
3,521
Nottingham
Best answers
0
Country flag
I would link the track's as a single unit from day one..

You will find it much easier to keep everything square with one rigid unit. - Remember, every millimetre you are out, is 22.5mm in the real world.

Your alignment wants to be spot-on.

PhilP
 
  • Like
Reactions: 1 user

DGE-Railroad

The Orchard Line
26 Jan 2020
607
89
52
United Kingdom
Best answers
0
Country flag
Do you mean keep both parallel tracks on one frame, Phil?

I'd have thought keeping each one as a single entity would make lining them up and locating them easier because one isn't going to influence the other :think: either in terms of installation, or in use, if they expand slightly differently.

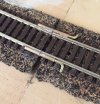
I saw this a while back and thought it was probably the ultimate in positive location methods! I'm not sure at the moment If I'll try it or not.
track-joins-boards.jpg
 
Last edited:

PhilP

G Scale, 7/8th's, Electronics
5 Jun 2013
33,561
3,521
Nottingham
Best answers
0
Country flag
Do you mean keep both parallel tracks on one frame, Phil?

I'd have thought keeping each one as a single entity would make lining them up and locating them easier because one isn't going to influence the other :think: either in terms of installation, or in use, if they expand slightly differently.
Yes.
A single, slim span, will tend to twist and flex more.
A larger, more rigid structure, will be easier to line-up (a wider face) to each abutment.
Any 'slop' in the hinging, should be easier to control, as well.

Of course, if your background and expertise, is in wrangling metal, it may be a different story?

PhilP
 

GAP

G Scale Trains, HO Trains, 1:1 Sugar Cane trains
14 Jun 2011
4,057
940
Bundaberg Queensland, Australia
Country
Australia
ringbalin-light-railway.blogspot.com
Best answers
0
Country flag
Yes.
A single, slim span, will tend to twist and flex more.
A larger, more rigid structure, will be easier to line-up (a wider face) to each abutment.
Any 'slop' in the hinging, should be easier to control, as well.

Of course, if your background and expertise, is in wrangling metal, it may be a different story?

PhilP

Totally agree with Phil, I experimented with separate spans but when trying to open it to get things through it was just a pain.
Single bridge with double track is the best in my humble opinion, plus with the cross bracing it is far more rigid.
 

DGE-Railroad

The Orchard Line
26 Jan 2020
607
89
52
United Kingdom
Best answers
0
Country flag
Thanks chaps! If you hadn’t both illuminated me to this, I’d have followed my nose and probably ended up with a system I cursed every time I used it :)

I’ll definitely follow the wisdom. Single span it is.
 
Last edited: