Piko 2-10-2 Class 95 Ref. 37230 conversion to Battery Power.

dunnyrail

DOGS, Garden Railways, Steam Trains, Jive Dancing,
Staff member
GSC Moderator
25 Oct 2009
26,160
4,986
75
St.Neots Cambridgeshire UK
Best answers
0
Country flag
In my continued quest for Battery Locomotives I have decided to buy one of these to be converted as a Harz Line may have been. It is pretty well known that there were to be a selection of Standard Locomotives Built by Krupp for Metre Gauge and possibly 75cm lines as well. Thus I intend to trash the value of my recent investment. But before I trash it completely a very short review of the beast.

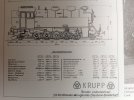
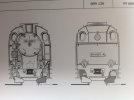
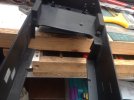
It is an Articulated 2-10-2 in the same way as the LGB Harz 2-10-2's are with a 6 wheel Power Bogie front and 4 wheel one rear joined by Coupling Rods and an internal Drive Rod in both cases. There the similarity ends as the Piko one is somewhat larger and of course has 4 Buffers being a Standard Gauge Locomotive. It really is a big beast as the following comparison pictures show when compared against an LGB Harz 2-10-2. I have test run it on its back with wires attahed and it appears to be a very capable runner. Full lighting is included with the inevitable Driver that will be swopped out! A neat solution of fitting a DCC Decoder by taking off the rear Pony to get at a simple to remove cover plate. Sound fitting will require removal of the Boiler and Cab assembly as I have done which requires the removal of 9 screws as shown in the Instruction Leaflet and carefull prising out the Straining Rods in front of the Smokebox. Whether that is the full story to simple decoder fitting I cannot say as I have not investigated further. But what it does mean to me is that there is plenty of room for Battery Kit.image.jpegimage.jpegimage.jpeg
For a starter having done the comparison pics I have partialy dismantled the Piko Loco and taken many pictures of how the wiring is done so that should I wish to return to Track power this will be possible (though highly unlikely). image.jpegimage.jpegimage.jpegimage.jpegimage.jpegimage.jpeg
The next stage of this saga may well take a while as I will be reviewing a very new and exciting bit of kit for Battery Conversions. So watch this space.
 

Zerogee

Clencher's Bogleman
25 Oct 2009
17,351
1,723
North Essex
Best answers
0
Country flag
Nice start, JonD.... just as a suggestion, while you're doing the conversion why don't you simply put in a DPDT switch so that you can flick from battery back to track power if and when you ever want to?
My guess is that even without the skates (which I assume you're going to remove) it would probably still run OK on track power just from the wheels, there are enough of them.......

Are you putting your new Revo RC-DCC gear in this with a Decoder, or have you got that earmarked for another project?

Jon.
 

dunnyrail

DOGS, Garden Railways, Steam Trains, Jive Dancing,
Staff member
GSC Moderator
25 Oct 2009
26,160
4,986
75
St.Neots Cambridgeshire UK
Best answers
0
Country flag
Nice start, JonD.... just as a suggestion, while you're doing the conversion why don't you simply put in a DPDT switch so that you can flick from battery back to track power if and when you ever want to?
My guess is that even without the skates (which I assume you're going to remove) it would probably still run OK on track power just from the wheels, there are enough of them.......

Are you putting your new Revo RC-DCC gear in this with a Decoder, or have you got that earmarked for another project?

Jon.
I will be removing all the Pickups and lights as I rarely use lighting. It will have a Fosworks setup and My Loco Sound Unit. It probably deserves better but I have been happy with the setup installed in my Mallett and Harz 2-6-2. My Revo DC kit which finally arrived a week or so ago will be going into one of my DCC Locomotives after I have tested then reviewed it. Will probably do that using a Test Bogie and putting the setup in an Open Wagon!
 

dunnyrail

DOGS, Garden Railways, Steam Trains, Jive Dancing,
Staff member
GSC Moderator
25 Oct 2009
26,160
4,986
75
St.Neots Cambridgeshire UK
Best answers
0
Country flag
For completeness I show drawings of the 3 Standard Types that were proposed, 99-6001 being the only one ever built. The second pic shows some of the Mods I will be making to create my LookNothingAlike!AACB8A0A-056F-4ABE-A99A-21336A808F7A.jpeg1D429823-DB83-4949-AFCA-DBE4DC50C3C4.jpeg
 
  • Like
Reactions: 1 user

Zerogee

Clencher's Bogleman
25 Oct 2009
17,351
1,723
North Essex
Best answers
0
Country flag
I'd say that will be close enough to look the part, JonD! ;)

My Revo DCC kit also arrived over a week ago now, but things (work stuff) have been so busy this week that I haven't had any chance to try it out either - my first test will simply be using one of my existing Battery-DCC converted locos, either the BoBo or the IVk, and just doing a straight swap between the Tam Valley Rx and the new Revo one.... shouldn't take very long at all, but it's finding the correct Tuit..... ;)

Jon.
 

idlemarvel

Neither idle nor a marvel
13 Jul 2015
3,136
801
Ascot
Country
Mars
Best answers
0
Country flag
Very nice.
It takes some nerve to contemplate hacking a brand new and fairly expensive loco like that. Still you can't take it with you. :)
It looks like it has illuminated running gear, are you going to keep that?
When you said the motor block design was like the LGB Harz bull, does that mean it has the outrageous rear overhang on sharp curves or are both motor blocks articulated like on the LGB Saxon VIK?
 

KentKeith

Registered
24 Oct 2009
3,034
1,665
SouthEast Kent
Best answers
0
Country flag
Snap! Another one has arrived on the EG&SNNR - already fitted with Massoth sound. Had its first amble round the track once the track cleaner had done it's work:

DR-95-04.jpg
 
  • Like
Reactions: 3 users

Zerogee

Clencher's Bogleman
25 Oct 2009
17,351
1,723
North Essex
Best answers
0
Country flag
Looks nice out on the line, Keith - though for some reason this one hasn't really grabbed me, unlike the BR64 and the BR24, so I don't think I'm likely to go for one....

Jon.
 

dunnyrail

DOGS, Garden Railways, Steam Trains, Jive Dancing,
Staff member
GSC Moderator
25 Oct 2009
26,160
4,986
75
St.Neots Cambridgeshire UK
Best answers
0
Country flag
Very nice.
It takes some nerve to contemplate hacking a brand new and fairly expensive loco like that. Still you can't take it with you. :)
It looks like it has illuminated running gear, are you going to keep that?
When you said the motor block design was like the LGB Harz bull, does that mean it has the outrageous rear overhang on sharp curves or are both motor blocks articulated like on the LGB Saxon VIK?
Yes I am afraid on sharpe curves the overhang will be pretty much like the bull and the bogies are both articulated. Must take a pic to show this in aid of the review. And yes all the lighting including that to the wheels and Smoke Unit will be removed.
 
  • Like
Reactions: 1 user

WKDOR

Registered
26 Oct 2009
775
6
Welsh Marches
Best answers
0
Country flag
Hello Jon

This is really interesting and great timing. I am just about to disassemble my first Piko loco (BR 64 Bubikopf) for conversion to battery/RC. All other locos are battery/RC that we have run for many years. Our current standard is Deltang, and this one will be getting MLS sound too.

For your conversion are you completely gutting all the electrics and PCBs - or just the track power connections? Although I have removed skates and pickups from LGB locos in the past I haven't done a Piko. So any pix of that part of the process would be very helpful.

Will be hanging on your every word as ever ......

Mike

Yes I am afraid on sharpe curves the overhang will be pretty much like the bull and the bogies are both articulated. Must take a pic to show this in aid of the review. And yes all the lighting including that to the wheels and Smoke Unit will be removed.
 

dunnyrail

DOGS, Garden Railways, Steam Trains, Jive Dancing,
Staff member
GSC Moderator
25 Oct 2009
26,160
4,986
75
St.Neots Cambridgeshire UK
Best answers
0
Country flag
Hello Jon

This is really interesting and great timing. I am just about to disassemble my first Piko loco (BR 64 Bubikopf) for conversion to battery/RC. All other locos are battery/RC that we have run for many years. Our current standard is Deltang, and this one will be getting MLS sound too.

For your conversion are you completely gutting all the electrics and PCBs - or just the track power connections? Although I have removed skates and pickups from LGB locos in the past I haven't done a Piko. So any pix of that part of the process would be very helpful.

Will be hanging on your every word as ever ......

Mike
Hi Mike,
Your request is almost ready to be fully answered.

All the circuit boards came out today in fact the beast has been pretty well pulled apart completely. I was asked about the Pivoting so the first picture is of that. The two LGB Guys either sides heads are pointing at the Pivots the one in the centre is the central pivot.

image.jpegimage.jpeg

The rear board that hides in the Bunker is here followed by all of them detached and recoupled to each other for safe storage in a Chineese Plastic TakeAway Container which with all the other removed bits will live in the Locomotives big box.

image.jpegimage.jpeg

The only real work to have been done is some cutting of the Bogies to fit LGB Couplings rather than dismantle the Piko ones which have hooks that I do not use on Locomotives. The benefit of this will be to reduce the length of the beast a shade. Also to be seen is the bit of 20thou Plasticard that will drop the hook down some to stop decoupling.

image.jpegimage.jpeg

Next a pic of it all in bits, the chassis is really quite lightweight with all ths bits and weight removed!

image.jpeg

and 3 pics to show the plans that I will be attempting to emulate. The 2-10-2 and also some of the Cab of 6001 which I happen to have a spare of and may consider using to in the conversion. The 2-6-2 is also being used as a theme for the 2 ends where a Single Buffer will replace the existing arrangement of 2.

All of the Pickup Skates and Wipers will be removed, perhaps in the morning. I think this will be simply achieved by removing the Chassis Keeper Plate to get behind the wheels.
 

Attachments

  • image.jpeg
    image.jpeg
    553.4 KB · Views: 0
  • image.jpeg
    image.jpeg
    412.9 KB · Views: 0
  • image.jpeg
    image.jpeg
    404.2 KB · Views: 0
  • Like
Reactions: 1 user

WKDOR

Registered
26 Oct 2009
775
6
Welsh Marches
Best answers
0
Country flag
Hi Mike,
Your request is almost ready to be fully answered.

All the circuit boards came out today in fact the beast has been pretty well pulled apart completely. I was asked about the Pivoting so the first picture is of that. The two LGB Guys either sides heads are pointing at the Pivots the one in the centre is the central pivot.

View attachment 241898View attachment 241897

The rear board that hides in the Bunker is here followed by all of them detached and recoupled to each other for safe storage in a Chineese Plastic TakeAway Container which with all the other removed bits will live in the Locomotives big box.

View attachment 241896View attachment 241897

The only real work to have been done is some cutting of the Bogies to fit LGB Couplings rather than dismantle the Piko ones which have hooks that I do not use on Locomotives. The benefit of this will be to reduce the length of the beast a shade. Also to be seen is the bit of 20thou Plasticard that will drop the hook down some to stop decoupling.

View attachment 241899View attachment 241900

Next a pic of it all in bits, the chassis is really quite lightweight with all ths bits and weight removed!

View attachment 241901

and 3 pics to show the plans that I will be attempting to emulate. The 2-10-2 and also some of the Cab of 6001 which I happen to have a spare of and may consider using to in the conversion. The 2-6-2 is also being used as a theme for the 2 ends where a Single Buffer will replace the existing arrangement of 2.

All of the Pickup Skates and Wipers will be removed, perhaps in the morning. I think this will be simply achieved by removing the Chassis Keeper Plate to get behind the wheels.

Brilliant Thank You!
 

tac foley

Registered
11 Apr 2017
4,263
1,008
78
Near Huntingdon, UK
Best answers
0
Country flag
Great post, JonD! And a LOT cheaper than futzing around with an LGB 2-10-2...

BTW, if you were planning on making the trip over to Barnwell this year, I won't be around, but the other two fine gentlemen will. Cake will be there in great amounts, of that there is no doubt.

Best

tac
OVGRS
 

dunnyrail

DOGS, Garden Railways, Steam Trains, Jive Dancing,
Staff member
GSC Moderator
25 Oct 2009
26,160
4,986
75
St.Neots Cambridgeshire UK
Best answers
0
Country flag
More work on the beast today though not of an electical slant. Passed the point of no return by seriously trashing the original. Cut out the raised part of the firebox this morning. This can be seen to the right in the pic below. I may cut out and reuse the boiler Washout Plugs on the revised boiler. At one stage I looked at using a new piece of Pipe to start a new boiler to go with the spare Newquida Cab that I have, but that plan did not seam the right way so cutting it was. You can see the mess created by the process below. Too late to go back now! Fortunately all the pipework and parts are easily removed to give a nice clean boiler to work on. Wish I had realised this when I took the cab off and trashed one end of each for the handrails on the cab doors

image.jpeg

So next step was to cut and fit some plastic boiler (black drainpipe) to fill the hole, I put the cut part in boiling water to get the shape to match the existing boiler and glued in place using Pipe Weld and offcuts of pipe similarly shaped inside the boiler. Finally filling with Car Body Filler. Pic below shows the cutout held in place with tape while it cools down to shape.

image.jpeg

Then with the filler.

image.jpeg

A second fill is drying off tonight for hopefully final sanding to shape perhaps tomorrow.
 
Last edited:
  • Like
Reactions: 1 user

dunnyrail

DOGS, Garden Railways, Steam Trains, Jive Dancing,
Staff member
GSC Moderator
25 Oct 2009
26,160
4,986
75
St.Neots Cambridgeshire UK
Best answers
0
Country flag
Apart from tidying up the former Firebox Fill I have been doing very little other thank thinking and drinking, mostly drinking! But some work has been undertaken. As part of my thinking I have been slightly offended by the monstrous Chimney. Though I have a spare on the Firebox from a Newquid 2-6-2 and this would have stamped the family line, thoughts turned to what about a Giesel Ejector? Now to the best of my knowledge no NG Steam in East Germany had them but the semi streamlined Pacific 18-201 did at one time so why not! I am aware that some Austrian U2,s or their like and a Tallylyn Loco had one as well. I had thought about fabricating one out of Metal but I know this to be notoriously tricky due to the complex shape so I took off the existing chimney (easy just twists out) and had a play. Squashing in the Vice appeared to work so I used that and have got what the East Germans may have done to pirate Mr Giesels Work perhaps!
image.jpegimage.jpegimage.jpeg
Stuck in place with some filler round the edges and the cracks it is currently drying out before sanding to shape at the bottom.image.jpegimage.jpegimage.jpeg
Will certainly look different when it all goes back together.
 
  • Like
Reactions: 1 user

dunnyrail

DOGS, Garden Railways, Steam Trains, Jive Dancing,
Staff member
GSC Moderator
25 Oct 2009
26,160
4,986
75
St.Neots Cambridgeshire UK
Best answers
0
Country flag
Having shown the drawing earlier on in this saga I decided it was time to get those foot steps cut out. The originals required mods as well. Simple job to drill out after first marking all to size with nice neat levels and square up lines all done using a Metal Ruler and small Metal Set Square. Then tidied up as required with suare and flat files. Inside had some thin plasticard to hide the through look and edges tidied with lots of small cut off's of Micro Strip. 4 pieces per hole 8 holes.image.jpegimage.jpeg
Then came the new Buffer Beams, the originals were well trashed when removing the Pairs of Buffers at each end. fortunately I had some 10 thou Red Plasticard in my Plasticard odds box. Cut to approximate shape, held on till dried then trimmed off to match the original size when dry. You can also see below two of the Modified Buffers to match Harz Style of Centre Buffer.. The fronts were made to match the ones on existing 2-6-2 and glued to modified original buffers from the 95. These were flattened at on two edges to sit nicely inside the new fronts. Centre detail drilled out then tidied with smal Swiss Files specially reserved for Plasticard and cruddy jobs. Buffers are waiting installation to the Buffer Beams now. Have to decide what fine details will go on the beams before fitting the buffers which will probably have screw ends inserted to assist keeping in place.image.jpegimage.jpegimage.jpeg
The revised Chimney has now been tided up by much use of Round Files and varying grades of Emery Cloth and Wet n Dry Papers. Two bits of Plastic Round Tube represent Blast Pipes, lot of exhaustvSteam to be got rid of on a big lump like this. Sprayed with Halfords Rattle Can Matt Grey then Matt Black it is now looking a much different front end.image.jpeg
These levers were carefully carved off of the original Buffer Beams and are seen on the Clean Up before reuse on the new Beams
image.jpeg
Next up was thinking about Battery Installation. I have a flat 5 long by 3 wide pack of Aa's that I was hoping to use but this will not fit without carving up the weight, something that I am reluctant to do with the fancy pivoting chassis. So a mock up of 3x2 was made using old AA's for trial fitting inside the side tanks. image.jpegimage.jpeg
Sadly the mock up would not allow the Tanks to sit in place some chassis hacking resulted in success. The removed parts can be seeen here.image.jpeg
Success.image.jpeg
So two sets of the 6 Batteries have been ordered from Fosworks with a nice long 5-6 inch wire in between to allow a set each side. 12 Batteries should give enough grunt and running time, specially now that I have removed all the Pick Up Plungers and Sliders. Surprisingly Piko Solder Up the Plungers to the internal Pickup Wires. No doubt this helps things somewhat with Track Pickup.
 

Attachments

  • image.jpeg
    image.jpeg
    324.4 KB · Views: 0
Last edited:
  • Like
Reactions: 1 users

idlemarvel

Neither idle nor a marvel
13 Jul 2015
3,136
801
Ascot
Country
Mars
Best answers
0
Country flag
Nicely done as always.
 
  • Like
Reactions: 1 user

dunnyrail

DOGS, Garden Railways, Steam Trains, Jive Dancing,
Staff member
GSC Moderator
25 Oct 2009
26,160
4,986
75
St.Neots Cambridgeshire UK
Best answers
0
Country flag
Looking back at the drawing of my inspiration for this bash I noticed that there was a much differen Cab Ventilator to that provided with the Piko Class 95. So in line with my trying to get this look and give a family likeness to 99-6001 the LGB 2-6-2, I decided to make a new Ventilator. Thus the existing Piko Vent has been dragged off. The one for the 95 needs to be somewhat larger than on 6001 but to a similar look. Plasticard has been cut for the sides, front and rear were a little trickier as they needed to match the Roof Profile. This was achieved in part by sanding with some Emery Mounted on the roof in order to get that profile. Not perfect but the joins have been beefed up with some Plasticard Micro Strip as can be seen in the pic below. The top was a much simpler big lump of Plasticard. Cab shown with 6001 for comparison.
image.jpeg
In the last few days I have been coaling up the Bunker, I use real Coal as nothing to my mind beats that look. A first coat of Ful Strength PVA is slopped on the plastic base, then large lumps pressed in place with some dust to fill the gaps. Then more lumps and dust with a Spray of Water with a touch of Washing Up Liquid then 50/50 Water Pva plus the ever required drop of Washing Up Liquid slopped over the lot from an old Glue Applicator. Finaly more dust is aded to get the look. . Can take a day or three todry fully, if a bit spongy another spray and some more 50/50 wil sort the job. Oh and make sure than any holes in the Base are filled somthat you do not get sloppy PVA everywhere!
image.jpeg
If you are struggling to get coal, BBQ Coals work just fine. Bash with a nice big hammer in a good strong cloth to break up and then sift using a Flour Grader to get the realy fine stuff. Then what is left here with a Veg Strainer to get reasonable sized lumps. Oh if you have a SWMBO do this whist said SWMBO is out shopping and wash up before SWMBO gets home.
 
  • Like
Reactions: 1 users

mike

Master at annoying..
Staff member
GSC Moderator
24 Oct 2009
51,804
4,431
Rossendale
www.gscalecentral.net
Best answers
0
Country flag
Love this ..ta
 

WKDOR

Registered
26 Oct 2009
775
6
Welsh Marches
Best answers
0
Country flag
Many Thanks Jon this is all really helpful.

I'm still debating where to apply the razor saw to my Bubikopf - cab or side tanks? - to house the batteries, see separate thread Piko BR 64 Bubikopf.

When it come to re-assembly, there are three screws with big red washers to attach the chassis to the motor blocks on both Piko locos. But I fear I didn't record how tight they all were and now can't remember! Perhaps all three tight then back off half a turn or all tight and back off the main pivot a whole turn? What would you say?