Mini Heisler

Bill Barnwell

Registered
30 Sep 2017
786
549
79
Ormond Beach, Fl
Best answers
0
Country flag
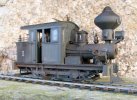
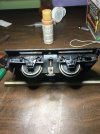
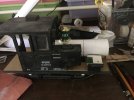
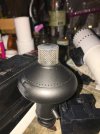
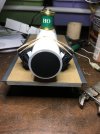
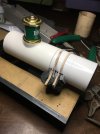
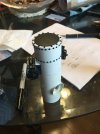
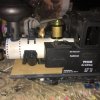
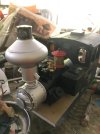
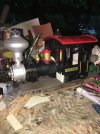
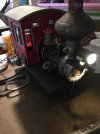
Latest venture is building a mini single boggie heisler with the realization that the one I'm building doesn't look anything like the real one and only 1 ever built. Found the picture on Pinterest of a On3 one that is listed as being on the roster of Rio Allosius Mining & Co and it's look and stature just struck me as being cool and being as I pretty much have everything for the build I decided to do it. Started with a LGB powered tender chassis, cut the sides down to a desired height and then with a flat 1/4" composite plate I cut out the length and width needed before proceeding with cutting a square section in the middle out so that the chassis would sit flat and secure it to the tender housing using 2/56 machine screws. I removed the bearing journals and springs for an old etech tender chassis and glued them to the side of the tender housing at the wheel location and finally added truss rods to the sides. at this point I am deciding on type of cab and have started on building the boiler using PVC fittings and a Lionel 0-6-0 sand dome, More to come
 

Attachments

  • mini right front.jpg
    mini right front.jpg
    81.7 KB · Views: 0
  • mini heisler platform 2.JPG
    mini heisler platform 2.JPG
    264.9 KB · Views: 0
  • mini heisler chassis with springs and wheel journals.JPG
    mini heisler chassis with springs and wheel journals.JPG
    331.1 KB · Views: 0
  • mini with boiler and test cab.JPG
    mini with boiler and test cab.JPG
    333.1 KB · Views: 0

Bill Barnwell

Registered
30 Sep 2017
786
549
79
Ormond Beach, Fl
Best answers
0
Country flag
Drafts (61) - billbarnwell09@gmail.com - Gmail

Well got the boiler size decided and partially constructed, rivets installed using 1/2 sided 2mm beads and now just starting to band it. Found a water regulator screen that fits the stack and caped it with a hole plug. Still undecided about the cab but leaning toward one from a aristocraft Rogers. V cylinders built out of old stanza ones and secured to the boiler. Will be making a smoke box door out of a hole plug and styrene strip. More to come
 

Attachments

  • mini heisler ember screen.JPG
    mini heisler ember screen.JPG
    252.2 KB · Views: 0
  • mini heisler V cylinders from the front.JPG
    mini heisler V cylinders from the front.JPG
    300.5 KB · Views: 0
  • mini heisler V cylingers from the side.JPG
    mini heisler V cylingers from the side.JPG
    243.8 KB · Views: 0
  • mini heisler boiler with rivets.JPG
    mini heisler boiler with rivets.JPG
    193.6 KB · Views: 0
  • Like
Reactions: 1 user

Bill Barnwell

Registered
30 Sep 2017
786
549
79
Ormond Beach, Fl
Best answers
0
Country flag
Found a smoke box door that fit so decided to use it, fitted the smoke stack and it is held in by a screw from the bottom and you can pick it up by it, makes a nice handle. still need to add a short piece to the rear of the boiler so there is room for the steam dome which will be in the cab like a Porter. Still using the old 2015 cab for fitting purposes but going to use the one from a 2-4-2 rogers. Getting time to mount the boiler to the chassis, more to come, BB
 

Attachments

  • mini heisler fitted some stack and test cab.JPG
    mini heisler fitted some stack and test cab.JPG
    297 KB · Views: 0

Bill Barnwell

Registered
30 Sep 2017
786
549
79
Ormond Beach, Fl
Best answers
0
Country flag
Sort of worked myself into a dilemma by finding a generator and thought I would use it although the model doesn't show one but sports a electric headlight so thought why not, by adding the short piece at the back of the boiler and going with a horizontal boiler instead of the large vertical one wound up with enough room in front to the cab. Was pointed out how noisy they were and right in front of the cab would probably be impossible to hear anyone say any thing, so turned my attention toward the front which I have extra room in front of the bell that was crying for attention, so that's where I placed it and it is in such a location that I have room for detailing conduit both to the head light but also back to the cab as well, pleased with the location, thanks to Nick for his suggestions and help, more to come, Bill
 

Attachments

  • mini heisler with generator in the front.JPG
    mini heisler with generator in the front.JPG
    351.1 KB · Views: 0
Last edited:

Bill Barnwell

Registered
30 Sep 2017
786
549
79
Ormond Beach, Fl
Best answers
0
Country flag
Finally had a non humid day and was able to get some paint on the heisler just for some inspiration decided on red for the cab with the rest of the engine black and silver. The red is a combination of ACE bright red and then sprayed over with Krylon sea glass paint in a color of ruby it is sort of like a candy paint has a color tint but able to see through it hard to tell from the small amount in the sand dome but looks much different on a larger area, more to come, Billmini heisler with black cylinders.JPG
 

Attachments

  • mini heisler in color.JPG
    mini heisler in color.JPG
    222.6 KB · Views: 0
Last edited:

Bill Barnwell

Registered
30 Sep 2017
786
549
79
Ormond Beach, Fl
Best answers
0
Country flag
mini heisler chassis painted.JPGmini heisler diamond plate deck surface.JPGGot a little more done on the mini heisler, was able to secure the rear of the boiler by adding some "L" shaped supports to either side of the fire box securing them down to the deck using 2/56 screws and then threading them into the fire box with the same size screws. Secured the front using 1 # 2/56 screw that passes from under the deck into the front boiler support. I then added diamond non skid plate detail using hex net mesh fabric glued to the deck and then painted. Still have some minor detailing to do to the chassis but it is getting there, More to come, Bill
 

Bill Barnwell

Registered
30 Sep 2017
786
549
79
Ormond Beach, Fl
Best answers
0
Country flag
After much fitting, looking and soul searching, I have finally decided on which cab to use on my mini heisler and have picked the aristocraft 2-4-2 Rogers and the basic reason was it fit better. It was larger than the one from the LGB 2015 and will require less cutting and piecing hopefully making it closer to 1:20 scale. The cab required me to cut the 2 tabs off the back where the rear pilot was fitted and also 2 locating points under the windows but other than that not much else. The cab steps up on both the sides of the front corners and the front left to right in the center where the boiler is because of the Rogers design but that will be a simple fix using flat plate styrene cut to accept the boiler on the front section and the sides I found hatch covers from the top of stanza tanks that just fit the opening and will add detail to the side of the cab. While fitting the cab I discovered that the drive gearing mechanism isn't set back far enough for me to add detail and rather than tearing everything apart I figured that it wouldn't show up anyways so I'm just going to leave it alone. Now looking at mounting the cab along with wiring, lights and details so there will be more to come, Billmini heisler with new cab.JPG
 

Bill Barnwell

Registered
30 Sep 2017
786
549
79
Ormond Beach, Fl
Best answers
0
Country flag
Been hot as the devil here lately so being as work area is outside only work getting done is at night so it has been slow, but got all the open areas filled along with the arch way in the front for the boiler. Still undecided as to shortening the cab roof but will wait and see after I get the tender section fitted, More to come BB
mini heisler with new cab fitted.JPG
 

Bill Barnwell

Registered
30 Sep 2017
786
549
79
Ormond Beach, Fl
Best answers
0
Country flag
Been hot as the devil here lately so being as work area is outside only work getting done is at night so it has been slow, but got all the open areas filled along with the arch way in the front for the boiler. Still undecided as to shortening the cab roof but will wait and see after I get the tender section fitted, More to come BB
 

Attachments

  • mini heisler with new cab fitted.JPG
    mini heisler with new cab fitted.JPG
    297.7 KB · Views: 0

Bill Barnwell

Registered
30 Sep 2017
786
549
79
Ormond Beach, Fl
Best answers
0
Country flag
Little work done on the tender portion of the heisler, it was cut from a tender that was part of a Christmas battery powered train set. After fitting I discovered that the water fill hatch was located partially under the cab roof and was worried that in real live it would interfere with water filling of the tender section but I posed the ? on LSC and fellow modeler Rick Marty settled my fears stating that the fill pipe did move laterally as well as up and down. Tender section is a little more narrow than the cab but think it will look neat having a walk area on each site. Now to figure out a mounting plan and add some grab rails, along with wood logs after painting, More to come, Bill
mini heisler tender and cab.JPGmini heisler tender.JPG
 

Bill Barnwell

Registered
30 Sep 2017
786
549
79
Ormond Beach, Fl
Best answers
0
Country flag
Cool evening and dryer day means I got a little work and painting done, fitted the tender section of the heisler with grab rails, the brass ones put Jax pewter black and the plastic ones will get a little brass paint to look the same. The top slanted section I made removable in order to access the interior for something to be determined later, just seemed like a wasted space to cover and not use. It's not too large and could probably get my G scale graphics receiver in it but not much room left for a battery or sound unit. Made it removable by using magnetic tape and can always put weight in there for traction. Painted it a flat black and secured the water hatch cover, still to do is mount it and weather it, I think I'm opting for a battery/sound car behind the engine as at the moment I have 4 small engines that are all track powered and no layout but friends with layouts but no track power. Think it would be great to be able to run all these engines. So I have a nice wood sided Kalamazoo box car that already has the bottom hole drilled for sound and being as my passenger train is the Mason Bogie I think the box car would function for all of them, it would be nice to see my fruits of my labor in action. More to come, Bill mini heisler tender painted.JPG
 

Bill Barnwell

Registered
30 Sep 2017
786
549
79
Ormond Beach, Fl
Best answers
0
Country flag
Slow progress on the heisler but some things have gotten done, have rebuilt the drive chassis and tested, while in the chassis I removed all links to rail pickup and soldered wires onto the motor leads for later battery powered operation. Have started on the lighting and wiring of the engine using a voltage regulator to lower the battery voltage to 3VDC for using LEDs. Although the G Scale graphics has a circuit for that in their system, by adding it on board it eliminates extra wires from the battery car to the engine and figured it would be easier. + the board is just a little bit bigger than a quarter and there is enough room to tuck in the tender section with room to spare. Got the headlight wired and tested + adde lighting in the cab by using a red and a orange 2mm flickering leds placed down by the fire box to simulate a fire in the box, this was done in lew of a over head light in the cab and adds plenty of light in the cab area for viewing detail, you can see the red glow in the cab window. Have done this on other engines with good success but was using track power then, left to do is add a diode to another light for backup on the tender section. More to come, Bill
 

Attachments

  • mini heisler lit.JPG
    mini heisler lit.JPG
    169.7 KB · Views: 0

Bill Barnwell

Registered
30 Sep 2017
786
549
79
Ormond Beach, Fl
Best answers
0
Country flag
Been adding detain parts and electrician connections to the heisler, found a pair of wood look a like tool chests from wiseman models that just did fit between the tender shell grab rail and the back of the engine cab so after a little paint to make them look woodiz I secured then to the deck. Also stumbled on to some old rusty chain from michaels and added it to the right from side rail. Found some railroad tools which after being painted will be added to the deck some where. Had some old logs from my Rosy build and secured them to the top of the tender housing. Came across an old Christmas decoration of a plastic deer head and after surgical removal of this head and scraping the glitter off his horns he became my hood ornament. With electrical connection complete and battery car in hand next on the build list is making and installing front and rear engine bolsters along with couplers and then build the battery car for the electronics, stay tuned, more to come, Bill mini heisler antlers.JPGmini heisler wood load.JPG