Conversion: Toby the Tram

BakerJohn

Baker, Modeler, Flour Ambassador
3 Feb 2018
650
218
28
West Warwick, RI
leedshillrailroad.weebly.com
Best answers
0
Good Morning all!
I would like to share with you my new project since my Forney is (almost) complete! I am going to be rewiring and detailing Bachmann's LS Toby the Tram. The goals of this project are to:
  • rewire for battery power r/c control including lights
  • remove the eye mechanism
  • remove all black-out windows and doors
  • glaze windows
  • fit floors and walls in cab
  • fabricate boiler to cover motor block and hie battery, Rx, and wiring
  • fabricate new brass hand rails
  • fabricate new light fixtures for either end of the tram
It's less complicated than it seems from that list, but it'll be my first time doing a larger build with styrene, so it's going to take some time.
Here's my wiring diagram for the loco...
7-Toby.png
There's a DPDT switch on the bottom of these locos used to switch polarity (or polabity). But, I'll be rewiring it to basically use it as a SPDT to switch between run and charge. You'll notice that the lights are also directly connected to the switch, but only the inside one will be always on when the locomotive is switched to RUN. (I need something to tell me the battery is active. Since there's no sound with this one I thought a cab light would be good.)
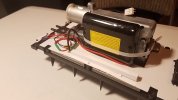
I've taken measurements of the whole thing and figured out what parts I need for this project already. However, I'm probably not going to really start until there's no chance of getting outside again. At the moment I may still be able to do some track work...
 

Rhinochugger

Retired Oik
27 Oct 2009
36,710
4,240
North West Norfolk
Best answers
0
Country flag
Others may be able to advise on the lighting outputs from the Rx (depending on which one your using) - but where I've wired LEDs from an ESC, the voltage is reduced so there's no need for a resistor. Equally, some only have two outputs - negative and positive - so you can wire the LEDs anode to cathode and all you have to do is a bit of trial and error to get them working the right way round.
 

PhilP

G Scale, 7/8th's, Electronics
5 Jun 2013
33,561
3,521
Nottingham
Best answers
0
Country flag
Others may be able to advise on the lighting outputs from the Rx (depending on which one your using) - but where I've wired LEDs from an ESC, the voltage is reduced so there's no need for a resistor. Equally, some only have two outputs - negative and positive - so you can wire the LEDs anode to cathode and all you have to do is a bit of trial and error to get them working the right way round.

As shown in John's diagram, it is a Deltang Rx65c receiver..
Pads 'A' and 'B' are front and rear light outputs respectively. 0V when 'on', so when connecting to a LED, and then battery positive, a suitably sized resistor is required.

PhilP.
 

Rhinochugger

Retired Oik
27 Oct 2009
36,710
4,240
North West Norfolk
Best answers
0
Country flag
As shown in John's diagram, it is a Deltang Rx65c receiver..
Pads 'A' and 'B' are front and rear light outputs respectively. 0V when 'on', so when connecting to a LED, and then battery positive, a suitably sized resistor is required.

PhilP.
Ooooh. sharrafter remember that one for the future - was thinking of one of those Rxs as a possibility for battering the Aristo Rogers 2-4-2 :think::think::think::think:
 

Madman

Registered
25 Oct 2009
17,136
2,951
Pennsylvania, USA
Best answers
0
Country flag
Looking forward to your progress, John.
 

PhilP

G Scale, 7/8th's, Electronics
5 Jun 2013
33,561
3,521
Nottingham
Best answers
0
Country flag
Looking forward to your progress, John.

Me too...

It will be a heck of a lot of work, to open the tram up, and detail it.. :think::nod::nod:
I think you may find Bachmann used a 'military grade' plastics! :eek::nod:
 

BakerJohn

Baker, Modeler, Flour Ambassador
3 Feb 2018
650
218
28
West Warwick, RI
leedshillrailroad.weebly.com
Best answers
0
Me too...

It will be a heck of a lot of work, to open the tram up, and detail it.. :think::nod::nod:
I think you may find Bachmann used a 'military grade' plastics! :eek::nod:
Well, it will be quite an experience then, won't it! Im thinking a slow angle grinder might be a good tool. But would it melt the plastics?
 

PhilP

G Scale, 7/8th's, Electronics
5 Jun 2013
33,561
3,521
Nottingham
Best answers
0
Country flag
Well, it will be quite an experience then, won't it! Im thinking a slow angle grinder might be a good tool. But would it melt the plastics?

:eek:
Perhaps a Dremel (mini-drill) cut-off disc might be a little more subtle! ;)

it has been done before... But I can't remember whether is was on the Internet, or Garden Rail?? - Perhaps someone with a digital subscription could do a search? :think:
 
8 Mar 2014
7,806
972
San Diego
Country
Armenia
www.elmassian.com
Best answers
0
Country flag
I have an Emily, used the Dremel cutoff wheels, the new style that use the quick release mandrel. I used the plastic cutoff wheel (they make a thin and metal variations).

The plastic will melt at higher speeds, but the "swarf" will break off easily, i.e. the melting is pretty localized, does not completely liquify and "grab" the wheel.

Greg
 
  • Like
Reactions: 1 user

BakerJohn

Baker, Modeler, Flour Ambassador
3 Feb 2018
650
218
28
West Warwick, RI
leedshillrailroad.weebly.com
Best answers
0
I did quite a bit of work on Toby yesterday and today. I took out all four doors and one window (the windows are much harder...).
DSC_0015.JPG

I fabricated a sub-floor, supports, and cab floors. I rewired the DPDT switch as well as installed the charger socket.
DSC_0029.JPG
DSC_0035.JPG
 
  • Like
Reactions: 1 user

ge_rik

British narrow gauge (esp. Southwold and W&LLR)
24 Oct 2009
10,701
1,244
Cheshire
www.riksrailway.blogspot.com
Best answers
0
Country flag
Interesting project. Will be intetested to see how she performs.
Good clear wiring diagram. What did you use?

Rik
 

BakerJohn

Baker, Modeler, Flour Ambassador
3 Feb 2018
650
218
28
West Warwick, RI
leedshillrailroad.weebly.com
Best answers
0

BakerJohn

Baker, Modeler, Flour Ambassador
3 Feb 2018
650
218
28
West Warwick, RI
leedshillrailroad.weebly.com
Best answers
0
Oh wow! It's been a long time since I've updated this thread. Okay guys! Photo Dump....

In January I built Toby's boiler and (after a few changes to get it to fit in the shell) I detailed it this morning. I was hoping to buy some quality detail parts but for now I cannot do that, so eventually I will add in more stuff.
249422
249423

I have custom built detail parts for Toby including cab floors, new lanterns for either end, new metal handrails, and window glazings.
249424
249425

Yesterday my Li-Ion battery arrived for Toby, so I wired that in place along with most of the leads I need for the Rx. I wanted to anchor the wires down somehow instead of having everything free-floating because of how the chassis and shell fit together. So, I created a little circuit board for all the negative leads to come together. It was also a good place to put the auto-reset fuse. Since I did this, all the wires stay in place nicely except for the lead to the LEDs (on top of the motor block).
249428


And, for good measure, a shot of the boiler from outside the loco.
249429


Now. Here's what is to be done still...
  • Finish the window and door frames
  • Touch-up any paint where I scratched it up (like the door frame above)
  • Wire in the Rx and test chassis movement
  • Glaze Windows
  • Install LEDs, boiler, floors, handrails, and lanterns
 

Rhinochugger

Retired Oik
27 Oct 2009
36,710
4,240
North West Norfolk
Best answers
0
Country flag
A trifle pernickety, but I think there's a few people who would say that the fuse would be better on the +ve side :nod::nod: especially as you're switching the +ve
 

BakerJohn

Baker, Modeler, Flour Ambassador
3 Feb 2018
650
218
28
West Warwick, RI
leedshillrailroad.weebly.com
Best answers
0
For this particular job, it doesn't matter where the fuse is.
To quote PhilP from my Forney thread....
"It doesn't matter which side it goes in (in this application).. Not like a vehicle, where the whole of the vehicle is negative return, and not like domestic mains, where the live is a higher potential to ground than the neutral.
The most important thing, is it as close to the battery as possible, and that there is one! "
 

BakerJohn

Baker, Modeler, Flour Ambassador
3 Feb 2018
650
218
28
West Warwick, RI
leedshillrailroad.weebly.com
Best answers
0
A couple more photos of my progress. I finished the boiler details and am planning to paint it tomorrow. (The dome on the rear of the boiler is a cap from a food coloring container.) 249682

I also finished the doors and windows today. Tomorrow I'll paint their frames and hopefully put the whole shell together!
 

Attachments

  • DSC_0563.JPG
    DSC_0563.JPG
    867.8 KB · Views: 0