I found a 13 mm plastic pipe in our school workshop.
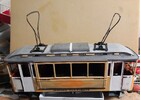
The roof was reinforced and adapted to the extended platform. Unfortunately, the carriage is about 93 mm too short. The windows do not match the drawings, which I thankfully received. There is also a three-window version. This would be about 4 mm shorter than the original LGB model. As I still have a few LGB tram bodies left over, I will probably build this one too. It will then be a little more accurate. I am now continuing to build this four-axle carriage (incorrectly). It is intended for a Dutch friend.
The tram came with one Lyra pantograph, but the original had two. We searched and searched. They are obviously unavailable. Then I asked two other tram model builders. One was able to help me, and today, after only one day of waiting, it arrived at my place.
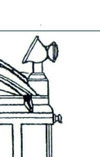
I am looking for this roof lamp. It shines white on the side of the line number plate and also white as a headlight. Has anyone built something like this before, or know where I could buy a lamp like this?
Peter


 ).
).