
R1 Y Point

I don't mean to hijack this thread, but with the OP's permission I will post my feasibility study here as it seems pointless (!!) to create another with the same title. Below you will find my line drawing of the potential product. To retain the integrity of LGB's geometry I first used both a left and right hand R1 point to ensure the correct turnout angle for each divergence. I then overlaid an R1 curve to mark the sleeper layout and the path of each rail. The required frog doesn't look like it's going to cause a problem to replicate. My intended material will be one of those brown block connectors used to assemble furniture etc - they are very hard wearing nylon, but fairly easy to carve to shape as I've found out in the past. I think the blades would need to be no longer than 80mm with pivot points somewhere around the fourth sleeper in from the toe end. I think I could make this using just two pieces of R1 curved track plus a few odd pieces of rail. I have a fairly decent track cutter (Parkside angle grinder courtesy of LIDL) and don't anticipate any track bending to be undertaken. The finished product may not look too pretty as some form of plate may be needed to fit underneath to maintain rigidity and give some additional strength to cut sleepers, but I believe it will work well. Suggestions and comments are most welcome before I even consider any attempt.
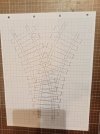
IMG_20261114_162647.jpg
 
I’ve had an idea, Not sure if people are aware but AI can make and modify files for 3D printing

I was going to make 2 files,
one with 3d printed rails,
One with no rails present, to slide recovered pre bent curves

I’ve started but ran out of credits, and it said there’s an issue with part of their software being offline,

But here’s the spec to enter AI to carry on,

I’m willing to print the finished design, to test it but won’t be for a few days
  • 45 mm track gauge.
  • 600 mm R1 curve radius.
  • Symmetrical Y configuration.
  • LGB rail profile: 3.4 × 8.6 × 7 mm.
  • Two versions: printed rails and recovered brass rails.
  • Working manual switching mechanism
  • Modular construction for the Bambu P2S.


Reply to a98087,

Hi, my name is Gerard,
Interesting idea making an AI design of the Y-shape R1 point.!
I started on my CHATGPT and put in your values and the drawing made by Mike.
After a day of many questions by CHATGPT and answers by me I so got so far as shown in attached report from CHATGPT.
I am nearby a whole design and after that CHATGPT wil generate proper drawings and STP files for 3D printing.
After a good start with entering a lot of measures from an R1 point i ran into a lot of correction remarks i had to make to get CHATGPT draw the proper design.
I did not reached that stage yet.
Apparently my questions and remarks are not enough precise to get CHATGPT in the right direction!

I suggest to the moderators we start a new thread or may be a whole new forum: "AI LGB designs: track and other designs by CHATGPT and/or CLOUD".

Gerard
 

Attachments

Reply to a98087,

Hi, my name is Gerard,
Interesting idea making an AI design of the Y-shape R1 point.!
I started on my CHATGPT and put in your values and the drawing made by Mike.
After a day of many questions by CHATGPT and answers by me I so got so far as shown in attached report from CHATGPT.
I am nearby a whole design and after that CHATGPT wil generate proper drawings and STP files for 3D printing.
After a good start with entering a lot of measures from an R1 point i ran into a lot of correction remarks i had to make to get CHATGPT draw the proper design.
I did not reached that stage yet.
Apparently my questions and remarks are not enough precise to get CHATGPT in the right direction!

I suggest to the moderators we start a new thread or may be a whole new forum: "AI LGB designs: track and other designs by CHATGPT and/or CLOUD".

Gerard
I downloaded your report and read through it Gerard. I am no longer keeping up with technology and have to admit I didn't understand most if it. I had hoped there might have been some suggestions from other forumites or potential problems identified but have seen none to date. As a result I am going to hack a few R1 curves about and see how it goes. I'm not particularly optimistic at the outcome but it will give me something to do while the weather is crap. I expect zig-zag sleepers in abundance.
 
I guess I'm not looking at GRS because it's not a direct fit for R1, and the wooden sleepers, there's no way they're as future proof as plastic, in an outdoor environment.

It's is a reverse loop yes, and once trains have entered they could continue to run in circles, until aimed out of the circle, exiting the reverse loop. The electrics for that are already there.

See rough diagram below, red is isolators and reverse loop module. Blue is the idea of a novelty circuit. Not been ignoring you all, just didn't get any notifications for this thread.

View attachment 363034
Just a little thing. While the GRS Y's 2ft radius is not exactly the R1 standard's 600mm, the margin of .0157" I quoted is 1/64". The arc of the R1 track section represented is 1/3 or that 600mm radius. The GRS Y's deviation from an R1's curve track section's alignment is therefore 1/192". Not exactly a deal breaker in the geometry department at that scale. Then again I might have misrepresented the maths.

Future proof/weather proof ? Some of my wooden sleepered GRS trackwork (quite complex in respect of the double slip, that was bought 2nd hand, provenance unknown) has been down for some 17 years or more. All items I have bought (6) function perfectly and none of it is rotted or falling apart. Nor is it lacking the electrical conductivity and reliability as it should be applied in a live rail LGB based layout, as is the rest of mine (apart from a Piko R5/R3 curved point). My track has been laid to direct to balast in conditions that vary from full shade to full sun, with all the rigors that entail that might test them, prolonged damp to extreme heat and sun exposure. Their maintainance is minimal, probably somewhat less than all your track's electrical connections may require individually over that time. I have no financial connection to GRS, just a happy customer (at least in this instance :giggle:). I do appreciate that others may come up with something that more exactly matches your needs and specifications with their exhaustive endeavours.
 
I don't mean to hijack this thread, but with the OP's permission I will post my feasibility study here as it seems pointless (!!) to create another with the same title. Below you will find my line drawing of the potential product. To retain the integrity of LGB's geometry I first used both a left and right hand R1 point to ensure the correct turnout angle for each divergence. I then overlaid an R1 curve to mark the sleeper layout and the path of each rail. The required frog doesn't look like it's going to cause a problem to replicate. My intended material will be one of those brown block connectors used to assemble furniture etc - they are very hard wearing nylon, but fairly easy to carve to shape as I've found out in the past. I think the blades would need to be no longer than 80mm with pivot points somewhere around the fourth sleeper in from the toe end. I think I could make this using just two pieces of R1 curved track plus a few odd pieces of rail. I have a fairly decent track cutter (Parkside angle grinder courtesy of LIDL) and don't anticipate any track bending to be undertaken. The finished product may not look too pretty as some form of plate may be needed to fit underneath to maintain rigidity and give some additional strength to cut sleepers, but I believe it will work well. Suggestions and comments are most welcome before I even consider any attempt.
View attachment 363140
That's amazing. Sorry, I hadn't seen that the thread had become active again! You could make a fortune if you pull it off!
 
Last edited:
Back
Top Bottom