You are using an out of date browser. It may not display this or other websites correctly.
You should upgrade or use an alternative browser.
You should upgrade or use an alternative browser.
PWay Battery Operated Trolley - Updated now with Radio Control
- Thread starter dunnyrail
- Start date
Miamigo259
Registered
[quote author=dunnyrail link=topic=297871.msg341697#msg341697 date=1422402321]
Yes I should really have painted it Yellow. But, could not get a Matt Rattle Can, too lazy to mix up Matt Yellow for Spray-gun, plus one of my pics earlier in this thread shows a Polish (PKP) one in Brown. Thus I applied Rule 1! Hope no one is too offended.
JonD
[/quote]
The Polish ones aren`t always brown, as there is a blue one in this line-up of preserved narrow gauge ones at Sochaczew.....(and there were green and yellow ones there as well!)

Zerogee
Clencher's Bogleman
Re JonD's comment above, for anyone who needs a good MATT yellow spray can:
http://www.amazon.co.uk/The-Army-Painter-Daemonic-Yellow/dp/B005C3D2PU/ref=sr_1_2?s=kids&ie=UTF8&qid=1423401030&sr=1-2&keywords=the+army+painter+yellow
Not cheap there, you can probably find a better price with a bit of searching (I normally pay around £10 a can at wargame shows), but I just wanted to point people to the actual product.
Good quality acrylic paint, with surprisingly good coverage for a yellow (which is of course a notoriously difficult colour to cover with). It's quite a big can and one should be enough for any reasonably-sized piece of G equipment.
Jon.
Tony Hunter
Tony - He/They - on long term break
That's a nicely built kit
Back in 2014 when I first started this little mod it was and has never been run much, trouble is it was just Battery Operated with Fwd/Stop/Reverce control no finesse. Having got into Deltang in a small way I decided that it would be good to give it some Control thus a very small Rx45-22 Reciever was obtained from Micron RC. My Tx has the ability to have 12 locomotives linked so this one would be No.4 on the list. The Rx was supplied only with wires for Battery and Motor connection as I had not intended to make it use sound though this would have been entirely possible with this Rx as Rik has shown. Battery wise the Dickie Loco had a 4aa battery box with screw so as I had decided to keep this on the original build it would be used with this mod but using NiMh rechargeable batts. This meant that the switch setup would need replacing but the spare hole from my 2 SPST system of reversing gave a second hole for the charging socket. Thus this should be a simple 1/2 day job. Hm how wrong can you be?
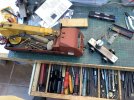
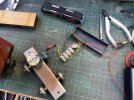
So the job started quite well and I tested How the setup would be using the varying parts in a lash up on the bench as seen below. I utilised a gash IP Engineering Cheepo Chassis that was just hanging around.
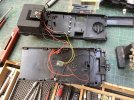
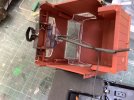
I then got to starting to install everything in place where it would live, I also elected to include lighting as an indicator to show when the system was powered up for running.
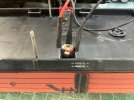
Then my problems started, things worked but only in an Intermittent way. Clearly something was wrong and I suspected the switch, this was a very small unobtrusive one that I wondered if I had trashed partly during the wire soldering process. But no swopped it out and things were still working in an intermittent way. I should have known it was nit this as ut was OK on the test lashup. Hm when moving things around I noticed that when the charging socket was moved this brought things on and off so this must be the issue. The charging socket as seen below has 3 prongs for wire, 1 is positive the other 2 negative. Without a plug in the 2 negs are connected but when a plug is placed in they are isolated and it was this that was not working and traced to a loose wire prong. But this was Friday and I did not have another one to hand so onto Amazon and ordered 10 for this and future projects. Wow much to my surprise they arrived Sat PM so I was able to get on with things again today. Socket underneath shown below. The 2 black leads should be connected without a charging plug inserted.
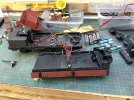
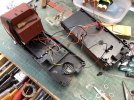
Here you can see the jumble of wires to be stuffed into the chassis. But at this point I decided to add a Red Led to the roof as the front lights were not very niticeable. For this there is a convenient 1/2 battery output to tap which is perfect for the LED, but this meant changing the switch for a DPDT. Oh well in for a penny.
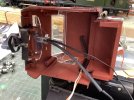
Here you can see the Red Led crudely mounted in a hole in the roof with some black trunking to help disguise the wires.
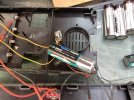
This picture shows the Rx45 with an aa battery to give some scale of size, I decided to mount it here with some tape to keep in place so that I can see the Programming Led should I ever have to do any, fortunately as supplied it will run the system as is though I did say when ordering that I would only be running via 4aa so perhaps Andy at Micron supplied it with that need programmed in.
Next post will show the final bit of this update.
So the job started quite well and I tested How the setup would be using the varying parts in a lash up on the bench as seen below. I utilised a gash IP Engineering Cheepo Chassis that was just hanging around.


I then got to starting to install everything in place where it would live, I also elected to include lighting as an indicator to show when the system was powered up for running.


Then my problems started, things worked but only in an Intermittent way. Clearly something was wrong and I suspected the switch, this was a very small unobtrusive one that I wondered if I had trashed partly during the wire soldering process. But no swopped it out and things were still working in an intermittent way. I should have known it was nit this as ut was OK on the test lashup. Hm when moving things around I noticed that when the charging socket was moved this brought things on and off so this must be the issue. The charging socket as seen below has 3 prongs for wire, 1 is positive the other 2 negative. Without a plug in the 2 negs are connected but when a plug is placed in they are isolated and it was this that was not working and traced to a loose wire prong. But this was Friday and I did not have another one to hand so onto Amazon and ordered 10 for this and future projects. Wow much to my surprise they arrived Sat PM so I was able to get on with things again today. Socket underneath shown below. The 2 black leads should be connected without a charging plug inserted.

Here you can see the jumble of wires to be stuffed into the chassis. But at this point I decided to add a Red Led to the roof as the front lights were not very niticeable. For this there is a convenient 1/2 battery output to tap which is perfect for the LED, but this meant changing the switch for a DPDT. Oh well in for a penny.

Here you can see the Red Led crudely mounted in a hole in the roof with some black trunking to help disguise the wires.

This picture shows the Rx45 with an aa battery to give some scale of size, I decided to mount it here with some tape to keep in place so that I can see the Programming Led should I ever have to do any, fortunately as supplied it will run the system as is though I did say when ordering that I would only be running via 4aa so perhaps Andy at Micron supplied it with that need programmed in.


Next post will show the final bit of this update.

