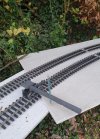
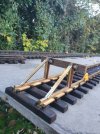
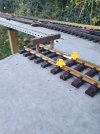
Progress on The Orchard Line - posts in. Next up, cable trays!

8 Mar 2014
7,806
972
San Diego
Country
Armenia
www.elmassian.com
Best answers
0
Country flag
I'd take this opportunity to put some sealer in the ends of the 4x4 posts, on cool evenings, moisture could condense on the inside of the metal boot.

Cheap insurance, and will be too much of a pain to do later.

Greg
 
  • Like
Reactions: 1 user

Rhinochugger

Retired Oik
27 Oct 2009
36,708
4,240
North West Norfolk
Best answers
0
Country flag
I'd take this opportunity to put some sealer in the ends of the 4x4 posts, on cool evenings, moisture could condense on the inside of the metal boot.

Cheap insurance, and will be too much of a pain to do later.

Greg
Yes, even though the timber is treated, I forget the statistic ( I ought to have known it at one time) but timber absorbs a zillion times more moisture through end grain than side grain :nerd::nerd:
 
  • Like
Reactions: 1 user

DGE-Railroad

The Orchard Line
26 Jan 2020
607
89
52
United Kingdom
Best answers
0
Country flag
I'd take this opportunity to put some sealer in the ends of the 4x4 posts, on cool evenings, moisture could condense on the inside of the metal boot.

Cheap insurance, and will be too much of a pain to do later.

Greg

Thanks for the suggestion Greg. I have indeed done so; my thinking being exactly as you suggested :)

I appreciate the advice - as you say, a cheap and easy step to take at this stage in order to avoid a lot of upheaval and disruption later on!
 

Dash9

Registered
5 Sep 2020
5
1
Barnesville PA
greysonvalleyrr.com
Best answers
0
So CAT-herine and Genny-fer were unable to detect the pipe. Predictable I suppose - it's probably plastic, or plastic sheathed. I followed it down into the ground for about a foot before giving up the excavation idea.

I'm just going to follow GAPs suggestion and dig out some small pad footings, line them with hardcore and make a little concrete pad for the post boots to bolt to.

The boots themselves inverted, look pretty good to make a snug and broad mounting point for the tops of the posts. That little strip of wood balanced on the top is 450mm wide, which is the cable tray width I'm now planning to go with

View attachment 272903
If digging around Electrical, Gas or anything buried, try to find someone with a Hydro excavator. Never any damage.
 
  • Like
Reactions: 1 user

DGE-Railroad

The Orchard Line
26 Jan 2020
607
89
52
United Kingdom
Best answers
0
Country flag
footings dug man-draulically - being small, they didn't take long at all. All 6 now filled with a small layer of hardcore ready for the concrete next week.

Makes a change from the 45 tons of concrete I've just laid for a new shed. I can mix this lot by hand and won't be ferrying it around in a dumper! :D
 

DGE-Railroad

The Orchard Line
26 Jan 2020
607
89
52
United Kingdom
Best answers
0
Country flag
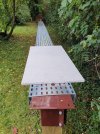
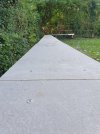
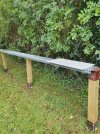
The test cable trays have turned up, so I've trialled mounting them. They're heavy-duty versions - I'm hoping the longer sides will add some stiffness to the spans.

If anyone has a tried-and-tested approach to forming gentle bends with cable tray, I'd be keen to hear them. Logic seems to dictate either sectioning the tray completely and bolting it together to form a curve, or to cut all the way to the side panel using that to help form the outside edge of the bend. The trays themselves don't actually have to be too conformant because the board on top will be creating the final shape. It'd seem to make sense though to try to have the cable tray follow the bend as much as possible to keep the board centered on it.

I've popped a piece of Hardiebacker cement board on top to get a feel for how it will look I've been experimenting with different cutting methods for the boards. I'm wary of the score-and-snap approach on a 1.2m board - any that go wrong would waste the board. I'm probably going to go the circular saw route to cut each board down the centre to get two 1.2m strips from each. I'll jigsaw the bends but only after the track is down.

The plan is to SBR some lightweight gravel along with the track, to the Hardiebacker

The section in the photos is the highest part of the layout; a height of about 4ft

20200924_190602.jpg
20200924_190645.jpg
 

Paul M

Registered
25 Oct 2016
11,875
1,696
60
Royston
Best answers
0
Country flag
If you don't mind the cost, you can buy curved sections of cable tray. Whether you can get the right radii or not I'm not sure
 
  • Like
Reactions: 1 user

GAP

G Scale Trains, HO Trains, 1:1 Sugar Cane trains
14 Jun 2011
4,057
940
Bundaberg Queensland, Australia
Country
Australia
ringbalin-light-railway.blogspot.com
Best answers
0
Country flag
The test cable trays have turned up, so I've trialled mounting them. They're heavy-duty versions - I'm hoping the longer sides will add some stiffness to the spans.

If anyone has a tried-and-tested approach to forming gentle bends with cable tray, I'd be keen to hear them. Logic seems to dictate either sectioning the tray completely and bolting it together to form a curve, or to cut all the way to the side panel using that to help form the outside edge of the bend. The trays themselves don't actually have to be too conformant because the board on top will be creating the final shape. It'd seem to make sense though to try to have the cable tray follow the bend as much as possible to keep the board centered on it.

I've popped a piece of Hardiebacker cement board on top to get a feel for how it will look I've been experimenting with different cutting methods for the boards. I'm wary of the score-and-snap approach on a 1.2m board - any that go wrong would waste the board. I'm probably going to go the circular saw route to cut each board down the centre to get two 1.2m strips from each. I'll jigsaw the bends but only after the track is down.

The plan is to SBR some lightweight gravel along with the track, to the Hardiebacker

The section in the photos is the highest part of the layout; a height of about 4ft

View attachment 273727
View attachment 273728


Personally I would section the tray completely and bolt it together to form a curve.

Or you could use something like this The garden layout extension begins !
It is C section steel house framing.

As for cutting the fibre cement I use an angle grinder with a metal cutting blade to cut through mine for long lengths and score with the grinder and snap for short lengths.
 
Last edited:
  • Like
Reactions: 1 user

DGE-Railroad

The Orchard Line
26 Jan 2020
607
89
52
United Kingdom
Best answers
0
Country flag
Thanks for the pointer re: curved cable tray Paul. I had noticed these but they seem to be smaller prescribed radii and mainly through 90 degrees.
 

DGE-Railroad

The Orchard Line
26 Jan 2020
607
89
52
United Kingdom
Best answers
0
Country flag
Cheers GAP, yes I think the sectioning completely is probably the easiest approach.

I particularly like that U channel ladder section idea though. I'm going to look at the availability and compare costs with the cable tray and will consider that for the rest of the layout - if it's comparable it'd be easier to work with and great for forming. Thanks very much for the pointer.

Found it - galvanised stud channel (or purlins would be another source)
 
Last edited:

GAP

G Scale Trains, HO Trains, 1:1 Sugar Cane trains
14 Jun 2011
4,057
940
Bundaberg Queensland, Australia
Country
Australia
ringbalin-light-railway.blogspot.com
Best answers
0
Country flag
Cheers GAP, yes I think the sectioning completely is probably the easiest approach.

I particularly like that U channel ladder section idea though. I'm going to look at the availability and compare costs with the cable tray and will consider that for the rest of the layout - if it's comparable it'd be easier to work with and great for forming. Thanks very much for the pointer.

Found it - galvanised stud channel (or purlins would be another source)

Yep purlins are what I use.
I'm doing a curve shortly but will not section, I will cut "V's" across the purlin leaving the outside intact and bend to form the curve and screw strapping to the inside to add strength then I'll screw my Villa Board (Hardiebacker) to the purlin.
 
  • Like
Reactions: 1 user

DGE-Railroad

The Orchard Line
26 Jan 2020
607
89
52
United Kingdom
Best answers
0
Country flag
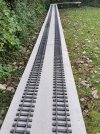
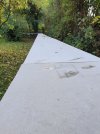
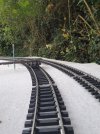
Finally. Ready for some track!

NB. The large gap in the distance isn't an oversight, its for a trestle :)

20201006_125833.jpg

20201007_181245.jpg
 
Last edited:

DGE-Railroad

The Orchard Line
26 Jan 2020
607
89
52
United Kingdom
Best answers
0
Country flag
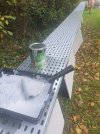
I forgot to add, because the cable trays are the pre-galvanised type and I'm cutting some of them too, I thought it worth giving them some extra protection.

They're fairly well protected being underneath the boards, but every little helps and I found a cheap and very quick way to do it.

A 1L tin of cold galvanising paint was £20 and easily did all of the trays, top and bottom. Using a mini roller made for incredibly quick and effective coverage.
20201016_165023.jpg

Once the cement boards were fixed all joins and holes were given a smear of clear silicone sealant, the idea being to limit the amount of water finding its way into the sides of the cement boards or worse, sitting between them and the cable trays
20201017_133747.jpg
 
Last edited:

dunnyrail

DOGS, Garden Railways, Steam Trains, Jive Dancing,
Staff member
GSC Moderator
25 Oct 2009
26,164
4,989
75
St.Neots Cambridgeshire UK
Best answers
0
Country flag
I forgot to add, because the cable trays are the pre-galvanised type and I'm cutting some of them too, I thought it worth giving them some extra protection.

They're fairly well protected being underneath the boards, but every little helps and I found a cheap and very quick way to do it.

A 1L tin of cold galvanising paint was £20 and easily did all of the trays, top and bottom. Using a mini roller made for incredibly quick and effective coverage.
View attachment 275095

Once the cement boards were fixed all joins and holes were given a smear of clear silicone sealant, the idea being to limit the amount of water finding its way into the sides of the cement boards or worse, sitting between them and the cable trays
View attachment 275115
Water will find its way under the Cement Boards, look at a Window it has a small groove below to stop water doing that. A possble solution if you are worried might be to have something that forms a lip below your boards. A thin run if external silicone sealer would probably do the job encouraging any water to drip off before it gets to the join between the trays and the boards. I would also do a small fillet where the cement boards join for the same reaseon.
 
  • Like
Reactions: 1 user

DGE-Railroad

The Orchard Line
26 Jan 2020
607
89
52
United Kingdom
Best answers
0
Country flag
Water will find its way under the Cement Boards, look at a Window it has a small groove below to stop water doing that. A possble solution if you are worried might be to have something that forms a lip below your boards. A thin run if external silicone sealer would probably do the job encouraging any water to drip off before it gets to the join between the trays and the boards. I would also do a small fillet where the cement boards join for the same reaseon.
That's brilliant. Thanks for the tip. I'll do that.

I'd only considered water finding its way through from the surface, not running underneath and finding its way through the capillary action
 

DGE-Railroad

The Orchard Line
26 Jan 2020
607
89
52
United Kingdom
Best answers
0
Country flag
It's the revolutionary new gadget thats shaking up the industry!
You'll wonder how you ever managed without one!

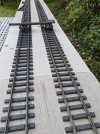
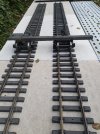
Yes!! We've managed to get our hands on the only example in the country. The eagerly awaited, omnidirectional, multifunction TrackMaster 10,000 Deluxe Edition.

Tired of laying wonky track? No problem!! The TrackMaster 10,000 takes care of it! With its twin bogey design, a fixed distance between tracks is guaranteed!!!

20201018_165644.jpg

20201018_165847.jpg
But is that all it can do? No siree!! Simply detach on of the bogeys, insert a writing implement of your choosing (not compatible with quills) and you will be marking radii to cut your baseboard curves with laser-like accuracy!!!

20201018_165710.jpg

20201018_165747.jpg
But wait. There's more!! Want omnidirectional control of this little beauty? Thanks to its ingenious design the TrackMaster is at home going backwards as it is forwards!

Hate pushing things? We've got you covered! The TrackMaster 10,000 Deluxe Edition incorporates optional industry standard couplers. Simply connect it to the locomotive of your choice, sit back and bask in the admiration of friends and family alike as the TrackMaster is towed around your layout, taking care of the hard work for you!

Years of research and development, fused with the finest attention to detail in the model railroad industry, each unit is hand assembled by our master craftsmen and women before receiving multiple coats of lustrous Saphire Grey metallic paint. It has definitely not been dreamt up in 10 minutes, thrown together and painted with a rattle can.
 
Last edited:

Paul M

Registered
25 Oct 2016
11,875
1,696
60
Royston
Best answers
0
Country flag
How about attaching a cutter? No need to try and follow pencil lines with a separate jigsaw.!
 
  • Like
Reactions: 1 user

dunnyrail

DOGS, Garden Railways, Steam Trains, Jive Dancing,
Staff member
GSC Moderator
25 Oct 2009
26,164
4,989
75
St.Neots Cambridgeshire UK
Best answers
0
Country flag
It's the revolutionary new gadget thats shaking up the industry!
You'll wonder how you ever managed without one!

Yes!! We've managed to get our hands on the only example in the country. The eagerly awaited, omnidirectional, multifunction TrackMaster 10,000 Deluxe Edition.

Tired of laying wonky track? No problem!! The TrackMaster 10,000 takes care of it! With its twin bogey design, a fixed distance between tracks is guaranteed!!!

View attachment 275203

View attachment 275204
But is that all it can do? No siree!! Simply detach on of the bogeys, insert a writing implement of your choosing (not compatible with quills) and you will be marking radii to cut your baseboard curves with laser-like accuracy!!!

View attachment 275205

View attachment 275206
But wait. There's more!! Want omnidirectional control of this little beauty? Thanks to its ingenious design the TrackMaster is at home going backwards as it is forwards!

Hate pushing things? We've got you covered! The TrackMaster 10,000 Deluxe Edition incorporates optional industry standard couplers. Simply connect it to the locomotive of your choice, sit back and bask in the admiration of friends and family alike as the TrackMaster is towed around your layout, taking care of the hard work for you!

Years of research and development, fused with the finest attention to detail in the model railroad industry, each unit is hand assembled by our master craftsmen and women before receiving multiple coats of lustrous Saphire Grey metallic paint. It has definitely not been dreamt up in 10 minutes, thrown together and painted with a rattle can.
Super device, you must have them in the shops for christmas.
 
Last edited:
  • Haha
Reactions: 1 user

DGE-Railroad

The Orchard Line
26 Jan 2020
607
89
52
United Kingdom
Best answers
0
Country flag
No real progress as such but I'd been mulling over what buffers to use for a while because I didn't really like any of the code 332 offerings that much.

Well acouple of days ago I stumbled across these by GRS. They turned up today and I think they're great value for £18!

20201110_221249.jpg

20201110_221314.jpg
 

dunnyrail

DOGS, Garden Railways, Steam Trains, Jive Dancing,
Staff member
GSC Moderator
25 Oct 2009
26,164
4,989
75
St.Neots Cambridgeshire UK
Best answers
0
Country flag
No real progress as such but I'd been mulling over what buffers to use for a while because I didn't really like any of the code 332 offerings that much.

Well acouple of days ago I stumbled across these by GRS. They turned up today and I think they're great value for £18!

View attachment 276083

View attachment 276084
They are a rather nice job, I inherited one from the Ruschbahn so they are a pretty long manufactured run by GRS.
 
  • Like
Reactions: 1 user