Mason Bogie kit bash

Bill Barnwell

Registered
30 Sep 2017
786
549
79
Ormond Beach, Fl
Best answers
0
Country flag
moving along with the build, got the dome bases formed and fitted to the boiler, and sent them off to the paint shop, also fitter the support for the boiler running boards and adjusted and glued the portion of it to the boiler. The boiler is now fitted and adjusted to the chassis and time to articulate itMB dome bases.JPG
 

Attachments

  • MB boiler on chassis with cab, tender and bogie.JPG
    MB boiler on chassis with cab, tender and bogie.JPG
    397.6 KB · Views: 0
Last edited:

Bill Barnwell

Registered
30 Sep 2017
786
549
79
Ormond Beach, Fl
Best answers
0
Country flag
Further progress on the mason bogie, boiler painted using cab light green and missed with silver over spray and the fire box I added rivets and colored both it and the smoke box with a dark gray metallic graphite. Pretty much most of the detailed fitting is done allowing a better look at the articulation suspension. which will be next along with the coloring of the running boards. Domes are done and screwed to the boiler with single 8/32 screw and leaving only the bell to be built and fitted to the top of the boiler. More to come, Bill MB boiler painted 1 quarter view from the front.JPGMB boiler painted from view.JPGMB boiler painted side view.JPG
 

Bill Barnwell

Registered
30 Sep 2017
786
549
79
Ormond Beach, Fl
Best answers
0
Country flag
Moving along at a snails pace the Mason Bogie is taking shape. Finally got everything fitted, what a pain, being as I'm not a master builder I adjust as I go along. Funny after fitting 1 piece and going to another when rechecking now the first piece is off a little more readjustments and so it went, on and on but finally everything is now fitting. Next is fitting the headlight and making the bell bracket and mounting, always touch up paint and the motor chassis has to be re assembled but the tunnel is getting shorter, more as it progressesMB painted_ fitted_ with cars.JPGMB running boards.JPGMB painted_ fitted with cars at angle.JPG
 

Bill Barnwell

Registered
30 Sep 2017
786
549
79
Ormond Beach, Fl
Best answers
0
Country flag
Since last post I have got the headlight done and mounted + got the side gear in place except for the reversing bar but moving right along, ordered the Gscale graphics rail boss 4 and a charging (door way) board and still looking at mounting the batteries in the boiler, more to come, Bill
 

Attachments

  • MB with new head light and running gear.JPG
    MB with new head light and running gear.JPG
    213.5 KB · Views: 0
  • MB with new head light.JPG
    MB with new head light.JPG
    182.6 KB · Views: 0

Bill Barnwell

Registered
30 Sep 2017
786
549
79
Ormond Beach, Fl
Best answers
0
Country flag
More progress on the Mason Bogie, got the boiler handrails done and piping for the sand dome and was done with 1/16" brass wire, reused the stanchions from the original Lionel 0-6-0 and was going to purchase 2 more to put 3 on each side but after reviewing the shipping cost I decided on 2 on each side. Received my G scale graphics R?C system and am looking forward to getting it install but first will have to make some more detail parts like the bell and the firebox but at least it is starting to look like something, more to follow.MB boiler detail with cars.JPGMB boiler with detail side shot.JPGMB boiler with detail side shot.JPG
 

Attachments

  • MB boiler with detail front end shot.JPG
    MB boiler with detail front end shot.JPG
    254.1 KB · Views: 0

Riograndad

Model Railroading, boats and oil painting,
6 Jul 2013
2,161
639
69
Northampton UK
Best answers
0
Country flag
Coming on well Bill and looking forward to the next update:clap::clap:
 

Paulus

Registered
13 Jan 2012
136
17
Best answers
0
Looks great! It is a remarkable engine. I also look forward to the next update!
 

Bill Barnwell

Registered
30 Sep 2017
786
549
79
Ormond Beach, Fl
Best answers
0
Country flag
MB shifter in white.JPGWhile still looking for the misplaced bell I have gotten most of the shifter mechanism done still in styrene white but as soon as it dries up around here it will get some paint. Left to do on it is designing the vertical lift bar that runs between the shift leaver at the top and the side drive bar on the chassis. Am considering using round cord elastic that would give with the turning and side rod movements, got to get it on the rollers and see how much everything moves,
 

Bill Barnwell

Registered
30 Sep 2017
786
549
79
Ormond Beach, Fl
Best answers
0
Country flag
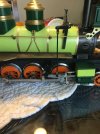
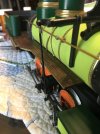
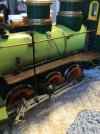
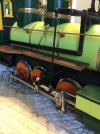
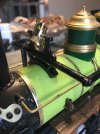
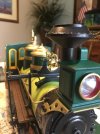
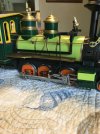
Update to the Mason Bogie bash, tested the operation of the reversing bar in relation ship to the reversing shaft at the bell housing and found very little up/down movement and very little front to rear, most of the movement comes when the engine is in a turn and that seems to more or less just flex with the turn. Not having the patience or tools necessary to machine parts for the vertical lifting bar I settled on elastic black cord and small crimp on fittings from Hobby Lobby to simulate the steel lifting rod and it seems to preform very well. The cord is stretched just enough to make it look straight and it puts up well with both side rod and turning applications. Both ends are secured with 2/56 Allen head screws which allow the grips to move freely and still looking for the bell, train show in a week might find one there. Being as the reversing shaft is free to move the shifting bar that runs from the cab interior to the long bar from the shifting shaft will be secured to the rear section of the boiler just before the cab in order to keep tension on the cord. Pleased with the out come so far and as with everything on this project it comes apart with 2/56 screws, just a lot of screws. At the moment I'm gathering parts to build a flickering fire box which I have built several and look really neat at night. So next step is getting into the wiring of headlight, smoke unit along with R/C and battery, more to come, Bill
 

Attachments

  • MB reversing shaft and lifting bar from side.JPG
    MB reversing shaft and lifting bar from side.JPG
    275.7 KB · Views: 0
  • MB reversing shift and lifting bar front.JPG
    MB reversing shift and lifting bar front.JPG
    223 KB · Views: 0
  • Love
Reactions: 1 user

Bill Barnwell

Registered
30 Sep 2017
786
549
79
Ormond Beach, Fl
Best answers
0
Country flag
Still working on the mason bogie, got the port side piping done and the reverse linkage secure, and on the starboard side I got the reach rod installed to the shifting linkage it is secured to the side of the engine in the black part of the firebox and does not enter into the cab, all the piping and grab rails move forward to remove themselves from the cab this way I can remove the boiler, cab or chassis for repair. Everything is built with styrene except for the bolts which are 2/56 black hex bolts. Next on the list is the sand dome activation bar and pull rod, still waiting on a replacement bell to arrive. More to follow, Bill
 

Attachments

  • MB port side steam pipe.JPG
    MB port side steam pipe.JPG
    277.7 KB · Views: 0
  • MB shift leaver.JPG
    MB shift leaver.JPG
    236.2 KB · Views: 0

Bill Barnwell

Registered
30 Sep 2017
786
549
79
Ormond Beach, Fl
Best answers
0
Country flag
Got a surprise in the mail yesterday from a new friend who donated a beautiful new bell to the project, easy install and now all that is left for the top of the boiler is a new lever and control rod for the sand dome
 

Attachments

  • MB bell from LF side.JPG
    MB bell from LF side.JPG
    239.6 KB · Views: 0
  • MB bell from RF.JPG
    MB bell from RF.JPG
    220.5 KB · Views: 0
  • Like
Reactions: 1 user

Bill Barnwell

Registered
30 Sep 2017
786
549
79
Ormond Beach, Fl
Best answers
0
Country flag
Added a little more detail, put a coat of matt on the bell so it would match the brass domes on the steam and sand dome, also installed a leaver at the base of the sand dome along with an activation rod, think I'm pretty much done with the boiler detail except for the builders plates which I have been experimenting with and so far nothing has worked. Had some brass paper that I tried printing on from an image of a real mason bogie plate which looked good on regular white paper but wasn't dark enough to show up well on the brass, might use the sticker end of a 38 caliber shell cartridge, just have to see, till then, Bill
 

Attachments

  • MB sand dome leaver and rod side view.JPG
    MB sand dome leaver and rod side view.JPG
    272.9 KB · Views: 0
Last edited:

Bill Barnwell

Registered
30 Sep 2017
786
549
79
Ormond Beach, Fl
Best answers
0
Country flag
Well since last post, I was able to decal my builders plate on to brass paper, sealed it with a heat laminated paper and after my steady handed wife cut them out, glued them to the correct location on the smoke box, and at the same time made rope from brass wire strands that I place in a drill and twisted. Wasn't to happy with the bell rope as I selected too small a wire to twist and didn't hang right, so I made another using a larger diameter wire and liking the results. Well since last post, I have been researching batteries and types and with the help of several on the forum have selected Lipo, reason being as hobby shops are far and few between in Daytona Beach, Fl. but one that has been around for several years and even thru the down town street redo is High Fly Hobbies. Primarily an R/C plane and car dealer but they have been more than helpful with my small purchases of styrene, brass wire, and paints and I valued their knowledge and that they are local dealer that I can return to if I have questions or problems. Was able to find a battery that along with the Gscalegraphics control board, fits nicely into the tender section of the engine with room left over for their, GSG's, sound board. Have hooked up the speed control and tested and all I can say is there isn't any thing much easer, worked great. The only thing left is to complete the wiring of the R/C system, front headlight, smoke unit and want to put a flickering led's in the fire box, thanks to all with the help and suggestions, more to come, BillMB builders plate installed.JPGMB new bell rope.JPG
 

PhilP

G Scale, 7/8th's, Electronics
5 Jun 2013
33,561
3,521
Nottingham
Best answers
0
Country flag
Bill, be aware the small Lipo batteries do not have protection boards built-in. - You really need one, in order to protect your batteries from over discharge.
PhilP.
 

Bill Barnwell

Registered
30 Sep 2017
786
549
79
Ormond Beach, Fl
Best answers
0
Country flag
I purchased both at the advise of the dealer the smart charger is adjustable for several different types and voltages, and the discharge checker is very small and also plugs into the batter and sounds a alarm when it 's time to charge and that level is adjustable but he advised not to go below 3vdc, thanks for the input, Bill
 

Riograndad

Model Railroading, boats and oil painting,
6 Jul 2013
2,161
639
69
Northampton UK
Best answers
0
Country flag
I`m keeping up with this one,looking good Bill;);):clap: