justme igor
Registered
PART ONE!!!
Thanks to the knowledge of the people on the forum, i proceeded with figuring out a production to make sleepers/ties for my tracks.

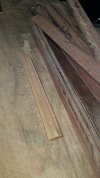
I had some wood left over from the carport, they sold it to me as azobe wood, but i think it is oak.
It was basically for firewood.
But i have other plans for them right now

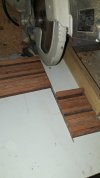
Cutting them into thick slaps

Cut them into strips.
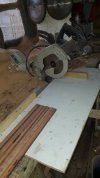
Where is that cleaning lady, saw dust al over....No worry i have a pro dusk mask on, the ventilation is not adequate enough and the filter/suction still must be installed....

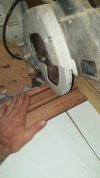
Cut them into 1 x 1 cm pieces.....5 x 20kg (dogfood) bags full of sawdust.....

I am really fond of making jigs,,,makes life so much easyer. for the next batch i just can get the jig fit for that job and screw it onto the bench.

If you want to copy what i am doing and you are NOT comfortable with this....PLEASE STOP HERE.....i am a professional carpenter for 30 years plus....not a hobbiest!
Be careful at all times!!!!machines dont forgive or feel...
And do what they are designed for....CUT
I do much more stupidity things with those machines, i can trim my nails if i want to, you are NOT me


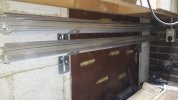
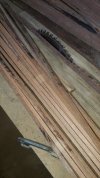
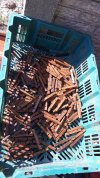
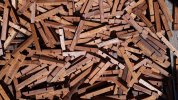
Running out of trays.....
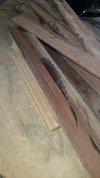
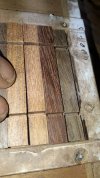
Some buckets of azobe or oak, some buckets of unknown orange wood(smelly when sawing), and some buckets with bankirai wood.
I am planning to use more hard woods to see what will last longer.
Also cut some meranti hardwood.
Fir(coniferas: tutuja in my case) will be next when this batch is converted into track. After that one i going to buy Azobe and stick with that.
A better wood would be palisander, but my wallet is protesting.
The balance between cost/time/ect incl wood stain would be a perfect price/quality ratio would be azobe wood, no fuzz just cut and use without wood stain?
Anybody has an idea on this???please any thought is welcome, thanks in advance.


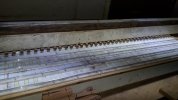
After cutting them to length they still need a slut to put the tracks in.
I made this jig with the jig on the sawing table to make sure i have a inside distance of 44,9 mm and a outside distance of 49,1mm.
I use 2 mm thick aluminium.
I bought a other sawblade of a cutting width of 2.2mm to give some more clearance, the saw blade that was 2.0 mm was just not big enough, too tight.
Didnt work, to much trouble.
I think it would be worth the effort to make a machine just for this job, i need a machinist for this, my old man was, we sold everything.
Lathe and all.
I am refuring to the machine from those folks at denver railway, i will post some pics


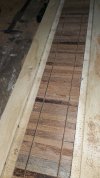
After playing a full day with wood stain alike(old recipe, i wont share, google is your friend, or a old fashioned carpenter) your fingers have the look that they where somewhere very deep...no need for explanation i guess?

One day of work with my woodstain......
Bucket number one sock for one to 6 hours. bucket number 2 & 3 let it drip for 12 hours minimum. All closed
Bucket number 4: Let them dry in open air.......
Dont forget to do your hippy hippy shake rattle and roll, before they stick together and on the hdpe!

By the way: for this whole process i used THREE different saw blades....any carpenter will understand.
A hobbyies will need one.
Well that is it for my production process, for now, if you think: if i forget something or you want to have more info on a bit/piece....please remind me!
Comments, thoughts, ideas or whatever are very appreciated!
It is very appreciated! Any thought or comment!
Thanks for reading and i hope i could tribute something to someone!
You can do this with very little investment regarding machinery.....
Best to you all and thanks for reading.
Thanks to the knowledge of the people on the forum, i proceeded with figuring out a production to make sleepers/ties for my tracks.
I had some wood left over from the carport, they sold it to me as azobe wood, but i think it is oak.
It was basically for firewood.
But i have other plans for them right now
Cutting them into thick slaps
Cut them into strips.
Where is that cleaning lady, saw dust al over....No worry i have a pro dusk mask on, the ventilation is not adequate enough and the filter/suction still must be installed....
Cut them into 1 x 1 cm pieces.....5 x 20kg (dogfood) bags full of sawdust.....
I am really fond of making jigs,,,makes life so much easyer. for the next batch i just can get the jig fit for that job and screw it onto the bench.
If you want to copy what i am doing and you are NOT comfortable with this....PLEASE STOP HERE.....i am a professional carpenter for 30 years plus....not a hobbiest!
Be careful at all times!!!!machines dont forgive or feel...
And do what they are designed for....CUT
I do much more stupidity things with those machines, i can trim my nails if i want to, you are NOT me
Running out of trays.....
Some buckets of azobe or oak, some buckets of unknown orange wood(smelly when sawing), and some buckets with bankirai wood.
I am planning to use more hard woods to see what will last longer.
Also cut some meranti hardwood.
Fir(coniferas: tutuja in my case) will be next when this batch is converted into track. After that one i going to buy Azobe and stick with that.
A better wood would be palisander, but my wallet is protesting.
The balance between cost/time/ect incl wood stain would be a perfect price/quality ratio would be azobe wood, no fuzz just cut and use without wood stain?
Anybody has an idea on this???please any thought is welcome, thanks in advance.
After cutting them to length they still need a slut to put the tracks in.
I made this jig with the jig on the sawing table to make sure i have a inside distance of 44,9 mm and a outside distance of 49,1mm.
I use 2 mm thick aluminium.
I bought a other sawblade of a cutting width of 2.2mm to give some more clearance, the saw blade that was 2.0 mm was just not big enough, too tight.
Didnt work, to much trouble.
I think it would be worth the effort to make a machine just for this job, i need a machinist for this, my old man was, we sold everything.
Lathe and all.
I am refuring to the machine from those folks at denver railway, i will post some pics
After playing a full day with wood stain alike(old recipe, i wont share, google is your friend, or a old fashioned carpenter) your fingers have the look that they where somewhere very deep...no need for explanation i guess?
One day of work with my woodstain......
Bucket number one sock for one to 6 hours. bucket number 2 & 3 let it drip for 12 hours minimum. All closed
Bucket number 4: Let them dry in open air.......
Dont forget to do your hippy hippy shake rattle and roll, before they stick together and on the hdpe!
By the way: for this whole process i used THREE different saw blades....any carpenter will understand.
A hobbyies will need one.
Well that is it for my production process, for now, if you think: if i forget something or you want to have more info on a bit/piece....please remind me!
Comments, thoughts, ideas or whatever are very appreciated!
It is very appreciated! Any thought or comment!
Thanks for reading and i hope i could tribute something to someone!
You can do this with very little investment regarding machinery.....
Best to you all and thanks for reading.
Attachments
Last edited:
")