Making of Old Joe

Bill Barnwell

Registered
30 Sep 2017
786
549
79
Ormond Beach, Fl
Best answers
0
Country flag
While looking for a figure to be Old Joe's engineer and fireman, thought the engine was small enough that 1 person could preform both jobs, I came across is figure from American diorama which seemed to fit the bill, pot bellied, standing and aged looking, only problem was he was carrying a took box and a wrench that was necessary for his job as an engineer/fireman. so I changed the toolbox to a log and removed the wrench also reformed his hat and dirtied him up a little.
 

Attachments

  • e-f new.JPG
    e-f new.JPG
    270 KB · Views: 0
  • e-f front.JPG
    e-f front.JPG
    265.9 KB · Views: 0
  • e-f back.JPG
    e-f back.JPG
    269.4 KB · Views: 0

Bill Barnwell

Registered
30 Sep 2017
786
549
79
Ormond Beach, Fl
Best answers
0
Country flag
Time to get back to work on Old Joe. With the Christmas crowd gone and the stuff put away figured it was time to get back to the construction of Old Joe. Never really stopped work but had only been piddling with guests here and medical issues, I had painted the engineer/fireman, and weathered the engine a little. Got tied up with the LSC MIK challenge but think I can do both just have to do a little juggling. Yesterday I got the new motor installed in the motor block and got the block reinstalled in the chassis which allowed me to start assembly of the boiler, side tanks and cab with wood chute. At the same time I ran wiring from the front head light back to the rear along with the motor wires. When I got done I powered it up on the roller bearings and it runs like a champ. The firewood bunker is real neat as it just slides on to the back of the cab and is all hollow back there leaving enough room to make up the wiring which I still have to do. Placed the engineer/fireman in the cab and he looks great, more to come, Bill
 

Attachments

  • old joe right side front.JPG
    old joe right side front.JPG
    394.3 KB · Views: 0
  • old joe left side with engineer.JPG
    old joe left side with engineer.JPG
    394.5 KB · Views: 0
  • old joe rusty starbord side.JPG
    old joe rusty starbord side.JPG
    337.7 KB · Views: 0
  • old joe left rear with engineer.JPG
    old joe left rear with engineer.JPG
    303.6 KB · Views: 0
  • old joe lect front.JPG
    old joe lect front.JPG
    271.1 KB · Views: 0

Bill Barnwell

Registered
30 Sep 2017
786
549
79
Ormond Beach, Fl
Best answers
0
Country flag
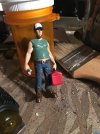
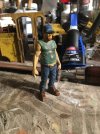
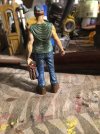
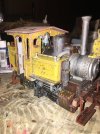
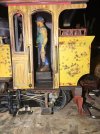
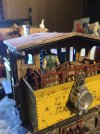
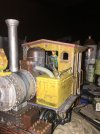
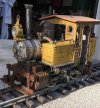
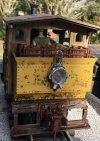
Old Joe, with the MIK challenge finish I have returned to unfinished projects and being as the least amount of work required was on Old Joe I worked on him. Got the number plate finished along with the whistle, wired up both lights and secured all the screws then tested and it works, fun build, now I have a small industrial steam switch made out of old scrap parts.old joe done front.jpgold joe done rh side.jpg He is a combination of parts left from previous builds. Cab is 2 rear sections of Lionel 0-6-0 gold rush special which were left over from my Mason Bogie build, along with the roof and fuel bunker, boiler is PVC fittings, side tanks came from a cut down LGB 2017 that were left from "Rosy's" saddle tanker build, lights came from a LGB 2010 that I built into a Forney, steam dome is a PVC pipe cap, whistle is parts from a electrical connector, left over bell, smoke stack was made from brass 1/4" pipe, firebox is left from my Spreewalt that was the chassis donor for my Mason Bogie build, cab steps were from an old LGB European low side gondola, water fill hatch off a Bachmann 4-6-0 tender from my 2-6-2 prairie build, the chassis and Kadee couplers are new and the bolsters are front is from the rear of the 4-6-0 tender and the rear came from the back on a aristo sloped back tender, Fun build
 

Attachments

  • old joe done lfr-side.jpg
    old joe done lfr-side.jpg
    441.1 KB · Views: 0
  • old joe done rear.jpg
    old joe done rear.jpg
    333.4 KB · Views: 0

royale

G scale and driving my Royale Sabre kit car
26 Oct 2009
1,568
52
Long Eaton
Best answers
0
Little more done today, got the cribbing for the wood box finished, painted and installed, but most the time was spent on figuring type, location and mounting of the front coupler. Luckily I found in my collection of Kadee couplers a centerset short gear box # 835 couple which enabled me to mount it to a wood beam and both secured to a small flat protruding plate that is on 2010 engines, there were some angled supports molded in underneath which I had to remove but a sharp chisel made short work of them. The wood beam is actually PVC board that I had ripped sometime ago to make supports for my water tower. The wantabe cow catcher is one left over from a Bachmann Big hauler tender that has excellent forgiveness in the crash department and is great for bending without breakage and gives the build the appearance of a working yard engine. I then secured every thing with 2/56 screws and nuts which can be seen in the picture as silvery dots but will get covered with grimy paint soon. Still trying to find a suitable material to make my canvas roof with, suggestion are welcome. Will post when further achievements are made, BillView attachment 259502View attachment 259503
For a canvas roof, you could try a piece of fine wet and dry paper - it works quite well and easily takes paint.