You are using an out of date browser. It may not display this or other websites correctly.
You should upgrade or use an alternative browser.
You should upgrade or use an alternative browser.
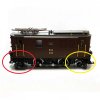
LGB 24450 RhB Ge2/4 No 221
- Thread starter jonothan
- Start date
D
Deleted member 4232
Guest
Moved
Last edited by a moderator:
This should answer your question ...RhB Ge 2/4 Electric Locomotive | Märklin
Thanks, John.
Strangely enough, it doesn't really answer my question, because I looked on Ebay before starting this thread and found photos of a model just like mine. The photo you've linked to on the LGB website is a pre-production model. I am looking for more first hand experience of this production run.
stockers
Trains, aircraft, models, walking, beer, travel
Just been looking at various pictures on Google. The original LGB brochure piccy does seem to show steps. More recent pictures by retailers dont show them.
Just as an example - P&S hobbies.
https://www.pshobbiesandmodelshop.c...e353c42017b430a49c3bb60cee6.image.243x182.jpg
Just as an example - P&S hobbies.
https://www.pshobbiesandmodelshop.c...e353c42017b430a49c3bb60cee6.image.243x182.jpg
PaulRhB
This Way Up
Looks like a mistake by LGB as they should be there right up to withdrawal
I guess they figured as the door is moulded shut it didn’t need steps! Funny they put the handrails on though
Try asking the shop to get spares.
I guess they figured as the door is moulded shut it didn’t need steps! Funny they put the handrails on though
Try asking the shop to get spares.
D
Deleted member 4232
Guest
Moved
Last edited by a moderator:
I think I’ve found the answer. If you look at the earlier prototypes, they have tanks/cylinders under the main body at each end on both sides which the earlier models have as well. In the modified prototype 221 and 222, those on the right of each side are missing as they were presumably redundant. So they’ve been omitted on the production model LGB 24450 too. They weren’t omitted on the preproduction models. I think that, in the model, the steps are secured by a tab underneath the tank/cylinder do they have been omitted from the model too. Does this make sense?
My 24450 has steps at both ends - as of about three weeks ago. Thanks John, for suggesting the spares! The steps mount quite easily.
The position for the steps is precisely fixed by locators moulded into the chassis, pic 1. (The two holes seen photo 1 are a result of my attaching the steps; they were not there originally.) The steps were put in place, then I drilled two pilot holes through both the steps and chassis, pic 2. The pilot holes in the steps were enlarged to through holes and the steps secured with two screws, pic 3.
1) 2)
2) 3)
3)
Pic 4 below shows the complete job. I did fix the whistle after I took the shot!.

Phil S.
The position for the steps is precisely fixed by locators moulded into the chassis, pic 1. (The two holes seen photo 1 are a result of my attaching the steps; they were not there originally.) The steps were put in place, then I drilled two pilot holes through both the steps and chassis, pic 2. The pilot holes in the steps were enlarged to through holes and the steps secured with two screws, pic 3.
1)
 2)
2) 3)
3)
Pic 4 below shows the complete job. I did fix the whistle after I took the shot!.

Phil S.


