I can understand some of the logic of using coloured wires, but all black wires certainly go away in such circumstances.First truck finished with the exception of the tray which I'll make and fit once its had a few test runs to check a few things.
MkII is under construction, the only real change from the original design is to tidy away cables and solder cable clips to the truck, basically a much tidier arrangement for the cabling.
David
You are using an out of date browser. It may not display this or other websites correctly.
You should upgrade or use an alternative browser.
You should upgrade or use an alternative browser.
G Scale Tram Project
- Thread starter DafyddElvy
- Start date
DafyddElvy
1:22.5 & 15mm Scale Trams, , NG Steam Railways
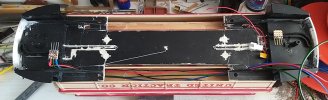
Most wires won't be seen once the body is fitted, a little blackening will be required to hind very few wires.I can understand some of the logic of using coloured wires, but all black wires certainly go away in such circumstances.
The MkII truck design stays the same but better deals with wire management. This has been a good learning experience. My past modelling has used DCC for full layout and train control, moving to a battery r/c control has meant more wires, the black and red wires on top of the motor relate to battery charging and battery feed to the r/c unit, the other colours are the motor feed from the r/c unit. I have also used connectors in place of soldering wires where I want things to be easily removable/demountable, which makes things appear a bit bulkier than than need to.
The truck in the photo was put together knowing it was the prototype for quite a few trucks in the future, I suspect the MkI truck will get reworked in the future.
I have shared the photo to show what I have been doing and also for feedback from others who may have ideas on what I could do differently with different components others might know of being available.
Greys cells continue to take in what I read about others projects and components they use.
David
Hi David, just a further thought that you could use Black Heat Shrink of an appropriate size to hide coloured wires, not shrunk of course. I have used this in some i stances to loose wires but it only really works best where you have screw terminals at one end of the offending coloured wire.Most wires won't be seen once the body is fitted, a little blackening will be required to hind very few wires.
The MkII truck design stays the same but better deals with wire management. This has been a good learning experience. My past modelling has used DCC for full layout and train control, moving to a battery r/c control has meant more wires, the black and red wires on top of the motor relate to battery charging and battery feed to the r/c unit, the other colours are the motor feed from the r/c unit. I have also used connectors in place of soldering wires where I want things to be easily removable/demountable, which makes things appear a bit bulkier than than need to.
The truck in the photo was put together knowing it was the prototype for quite a few trucks in the future, I suspect the MkI truck will get reworked in the future.
I have shared the photo to show what I have been doing and also for feedback from others who may have ideas on what I could do differently with different components others might know of being available.
Greys cells continue to take in what I read about others projects and components they use.
David
DafyddElvy
1:22.5 & 15mm Scale Trams, , NG Steam Railways
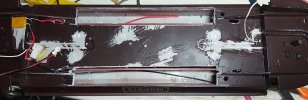
I have just taken a photo of the tram underside, the two vaero boards strips are for the head and tail lamp connections, I added pins to the boards to connect the wires from the r/c unit, I used the vaero board because I also need to add the wires for the tram to trailer jumpers. The blue and black wires sticking up are for the interior lights.Hi David, just a further thought that you could use Black Heat Shrink of an appropriate size to hide coloured wires, not shrunk of course. I have used this in some i stances to loose wires but it only really works best where you have screw terminals at one end of the offending coloured wire.
Thinner wire is being obtained for the lighting connections in future trams.
David
Attachments
Last edited:
DafyddElvy
1:22.5 & 15mm Scale Trams, , NG Steam Railways
How long should one spend searching the forum before giving up and posting a message for help, this is something I have often wondered.
Help please, I previously posted in this forum somewhere a question about re-chargeable batteries and good suppliers, I received excellent advice as always but now I am darned if I can find what advice I received or from where I purchased my batteries from, I also can't find my piece of paper with the suppliers I have used for different items, my fear is someone has helped tidy my wee room.
Please where would folks suggest to buy rechargeable batteries, thanks.
David
who will be fitting a lock to my door gggggrrrrrrrrr
DafyddElvy
1:22.5 & 15mm Scale Trams, , NG Steam Railways
Phil,Strikalite for batteries..
What sort of other bits are you after?
PhilP
Thanks, for some reason I don't recall I listed where I obtained all the parts purchased in my wee spreadsheet except the batteries and battery charger, I have a list of every model purchased, what has been fitted and for the batteries the date fitted and first charged, but not the battery supplier, doh.
More batteries can now be ordered, thanks.
David
Northsider
Modelling the Northern half of the Isle of Man
I'm intrigued by the use of Dettol: what dilution, and how long proves effective?As I previously said, I followed the same methods I always use, all paint coats were fine until the last.
A soak in dettol is how I remove paint, followed by a good clean, then a wire brush in the drill followed by a bath in viakal, and a final wash using a toothbrush to make sure all is clean again.
Thanks for all the thoughts.
David
DafyddElvy
1:22.5 & 15mm Scale Trams, , NG Steam Railways
Neat dettol, top paint layer starts to lift after about 15 minutes.I'm intrigued by the use of Dettol: what dilution, and how long proves effective?
Brass just leave overnight
Plastic and resin monitor every 30 minutes incase the resin or plastic starts to become too soft, no more than about 2 hours. That's based on my models which have been soak.
Resin and plastic lift out with fingers and straight in to water until for 30 minutes to un-soften.
Simples.
David
DafyddElvy
1:22.5 & 15mm Scale Trams, , NG Steam Railways
A wee bit a testing for the tram and trailer on a roughly 3% gradient which it shouldn't ever need to tackle on the garden tramway.
Batteries at approx 90% charge Tram + trailer required 20% power Tram on it's own struggled on 5%, nae bother on 10%
David
Batteries at approx 90% charge Tram + trailer required 20% power Tram on it's own struggled on 5%, nae bother on 10%
David
JimmyB
Now retired - trains and fishing
Looking good but did I miss the bit on you fitting the batteries.Batteries at approx 90% charge Tram + trailer required 20% power Tram on it's own struggled on 5%, nae bother on 10%
David
")
DafyddElvy
1:22.5 & 15mm Scale Trams, , NG Steam Railways
Jimmy,Looking good but did I miss the bit on you fitting the batteries.
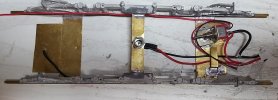
Different tram but using the same idea, the batteries are in the bench seats each side of the tram, I carefully cut out the floor directly below the seats with the piece cutting out being reused to keep the batteries in place once the truck is fitted. I have not long started working on the second powered tram so it's still in its early stage of modification/upgrade.
Holes are drilled through the floor under the seats with wires passed through to keep them tidy and out of harm's (me) way.
Truck MkII is being wired slightly differently to try and cut down on wires in the truck going from one end to the other.
The other idea/thought change I've had is to fit AAA batteries in the trailer for the interior lights, jumpers between vehicles will only used for tail lights.
I hope that all makes sense.
David
Attachments
DafyddElvy
1:22.5 & 15mm Scale Trams, , NG Steam Railways
Dunny rail thanks for the challenge about the wiring. For truck MkII I am taking a different approach to the wiring, only 2 wires now pass over the traction motor, the two wires that feed powet to the r/c unit now pass along the inside of the I beam above the main truck, this revised arrangement has reduced by 4 the number of wires passing over the truck.I can understand some of the logic of using coloured wires, but all black wires certainly go away in such circumstances.
Powered tram 2 interior lighting is a different arrangement, this one has contacts at each end of the roof in stead of being hard wired.
At the moment I am still enjoying the conversions, I suspect when I get to tram conversion number 6 I may have a different opinion but for now I'm enjoying the challenge and the ability to actually see and hold properly the parts I am working on and with.
David
Attachments
JimmyB
Now retired - trains and fishing
My thanks, all makes sense, having removed the benches I see that 3 X AA would fit each side, but had not considered removing the floor under the seats for access. I am considering 6 X 14500 in a 3S2P configuration to give me 11.8 volts, just got to work out the wiring, specifically the protection board.Jimmy,
Different tram but using the same idea, the batteries are in the bench seats each side of the tram, I carefully cut out the floor directly below the seats with the piece cutting out being reused to keep the batteries in place once the truck is fitted. I have not long started working on the second powered tram so it's still in its early stage of modification/upgrade.
Holes are drilled through the floor under the seats with wires passed through to keep them tidy and out of harm's (me) way.
Truck MkII is being wired slightly differently to try and cut down on wires in the truck going from one end to the other.
The other idea/thought change I've had is to fit AAA batteries in the trailer for the interior lights, jumpers between vehicles will only used for tail lights.
I hope that all makes sense.
David
DafyddElvy
1:22.5 & 15mm Scale Trams, , NG Steam Railways
Jimmy,My thanks, all makes sense, having removed the benches I see that 3 X AA would fit each side, but had not considered removing the floor under the seats for access. I am considering 6 X 14500 in a 3S2P configuration to give me 11.8 volts, just got to work out the wiring, specifically the protection board.
I removed the fix screw moulding from inside the seats and glued the seats to the inside of the car, by doing this I have managed to easily fit 4 x AA batteries each side.
After some testing last night the batteries were only down to 10.37v which I thought was quite good considering I had been doing steep gradient trials with loads.
I'm glad some has found my jottings useful.
David
Last edited:
JimmyB
Now retired - trains and fishing
On initially reading this I thought you meant you had glued the fixing to the inside of the car, which caused me the "scratch my head a little, but on reflection I assume you mean you glued the seats inside the carJimmy,
I removed the fix screw moulding from inside the seats and glued them to the inside of the car,
DafyddElvy
1:22.5 & 15mm Scale Trams, , NG Steam Railways
Jimmy,On initially reading this I thought you meant you had glued the fixing to the inside of the car, which caused me the "scratch my head a little, but on reflection I assume you mean you glued the seats inside the car
Well spotted, message updated, I will endeavour to write clearer in the future
David
DafyddElvy
1:22.5 & 15mm Scale Trams, , NG Steam Railways
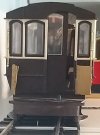
Things have been progressing quite well with the Bachmann tram conversions, the original one I started with is complete except for the front dash's which I am waiting on less humid weather before I paint, I am just finishing off the lights battery box for the trailer, and powered tram number 2 is also waiting on more suitable weather for painting.
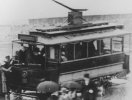
As tends to be my way the mind has drifted a wee bitty; after coming across the only have decent picture of the Leith single deck car it got me thinking. A Bachmann model with a standard gauge truck, a pair of new dash boards and a wee tweak to the end panels and its not quite correct but I think it would make a nice representation, for now any how.
Then I looked up at the top of the forum page which clearly says G Scale Central, and I thought to myself, I am sure as I am using a G Scale model as the basis for the conversion, folks on here I think will allow me a wee bit of leniency ;-) as I have a slight deviation in to Gauge 3 (ish).
The next conversion was to be a new power truck for an open car but I suspect that will change.
David
Attachments

DafyddElvy
1:22.5 & 15mm Scale Trams, , NG Steam Railways
A wee bit of an update.
After the paint failure with the new sash boards all painting is suspended until this humid weather sorts itself out.
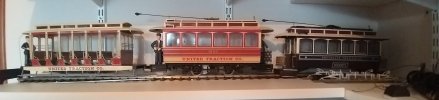
I thought I would however show folks where I've got to with this venture in to G scale tramway modelling.
From right to left.
Number 6
Body and all wiring complete, new truck is waiting for less humid weather to be painted.
Number 1623
Complete except for the new dash boards which are waiting on less humid weather.
Number 2259 (trailer)
Complete
All models waiting for me to finalise how I will mount the vehicle to vehicle jumper cables before being re-fitting.
2504 (trailer) I think will be next.
They are keeping me occupied if nothing else.
David
After the paint failure with the new sash boards all painting is suspended until this humid weather sorts itself out.
I thought I would however show folks where I've got to with this venture in to G scale tramway modelling.
From right to left.
Number 6
Body and all wiring complete, new truck is waiting for less humid weather to be painted.
Number 1623
Complete except for the new dash boards which are waiting on less humid weather.
Number 2259 (trailer)
Complete
All models waiting for me to finalise how I will mount the vehicle to vehicle jumper cables before being re-fitting.
2504 (trailer) I think will be next.
They are keeping me occupied if nothing else.
David
Attachments
Similar threads
- Replies
- 2
- Views
- 203