You are using an out of date browser. It may not display this or other websites correctly.
You should upgrade or use an alternative browser.
You should upgrade or use an alternative browser.
G Scale Tram Project
- Thread starter DafyddElvy
- Start date
schienenkönig
I'm a tram enthusiast and have made trams Scale G
And I thought I was alone with these tiny ones.
But ... there are smaller ones on the market! I need this smd for the lighting of the line number box. Now I have to find a way where I can connect them.


But ... there are smaller ones on the market! I need this smd for the lighting of the line number box. Now I have to find a way where I can connect them.
Rhinochugger
Retired Oik
Well, you might, as the end result's betterI'll not make that mistake again.
David

Jasper
Hey, I'm only being creative here!
Thanks for mentioning! I never realised this.Assuming you are using the correct resistor with these? Failure to do so will let the magic smoke out quite quickly...
I installed leds in one loco, and I never bothered to use the resistors that the guy sent along, because "hey, it works". I guess I've been lucky so far. I'll be a good boy and put them in now.
DafyddElvy
1:22.5 & 15mm Scale Trams, , NG Steam Railways
The LEDs came with the resister attached.
I have decided to take a different approach to how the front lamps will be wired, I'm making up a wee bit of circuit board with the components attached and then running wires to the LED, carefully cut back the wire insulation, hopefully, and reattached after soldering the wire to the LED. No heat source required so I'm hoping that will eliminate the risk of me melting things again, I sincerely hope anyhow.
David
DafyddElvy
1:22.5 & 15mm Scale Trams, , NG Steam Railways
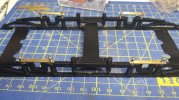
I think I have finally tweaked all the tweaks required to my new truck design and yesterday took the decision to paint the new trucks for the powered tram and its trailer. Aye I know I'm tempting fate but I had to start painting things at some point.
Now I need to remember how it all goes back together.
David
Edit
A bit more done yesterday, dummy springs were drilled out, 8 keeper plates made and the trailer truck fitted with its keeper plates, down to the workshop tomorrow for some blackening fluid.
I have added this photo to show one of the benefits I have found from working in this scale, drilling white mental with a 0.7mm drill bit rather than struggling with 0.2mm-0.3mm drill bits, using M1.5 screws I can hold in my fingers, all things that I have found attractive to 1:22.5 scale.
I mention the benefits I have found from modelling in this scale because their does exists (by some) that G Scale can appear quite toyish especially when seen at exhibitions. After arriving at this scale completely by accident I do now plan to promote 1:22.5 scale as an enjoyable scale to work in as a fine scale modeller. Yes I've gone slightly off topic however thought these words worth mentioning.
Attachments

Last edited:
DafyddElvy
1:22.5 & 15mm Scale Trams, , NG Steam Railways
A little bit more progress during my lunch break today, the trailer truck has been re-assembled and it's back in its trailer, I have tried to build the new truck to a common design so that it can be swapped out with any other open trailer vehicle. Hopefully the wee video link works, its only 7 seconds but shows the trailer with sprung axle boxes.
David
David
DafyddElvy
1:22.5 & 15mm Scale Trams, , NG Steam Railways
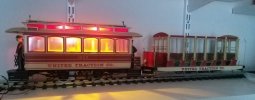
Very much a temporary power arrangement, internal lights have been fitted and wired up, the photo was taken with the room lights off for effect. The photo doesn't really show the brightness off very well, it doesn't look as bright as the photo would suggest.
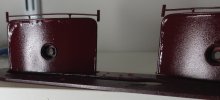
The new dash boards were painted yesterday but something seems to have gone wrong, primer was fine, a dusting with some black to darken the red and a top coat of the red, all paint from the same company and all should be compatible.
Its the first time I've had this happen so if anyone knows what might have caused it to avoid the same thing happening again it would be useful.
Dettol bath for these and another go at painting them.
David
Attachments
Hm that effect is unusual, I wonder did the coats dry properly between application? Or were the paints different types (ie acrylic and enamel) or perhaps that dusting was more blotchy than you thought? Not entirely sure that a dusting of bkack would be the best way to darken the top coat of red prior to application, perhaps after with a very thin wash with thinners may have been better. Time to experiment on an old tin can me thinks.Very much a temporary power arrangement, internal lights have been fitted and wired up, the photo was taken with the room lights off for effect. The photo doesn't really show the brightness off very well, it doesn't look as bright as the photo would suggest.
The new dash boards were painted yesterday but something seems to have gone wrong, primer was fine, a dusting with some black to darken the red and a top coat of the red, all paint from the same company and all should be compatible.
Its the first time I've had this happen so if anyone knows what might have caused it to avoid the same thing happening again it would be useful.
Dettol bath for these and another go at painting them.
David
DafyddElvy
1:22.5 & 15mm Scale Trams, , NG Steam Railways
Before applying to the new dash panels I did some colour experiments on scrap pieces of brass to see what would give me the closest match to the Bachman tram, the test pieces were and are still fineHm that effect is unusual, I wonder did the coats dry properly between application? Or were the paints different types (ie acrylic and enamel) or perhaps that dusting was more blotchy than you thought? Not entirely sure that a dusting of bkack would be the best way to darken the top coat of red prior to application, perhaps after with a very thin wash with thinners may have been better. Time to experiment on an old tin can me thinks.
Before painting the new dash panels I did some colour patch tests using the same brass sheet the dash panels are made from to see what colour best matched the bachman tram, the colours aren't a perfect match but I was happy with the one that had been over the black undercoat.Hm that effect is unusual, I wonder did the coats dry properly between application? Or were the paints different types (ie acrylic and enamel) or perhaps that dusting was more blotchy than you thought? Not entirely sure that a dusting of bkack would be the best way to darken the top coat of red prior to application, perhaps after with a very thin wash with thinners may have been better. Time to experiment on an old tin can me thinks.
The dash panels were painted in exactly the same way as the test pieces with at least 24 and 8 hours between coats. As with the test pieces, the dash panels were brought inside after each coat was applied to try and have both the paint and the dash panels at the same temperature.
This has me completely baffled, I've never had any problems like this before and the fact the test pieces are still fine puzzles me even more.
I do prefer to use a black primer, when I can get hold of it, to avoid the extra coat of paint, but as the dash panels don't have any real detail that can be lost with an extra coat of paint I was worried.
I have used the same methods that i have been using for years now on brass and white metal and never had this problem so I am baffled???
David
Attachments
Hm where is the confused imoji when you need it?Before applying to the new dash panels I did some colour experiments on scrap pieces of brass to see what would give me the closest match to the Bachman tram, the test pieces were and are still fine
Before painting the new dash panels I did some colour patch tests using the same brass sheet the dash panels are made from to see what colour best matched the bachman tram, the colours aren't a perfect match but I was happy with the one that had been over the black undercoat.
The dash panels were painted in exactly the same way as the test pieces with at least 24 and 8 hours between coats. As with the test pieces, the dash panels were brought inside after each coat was applied to try and have both the paint and the dash panels at the same temperature.
This has me completely baffled, I've never had any problems like this before and the fact the test pieces are still fine puzzles me even more.
I do prefer to use a black primer, when I can get hold of it, to avoid the extra coat of paint, but as the dash panels don't have any real detail that can be lost with an extra coat of paint I was worried.
I have used the same methods that i have been using for years now on brass and white metal and never had this problem so I am baffled???
David
Final thought as these are metal parts did you do a thorough clean up of soldering and finger marks? Thinking this through I tend to use Lighter Fuel for this purpose as it tends to evaporate clean with no residue. Other than that I am also baffled.
DafyddElvy
1:22.5 & 15mm Scale Trams, , NG Steam Railways
Warm dry weather when the primer and undercoat was applied, it was humid when the top coat was sprayed on.It looks like water has got in, but if it was totally dry, I'm stumped
Still don't understand why all three coats lifted.
David
Fred2179G
Registered
Here in Maryland we know humid, and I made the mistake of spraying my Midland coach build when there was too much of it around. I suspect the weather wasn't exactly the same, and the humidity was higher for one of the two exercises.it was humid when the top coat was sprayed on.
I usually sand it down and try again . . .
JimmyB
Now retired - trains and fishing
Poor paint work is normally due to poor preparation, I am not saying you didn’t prep the job, but it would seem the best option as already said is rub down and start again.
I think this is why I hate painting, you put a lot of time and effort into the job and all can be lost at the final hurdle, at least decals had not been applied")
I think this is why I hate painting, you put a lot of time and effort into the job and all can be lost at the final hurdle, at least decals had not been applied
DafyddElvy
1:22.5 & 15mm Scale Trams, , NG Steam Railways
As I previously said, I followed the same methods I always use, all paint coats were fine until the last.
A soak in dettol is how I remove paint, followed by a good clean, then a wire brush in the drill followed by a bath in viakal, and a final wash using a toothbrush to make sure all is clean again.
Thanks for all the thoughts.
David
A soak in dettol is how I remove paint, followed by a good clean, then a wire brush in the drill followed by a bath in viakal, and a final wash using a toothbrush to make sure all is clean again.
Thanks for all the thoughts.
David
Jasper
Hey, I'm only being creative here!
Worth mentioning indeed. And I'm glad you're enjoying G.After arriving at this scale completely by accident I do now plan to promote 1:22.5 scale as an enjoyable scale to work in as a fine scale modeller. Yes I've gone slightly off topic however thought these words worth mentioning.
By the way your video link works fine for me.
I've got nothing on the paint, I'm a complete fool paint-wise. Even if it's just a little plank I try to get SWMBO to do it.
DafyddElvy
1:22.5 & 15mm Scale Trams, , NG Steam Railways
I think the consensus is the last coat was applied when it was too humid, an annoying lesson learnt.
David
David
DafyddElvy
1:22.5 & 15mm Scale Trams, , NG Steam Railways
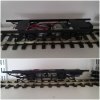
First truck finished with the exception of the tray which I'll make and fit once its had a few test runs to check a few things.
MkII is under construction, the only real change from the original design is to tidy away cables and solder cable clips to the truck, basically a much tidier arrangement for the cabling.
David
MkII is under construction, the only real change from the original design is to tidy away cables and solder cable clips to the truck, basically a much tidier arrangement for the cabling.
David
Attachments
Similar threads
- Replies
- 2
- Views
- 203