Contractor's Thrashing set

Thanks for your comments - and the Blue Tack idea (a good one) - funnily enough, I don`t think I have seen any on ebay for a while. The living needs a little tidying up - I suppose it could tow behind the baler and make up a decent road train. I still have bits to add to the engine but I`m getting impatient!

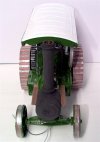
So, inbetween doing bits on the trailer, I set to on the first stage of painting it. I used plastic primer (Holts - far cheaper than Halfords) then Simoniz acrylic primer over that. Once the parts were coated all over, and dry, they were reassembled to see what it looked like. Apart from obvious joint lines (smokebox front in particular) it doesnt look too bad in works grey....

Threshing Set (21).JPG

Threshing Set (22).JPG

Threshing Set (23).JPG

Threshing Set (24).JPG

There will not be any work carried out today as I am off with the trailer but tomorrow`s another day I hope.
 
It looks just the job, Mick, and shows nothing of its humble origins other than the join round the smokebox, which I know will soon disappear too.
 
I have been following this ,what a great job you have done it looks very realistic .I have done a few of these myself and have used them as loads on the back of wagons .
Graham Shrewsbury
 
Thanks for your comments Gordon & Graham. This week, starting with Sunday, hasn`t been the what I would have hoped it to be. So, instead of completing the detailing, I just daubed on some paint.

Having had a primer for the plastic which comes away if you bend any of the components, plus a primer/u`coat, I looked for a suitable green. I don`t really have much of a stock of model paints so I tend to use what is to hand.

I had plenty of different shades of green - both in acrylics and oil based. I used a dulux green undercoat and, although I liked the colour, I didn`t like the finish. I had some small tin`s of Blackfriars enamel and selected a suitable green.

Snag is, without flatting down, the gloss highlights what is underneath. The camera shows it all. I`ll live with it.
Next time I`ll use a rattle can for the main finish colour.

Brush strokes ......

Threshing Set (31).JPG

I also fitted a 6v Graupner (made by Seuth) smoke unit - a perfect fit down the improvised chimney. The wires will be fitted so the don`t show and the rest of the wiring and voltage dropper unit will be under the baseboard.
Power supply will come from the 12v battery used for the lighting.

Snug fit .....

Threshing Set (29).JPG

I printed the names out on photo paper, cut them out (after first applying a backing of double-sided tape), then treated the raw edges to a green felt tip pen. I misjudged this on the offside one :(

Unsteady hand ....

Threshing Set (27).JPG

I like the shade of green ......

Threshing Set (30).JPG

Looks better from this angle .....

Threshing Set (26).JPG

Threshing Set (31).JPG

I still have the detailed bits to add like a front tow hitch, number plate, steering chains, safety valve springs, whistle, throttle, steps, splash guard for gears, suction hose, etc.

When complete I`ll give it a coat of varnish to protect the paint and then dull it all down with some Humbrol matt.


Attachments

  • Threshing Set (28).JPG
    Threshing Set (28).JPG
    92.8 KB · Views: 11
It looks very good indeed, Mick. And let's remember as regards paint finish whether on the vehicle or signage, these were working vehicles and would get damaged and repaired/repainted as well as the owner was able/could afford, so they wouldn't have been showroom finish in real life. And there's also the 10 foot rule, of course.
 
Amazing the difference a coat of paint makes.. Even in primer, it pulled it all together.
Wish I had the 'vision' to see the potential, rather than what is in front of my eyes..
 
Nice one Mick, the transformation from it's origins is superb, do like the green sets it off very nicely, so no resting on your laurels, await the thrashing trailer............ ;)
 
The transformation is breath taking.... Especially from a chap who showed such reticence taking a Razor Saw to the bumpers on a bachman tram....
 
tramcar trev said:
The transformation is breath taking.... Especially from a chap who showed such reticence taking a Razor Saw to the bumpers on a bachman tram....

I can (sometimes) overcome that reticence - I did attack the Bachmann 45 ton diesel and got away with it!
 
I thought of something else I could add to it - I'm hoping to get some bits done this morning (famous last words).

Thanks for your encourage everybody. Once I've stuck all the "extras" on I have to make some form of basic drawing to work from for the threshing drum - then there's the baler ....

H'mm - its going to hold up the traffic in the village .... (need to extend the trailer?).
 
So, its 1948 and Molloy is down the pub one night with a few bob in his pocket. Its been a profitable few months carting stone, coal and manure but the tractor is looking a bit the worse for wear. Murphy the farmer is in for a late whiskey, and buttonholes Molloy - "Yer not thinking of thrashing my wheat with that engine are you ? I don't want that dirty old thing in my fields !". To be fair, the engine was painted in 1932, and has lasted well, but there isn't a drop of paint left in the yard. O'Connell, the local scrapman, sidles up - "I think I can find a drop of green paint if you can wait a week or two". Everyone is fine with that so money changes hands, and Murphy the farmer buys everyone a whiskey.

A couple of weeks later O'Connell sends the horse cart round with a couple of drums of paint. All the markings have been sanded off the drums, which are rusty and full of dings. Molloy's handyman, Old Michael, is dragged out of the bothy with his trusty three-haired brush in hand, and set to work. After a week, there hasn't been much progress, so Molloy gives him a bigger brush. Old Michael kicks off 'cos he's going to have to do some work, and throws the brush at the engine. Unfortunately, in the heat of battle he wings the signboards, so Molloy threatens to bollock, sack and shoot him - all in the same sentence.

Eventually the job is done and the engine is all shiny and green. Molloy and his man take the engine for a run, and somehow end up at the pub. Everyone comes out for a look, and Murphy observes that some of the painting is a little "thorough". Old Mick curses his new brush and starts rattling on about paint like treacle "with a skin yer could dance on". All eyes focus on O'Connell as they ask him where the paint came from. "War surplus" he says "tank paint from the English". "Which war ?" says Molloy. "Well, the First One..." replies the scrapman "....what do you expect for ten quid?" Everyone agrees that actually it looks pretty good after all, and Murphy buys a round of whiskeys.


                                                                roflmao.gif

Its the way he tells `em ;)
 
Well, despite the long grass waving at me, I dived into the shed.

I`d thought of side curtains, so that thought wouldn`t go away until I had a go.

Material? No green suitable, no cloth suitable.  Then I remembered an offcut from a roller blind. Yellow it was, green it would be.

To start with, I just unrolled the offcut and applied a piece of 50mm wide double-sided carpet tape. I then cut it out, leaving a 5mm margin along both edges of the length. Then I cut it in two along the length.

I thought if I wrapped it around some 4mm dowel it would be just right (but it wasn`t). So I managed to peel it off the dowel and roll it up - just like the prototype.

Next - how to represent the leather straps? I settled on some baked bean tin material, cut into strips and then pre-formed to go around the rolled up "canvas". Once I had got the strips in position, I clinched them up a little to slightly deform the roll to allow slight sags between straps.

Threshing Set (32).JPG

Then, out with the green and a daub all over to cover the yellow and prime the tin (apart from the inside face of the same which would be stuck to the canopy).

Whilst waiting for the sheets to dry, I brassed the safety valves and made the spring bar (from a bit of steel wire) and a spring formed from a piece of insulated wire.

While the `brass` paint was drying, I looked through my odds and sods and found a die-cast whistle from a BH.
The whistle had broken its` 2.0mm stem so I had to drill a 1.0mm hole to accept a steel pin. The whistle`s a little fatter than what you might get on such a machine but the contractor spent a lot of time in America.

So, all the paint was drying nicely and I pondered the best way to attach the canvas to the canopy. Good old double-sided to the rescue!

Nicely stuck in position, I thought of a "belt and braces" approach. I would add a litle drop of superglue to make things more secure. Now, what`s a good release agent for double sided tape? Yep - superglue!

So now it is just held there with the D/S tape.

Then I stuck in the whistle and the safety valve bar (pre-drilled holes of course). So here are some pics - down to my familiar standard I`m afraid (well for every standard there has to be a sub).

Threshing Set (33).JPG

Threshing Set (34).JPG

Threshing Set (35).JPG

That gloss has to go - still, what did I expect it is enamel.

 
Right - the engine is about finished and I need to get on with other things. It sports Mayo number plates (contemporary with its supposed age), and other little bits like a regulator handle, brake wheel, suction hose, splash guard over the gears, and - it has been dulled down!

It needs towing pins (I made some and lost them), diff lock pins, a coal load for the bunker and maybe even a driver! Oh, and I must get the smoke unit working!

Here`s the (nearly) finished item pics;

Threshing Set (36).JPG

Threshing Set (37).JPG

Threshing Set (38).JPG

Threshing Set (39).JPG

Threshing Set (40).JPG

Now to print some pics to make drawings for the thrasher.
 
Mick,

Truly superb, as they say where I come from "it's the dogs b*******"

Still await the trailer................. ;)
 
A truely amazing conversion ..... :o
 
Back
Top Bottom