You are using an out of date browser. It may not display this or other websites correctly.
You should upgrade or use an alternative browser.
You should upgrade or use an alternative browser.
What happened at your workbench today?
- Thread starter Henri
- Start date


Indeed so but at least it is readable.Comes to something, when the diagram on the slip of paper is HUGE, in comparison to the device itself.
View attachment 295551

DafyddElvy
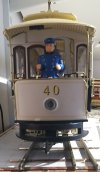
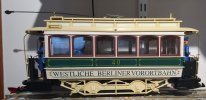
1:22.5 & 15mm Scale Trams, , NG Steam Railways
Although I purchased the newest member of the fleet yesterday, it didn't come inside until today (I forgot I'd left it in the car 

") ) unfortunately the person I purchased the tram from had put a screw in the roof to hold it in place so a little bit of cosmetic repair required.
) unfortunately the person I purchased the tram from had put a screw in the roof to hold it in place so a little bit of cosmetic repair required.
) unfortunately the person I purchased the tram from had put a screw in the roof to hold it in place so a little bit of cosmetic repair required.Attachments
Rhinochugger
Retired Oik
At great expense, and with a cast of thousands ...........................

3 minutes of fame
3d printing, electronics and trams
I've been busy with Tinkercad and the resin printer, creating some tram parts. Handrails, handwheels, hubs, springs and controllers have all been designed up and printed. A few tweaks to follow, but otherwise, I'm happy with these.


3 minutes of fame
3d printing, electronics and trams
In pursuit of some wagons for my 3D printed Rocket to pull, I've created these Chauldrons. They are laser cut out of an A4 sized sheet of 2mm and thrown together in about 30 minutes. A coat of black stain should give them a more realistic colour! The number plates were engraved to give some relief. Trickier than it looks on a laser, but faster than 3D printing them. Wheels are 3D printed using a design from some Bug Box coaches I'm currently printing. More on those later..


3 minutes of fame
3d printing, electronics and trams
I did promise to update you on some Bug Boxes I'm making. These are a design off Thingiverse that use 3D printed ends and chassis, with wooden laser cut sides. I think there's some tweaking to do to get a better fit, but so far so good.


3 minutes of fame
3d printing, electronics and trams
Some progress on my tram chassis. Based on a Brill 21e, this is mainly 3d printed and laser cut. Springs are the usual wire wound around a drill bit.

Spent the afternoon prepping a couple of LGB two axle wagons for interior lighting. The wagons came with metal wheelsets. I didn't want to change them out for the ball bearing, power pickup wheelsets. I have a bunch of the old 3019/3 Electric Contact brush holders that I wanted to make use of instead. This is how I adapted them to these newer LGB wagons.
.jpeg")

.jpeg")
.jpeg")
.jpeg")
.jpeg")
.jpeg")
.jpeg")
.jpeg")
.jpeg")
And finished with the adapted old style LGB Electric Contact installation.
.jpeg")
And finished with the adapted old style LGB Electric Contact installation.
viaEstrecha
Spanish metre gauge in G scale (on the cheap)
Today on the bench, a zombie invasion as the interiors for my kit-bashed Bachmann coaches filled up with passengers, ready for assembly. All the main bits are now done, roofs and lighting are complete, and so I'm hoping to finish the project by next week; it has been a marathon but I've learned a lot.

3 minutes of fame
3d printing, electronics and trams
Slopped a little paint on the cauldrons. I've got some chains on order to complete the wagons, along with some coal loads.

craigwrdouglas2
Registered


Painted a few figures to put into the RhB sightseeing car. Figures from Elita - mostly LGB casts and 4 figures from Massoth. Simple scheme with solid colours eyes, eyebrows and a little drybrushing on the hair.
3 minutes of fame
3d printing, electronics and trams
This week's labour of love has been the start of the creation of this ruined church. It's a scaled up wargaming model, printed in 12 sections @ 175%. Each print ranges from 8 - 20 hours and we're 1.2KGs of filament expended so far - with about the same to go again.
To give a context of scale, the tower stands 480mm tall, the Nave is 420mm long and the Chancel another 250mm.
I need to think about how to paint it. I was considering textured spray paint, but I've tried it on 1 section and I'm not impressed with the finish. I might end up making my own sand textured paint and brush apply it. Thoughts welcome!
viaEstrecha
Spanish metre gauge in G scale (on the cheap)
That's amazing! You might try mid-stone masonry paint from a tester pot as the base layer? I use masonry paints for all my structures, then sponge dab them with acrylics and enamels to bring out the texture and depth.I need to think about how to paint it. I was considering textured spray paint, but I've tried it on 1 section and I'm not impressed with the finish. I might end up making my own sand textured paint and brush apply it. Thoughts welcome!
3 minutes of fame
3d printing, electronics and trams
Brilliant, thank you, I will try that. I need to cover up some of the 3d print artefacts, so a thicker base layer will help with this.That's amazing! You might try mid-stone masonry paint from a tester pot as the base layer? I use masonry paints for all my structures, then sponge dab them with acrylics and enamels to bring out the texture and depth.
When I last ran my LGB 20273 LD1 the fan in the smoke unit began screeching quite loudly. I had to replace the unit once already due to a failed bushing on the fan motor. Today, I opened up the smoke unit to put a dab of oil on the motor bushing hoping to save the unit before the bushing destroyed itself. Removing the leading truck gives access to one screw keeping the loco smokebox in place. The front steam dome has a pin that retains the top of the smokebox. Taking the top off the dome gives access to a screw holding the dome to the boiler. The smoke stack also needs to be taken off to remove the smokebox. Give it a 1/4 turn counter-clockwise to align keys molded on the stack to the keyways on the smokebox then pull it straight up. The smokebox can be worked free once the stack, bottom screw and dome are taken off.

After the two tubes feeding "smoke" to the cylinders are disconnected from the smoke unit it can be wiggled out of the boiler. There is plenty of slack in the wires between the smoke unit and the decoder to allow it to be pulled out far enough to work on. The following few pics are of the old, failed unit but do illustrate what I did to get to the fan motor.
First the fan had to be removed from the motor shaft. It pulls straight off. I used needle nose pliers to get it off. The circuit board to which the fan motor is soldered can not be taken out of the smoke unit housing unless the fan is off.
.jpeg")
Removing the four screws on the top of the housing allows it to be opened up -
.jpeg") and the circuit board can be taken out.
and the circuit board can be taken out..jpeg") This shows the motor shaft bushing that failed on this unit. That is where I put a small drop of oil on the one I serviced in the LD1. Unfortunately the bushing on the other side cannot be gotten at without desoldering the motor which I was unwilling to do. After reassembling the smoke unit housing I added another small drop of oil where the fan motor shaft comes through the housing before pushing the fan back on the shaft.
This shows the motor shaft bushing that failed on this unit. That is where I put a small drop of oil on the one I serviced in the LD1. Unfortunately the bushing on the other side cannot be gotten at without desoldering the motor which I was unwilling to do. After reassembling the smoke unit housing I added another small drop of oil where the fan motor shaft comes through the housing before pushing the fan back on the shaft.
Here the unit is being tested before reassembling the loco. I also replaced all the plastic tubes feeding "smoke" to the cylinders. The tubes become quite hard after being used and are best replaced. The second pic below shows some smoke unit tubing I got from Schlauchset für Gepulste Verdampfer 4 Stück ML-Train 86101004 when I last ordered parts from them.
.jpeg")
.jpeg")
The screeching is now gone so hopefully this took care of the problem. I should note that a whole lot more loco disassembly is needed to replace the smoke unit as access to the decoder is needed.
Edited to note that the smokestack must also be taken off in order to remove the loco smokebox.
Second edit added: I'll make sure the oil the motor on the next replacement before I install it!
After the two tubes feeding "smoke" to the cylinders are disconnected from the smoke unit it can be wiggled out of the boiler. There is plenty of slack in the wires between the smoke unit and the decoder to allow it to be pulled out far enough to work on. The following few pics are of the old, failed unit but do illustrate what I did to get to the fan motor.
First the fan had to be removed from the motor shaft. It pulls straight off. I used needle nose pliers to get it off. The circuit board to which the fan motor is soldered can not be taken out of the smoke unit housing unless the fan is off.
Removing the four screws on the top of the housing allows it to be opened up -
and the circuit board can be taken out. This shows the motor shaft bushing that failed on this unit. That is where I put a small drop of oil on the one I serviced in the LD1. Unfortunately the bushing on the other side cannot be gotten at without desoldering the motor which I was unwilling to do. After reassembling the smoke unit housing I added another small drop of oil where the fan motor shaft comes through the housing before pushing the fan back on the shaft.Here the unit is being tested before reassembling the loco. I also replaced all the plastic tubes feeding "smoke" to the cylinders. The tubes become quite hard after being used and are best replaced. The second pic below shows some smoke unit tubing I got from Schlauchset für Gepulste Verdampfer 4 Stück ML-Train 86101004 when I last ordered parts from them.
The screeching is now gone so hopefully this took care of the problem. I should note that a whole lot more loco disassembly is needed to replace the smoke unit as access to the decoder is needed.
Edited to note that the smokestack must also be taken off in order to remove the loco smokebox.
Second edit added: I'll make sure the oil the motor on the next replacement before I install it!
Last edited:
JimmyB
Now retired - trains and fishing
Got out on the railway, carried out the necessary weeding and trimming and replaced some of the ballast as required. Then out with the battery Stainz for a quick spin to check the track and switches (points). All good so out with the RH Fowler, and the first thing is full steam to check the Pressure Safety Valve, seeps at 20 psi (just a little) and from 30 psi gradually lifts and blows of at 40 psi so all is good, though I do prefer post valves, and would love to swap it. All lubed and tested and off for a play, test run ")

Not my workbench or even a bench, but I helped my friend resuport part of his railway that got damaged in the recent storms. Below you can see the damage, the plan was to replace the 2 brick pillars with wooden posts. Thankfully the line was not connected to the fence at any point, this is the prime example why you should never ever do that. In this case the damage caused was due to the fence posts rotting at ground level and the fence flapping literally in the wind like a piece of cardboard thus knocking over the posts.

The plan was to replace the brick pists now thet the fence has been replaced. However the second one had been moved to get the line somewhat right so he only wanted one new post. So a hole was dug, a metpost with post from one of the rotted at ground level suitably used after cutting to length. Some broken bricks and a bag of postcrete made things right. I was worried aboit the other brick pillar so have put some bricks round it and a bag of postcrete hoping thet it will stay secure, it all felt pretty stable before that despite the angle of dangle as it were. A bodge but hey it is his railway.

Whilst on site it would have been churlish not to run a train or two, I took my Triang Big Big Hymec with new bogies, MLS sound and Fosworks RC for a run. Bit on the slow side but very tolerant of no track power. You can see the repaired bit of line leading to Shed1 to the right. He has 2 Sheds for stock storage.

Seen below with one of his DCC 2 rail Sound Choppers. Thie Chopper found a couple of dodgy points, after 2 micro switches that supply power to the frogs replaced all was good and ready for a new season of train running. Incidentally the white line is a measure of distance in scale 1/4 miles.

The plan was to replace the brick pists now thet the fence has been replaced. However the second one had been moved to get the line somewhat right so he only wanted one new post. So a hole was dug, a metpost with post from one of the rotted at ground level suitably used after cutting to length. Some broken bricks and a bag of postcrete made things right. I was worried aboit the other brick pillar so have put some bricks round it and a bag of postcrete hoping thet it will stay secure, it all felt pretty stable before that despite the angle of dangle as it were. A bodge but hey it is his railway.
Whilst on site it would have been churlish not to run a train or two, I took my Triang Big Big Hymec with new bogies, MLS sound and Fosworks RC for a run. Bit on the slow side but very tolerant of no track power. You can see the repaired bit of line leading to Shed1 to the right. He has 2 Sheds for stock storage.
Seen below with one of his DCC 2 rail Sound Choppers. Thie Chopper found a couple of dodgy points, after 2 micro switches that supply power to the frogs replaced all was good and ready for a new season of train running. Incidentally the white line is a measure of distance in scale 1/4 miles.
Similar threads
- Replies
- 18
- Views
- 3K