Been making circuit boards for my servo point motor controllers. I am now in the process of installing them, thre are 9 in two "districts" , Ringbalin Yard and Ringbalin Approach.
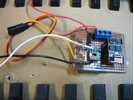
A Picaxe micro-controller to do the servos and an ESP01 WiFi module (the one with the wriggly piece of track that is the antenna) to relay the point position (Straight through or Divergent) to a small computer (Raspberry Pi) that displays the position on a screen using icons that change colour. That way I can see at a glance which way the points are set at a glance from across the room.
The input is from a microswitch mounted under a 3D printed point lever, this also doubles as an indicator of point setting.
The blade position is adjustable by 2 "trimpots" for each controller, it reads their setting to determine servo position.
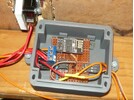
Single board, the prototype.
View attachment 349230
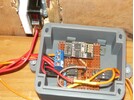
The main board with 5 controllers they each act like a single board but are built on 1 board for ease of mounting.
View attachment 349225
Point lever in straight position
View attachment 349227
Point lever in thrown position
View attachment 349228
Lever and servo point motor
View attachment 349226
Blade adjustment "trimpots"
View attachment 349234
View attachment 349233
Next step will be to make controllers for out in the yard that will be controlled by switches on a control panel connected to the small computer and the display will show point setting.
This has been a fun project using my soldering skills and my learning how to use an AI bot to turn my ideas into software code.

 The diner ends at the food service counter, there's no room for food prep but don't tell the customers
")