W&L Coach Partial Kit Build

jimmielx

45mm gauge track - approx 16mm scale (1:19)
24 Oct 2009
786
41
Hastings, UK
Country
United-Kingdom
Best answers
0
Country flag
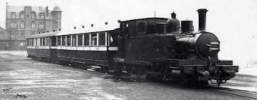
A few months ago I bought a partial Brandbright Kit of a W&L Third Class Saloon - PS24 - on eBay. I bought it on bait of whim - it was stated that the kit was incomplete, and from the pictures looked to have a roof and a good number of white metal parts, but no other big bits. So I thought, worst case, I'd get a bunch of useful parts - I think it wasn't too expensive.

It turns out that the kit is complete - apart from the floor, sides, ends (there is one end with door), sole bars, buffer beams and bogie supports. So some absolutely critical bits are missing. But the only difficult bits to reproduce are the sides and and ends - with all the cut outs for the windows.

So I'm going to give it a go!

It is a very long coach at 57cm - length deduced from the roof. That's 5cm longer than my Brandbright VOR coaches, but I mocked up a floor and chassis and it does look like it will make it round my railway.

It does fit my narrow ish gauge GWR theme so should be a nice addition. I don't anticipate a rake of these, because it isn't currently in production by Brandbright (Accucraft RTR models are available though), so I'll probably run it as a short mixed train - maybe with a guards van and parcels wagon. I'm getting carried away here - need to build it first!

I've already cut a floor from 3mm Obeche - my usual and will build up the under frame first. I've bought a pair of bogies and accompanying wheels from Tenmille.

My plan for the sides and ends is to design them on the computer and then print out templates to cut around - this is a tried and tested method for me. To create the panelling I'll cut out a top layer from thin plasticard using my vinyl cutter. I should be able to figure out dimensions from the parts I do have.

I must say that there's nothing particularly sensible about doing this. It would be cheaper and much quicker to just buy an Accucraft coach. In any case I don't have anything W&L to go with it. It's just that it appeals to me get the kit built - to not let it go to waste. So I'll update my progress here. Hopefully I'll get a bit done over the next few days, but after that it won't be fast - too much else on.

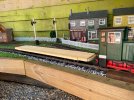
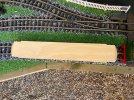
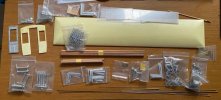
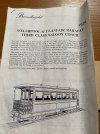
For now, here's what I got in the kit.
IMG_6920.jpg
IMG_6923.jpg
IMG_6924.jpg

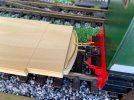
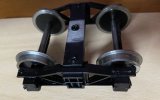
And here is one of the bogies, ready to go...
IMG_6921.jpg
 

Paul M

Registered
25 Oct 2016
11,875
1,696
60
Royston
Best answers
0
Country flag
A few months ago I bought a partial Brandbright Kit of a W&L Third Class Saloon - PS24 - on eBay. I bought it on bait of whim - it was stated that the kit was incomplete, and from the pictures looked to have a roof and a good number of white metal parts, but no other big bits. So I thought, worst case, I'd get a bunch of useful parts - I think it wasn't too expensive.

It turns out that the kit is complete - apart from the floor, sides, ends (there is one end with door), sole bars, buffer beams and bogie supports. So some absolutely critical bits are missing. But the only difficult bits to reproduce are the sides and and ends - with all the cut outs for the windows.

So I'm going to give it a go!

It is a very long coach at 57cm - length deduced from the roof. That's 5cm longer than my Brandbright VOR coaches, but I mocked up a floor and chassis and it does look like it will make it round my railway.

It does fit my narrow ish gauge GWR theme so should be a nice addition. I don't anticipate a rake of these, because it isn't currently in production by Brandbright (Accucraft RTR models are available though), so I'll probably run it as a short mixed train - maybe with a guards van and parcels wagon. I'm getting carried away here - need to build it first!

I've already cut a floor from 3mm Obeche - my usual and will build up the under frame first. I've bought a pair of bogies and accompanying wheels from Tenmille.

My plan for the sides and ends is to design them on the computer and then print out templates to cut around - this is a tried and tested method for me. To create the panelling I'll cut out a top layer from thin plasticard using my vinyl cutter. I should be able to figure out dimensions from the parts I do have.

I must say that there's nothing particularly sensible about doing this. It would be cheaper and much quicker to just buy an Accucraft coach. In any case I don't have anything W&L to go with it. It's just that it appeals to me get the kit built - to not let it go to waste. So I'll update my progress here. Hopefully I'll get a bit done over the next few days, but after that it won't be fast - too much else on.

For now, here's what I got in the kit.
View attachment 288178
View attachment 288179
View attachment 288180

And here is one of the bogies, ready to go...
View attachment 288181
I'm looking forward to watching your progress
 

ge_rik

British narrow gauge (esp. Southwold and W&LLR)
24 Oct 2009
10,701
1,244
Cheshire
www.riksrailway.blogspot.com
Best answers
0
Country flag
Looks like it will be a challenge given some of the key parts are missing. Looking forward to seeing how it goes.

Rik
 

maxi-model

UK/US/ROW steam narrow gauge railways 1:1
27 Oct 2009
5,673
661
Bucks/Oxon/Northants area
Best answers
0
Country flag
Silly thought. Have you thought of contacting Brandbright to see if the may have any "overs" from past production lying around ? I have been in the quick cure resin/white & etched metal kit business in the past myself. While parts are usually produced as "complete sets", if ordered from one of the contract suppliers out there (I bet I can guess who they used if they did that), it is inevitable that you will end up with odd "parts sets"through furnishing customers with the odd replacement part.

Just a thought and I know that Barndbright is rumored to be up for sale, so they may have other things on their mind. But then again it sounds you might enjoy the challenge. You certainly appear to have the skills and kit (vinyl (laser) cutter, 3D printer ?) to achieve a decent result. All the best with your endeavors. Max
 

jimmielx

45mm gauge track - approx 16mm scale (1:19)
24 Oct 2009
786
41
Hastings, UK
Country
United-Kingdom
Best answers
0
Country flag
Thanks chaps!
Max, for me part of the challenge of this build is going to be the figuring out and adapting to see what I get - I know, a bit crazy! But you're right, it would have been sensible to have contacted Brandbright in case they had any of the missing pieces... The range has shrunk recently and I saw on the news section that the current owner is seeking to sell. I do hope a buyer is found who can take it forward again - my VOR coach kits were excellent, even including decals.
I don't have a 3D printer or a laser cutter - one day. My vinyl cutter is intended for crafters to cut card and the like - but it will get through 15 thou plasticard, so it can be useful for detail parts. Its very simple and quick to use - not much trickier than a printer. I'm hopeful that I won't need any 3D parts because I've got all the white metal castings, but I have designed a few things in the past and had them printed by an online company.
 

jimmielx

45mm gauge track - approx 16mm scale (1:19)
24 Oct 2009
786
41
Hastings, UK
Country
United-Kingdom
Best answers
0
Country flag
Progress. I now have a basic chassis. And have figured a few things out.
I'm not going to model the tumble homes and will instead have flat sides. The sides with the kit would have been solid resin. I'll be making mine from wood, so straight sides will be very much simpler. So on the chassis I've cut in at the ends on either side where the balconies will go - this dimension from the balcony pieces which I do have and represents what I think would have been the width of the floor of the kit originally. The straight up sides should then fit exactly into the roof, which I also have.
Chassis on the rails to check the coupling height. Here is another major departure from the kit - my coupling system. To allow chain coupling of bogie vehicles on my tight LGB R2 curves I have a wide dumb buffer with a chain on a brass curved bar. Tried and tested and works very - well pull and push.
IMG_6928.jpg
IMG_6930.jpg
IMG_6931.jpg
 

jimmielx

45mm gauge track - approx 16mm scale (1:19)
24 Oct 2009
786
41
Hastings, UK
Country
United-Kingdom
Best answers
0
Country flag
I thought Brandbright only used wood
Paul, I thought so too, but this kit definitely has resin parts! I’ve got the resin roof and one end piece.
I think the kit is potentially quite old. It is PS24 - a number which they now give to a different model.

Here’s the start of the instructions which references the resin.
110F9812-9033-42A2-9BB7-297F83402820.jpeg
 

maxi-model

UK/US/ROW steam narrow gauge railways 1:1
27 Oct 2009
5,673
661
Bucks/Oxon/Northants area
Best answers
0
Country flag
I thought Brandbright only used wood
Somwhere in the dim distant past they might have but as the parts sheet says they are listed as molded resin. Products evolve and develop over time. Garden Railway Specialsts have used the material for many years in their coach kits, even used injection molded or vac formed styrene on some. Swift 16 make it a feature of it in their kits. Makes life a lot easier when modelling curves, both single and compound and where there is a lot of surface detail, for a builder if they are molded in some plastic or other. Having said that OcCre use a construction method with wood that allows fairly easy creation of "tumblehome" curvature using 0.5 mm ply over a 3 mm ply frame. But then they are quite a dated range.

The downside for a supplier is when using molded parts you need to be certain of a level of sales to amortise the cost of masters and molds, or cutting dies for that matter. Laser cutting and 3D printing only require the investment in the tooling - the data files to drive your production kit. The only "old school" (die) cut wood kit makers I can think now are Perfect World and Tenmille. Max
 
Last edited:

Paul M

Registered
25 Oct 2016
11,875
1,696
60
Royston
Best answers
0
Country flag
I stand corrected!
 

jimmielx

45mm gauge track - approx 16mm scale (1:19)
24 Oct 2009
786
41
Hastings, UK
Country
United-Kingdom
Best answers
0
Country flag
Some progress.
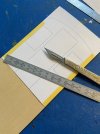
I’ve cut out the end and partition panels.
44B2FA5E-1F28-4BC0-869B-432E8D2920A0.jpeg
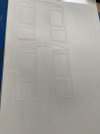
And printed out the plasticard panelling overlays on the vinyl cutter.
17150AF1-F314-40E2-BF02-7588C0AD186B.jpegHere’s the general effect of the two overlaid.
184FD4B9-8441-4756-98B9-71E26BA1FF67.jpeg
I’ve also got the side panels and overlays drawn up and ready to cut out.
 

dunnyrail

DOGS, Garden Railways, Steam Trains, Jive Dancing,
Staff member
GSC Moderator
25 Oct 2009
26,164
4,989
75
St.Neots Cambridgeshire UK
Best answers
0
Country flag
Some progress.
I’ve cut out the end and partition panels.
View attachment 288275
And printed out the plasticard panelling overlays on the vinyl cutter.
View attachment 288276Here’s the general effect of the two overlaid.
View attachment 288277
I’ve also got the side panels and overlays drawn up and ready to cut out.
Interested in the Vynil Cutter, was looking at the Cricut range in John Lewis last week and wondering. What software you using, the Cricut appeared to be Mac Compatible so that may work for me.
 

jimmielx

45mm gauge track - approx 16mm scale (1:19)
24 Oct 2009
786
41
Hastings, UK
Country
United-Kingdom
Best answers
0
Country flag
Hi Jon,
I've got a Silhouette Portrait 2 with the regular auto blade and a deep cut blade. It comes with Silhouette Studio software which allows you to draw and send to the machine. I'm on Mac too. I do usually draw the parts in a 2D CAD software (PowerCADD which is on it's way to becoming obsolete) as I've been using that in my work for some 20 years and am very accustomed to it. I then import the drawings into Silhouette Studio as a DXF which works well. No reason that I couldn't draw them directly in Silhouette Studio though.
I think the Cricut and Silhouette machines are much of a muchness. As I understand it both brands come with similar software and work much the same. The one I got was simply the cheapest and also quite small - working to about A4 size, the bigger machines do A3 size. I think some of the newest Cricut machines also have a more powerful cutting action, which may help them to get through thicker plasticard - . My experience on this, which seems to chime with what I've read, is that 0.010" (1/4mm) plasticard will easily cut right through with a couple of passes, so I use this for very fine pieces. 0.015" (1/3mm) plasticard will not quite cut through on my machine - I do about six passes and have to finish it off by either snapping the pieces out or going over the cuts with a scalpel. It will score thicker plasticard - up to 2mm will go through the machine, so you could then snap those pieces out.
I find mine very useful and am pleased that I got it. I do think that it's important to have expectation management though. I had ideas about getting it to cut thin wood and 1mm plasticard - things that might be more structural, but it just doesn't to do that - though it will score them. There's just a limit to the pressure on the blade and the the machines ability to pull it through tough material. However - it is as easy to use as a printer once you've got it setup and does allow very intricate shapes to be cut out - as long as you can draw them.
A useful technique if you were cutting out letters on a sign or making a painting mask from stick vinyl, is to cut out the shapes, then before removing the pieces from the cutting mat stick a piece of stick back plastic (transfer tape) over the top, remove the whole lot from the mat on the stick back plastic, carefully remove the unwanted pieces, then stick either the cut out shapes or the mask onto the final surface. Hope that makes some sense!
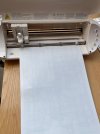
Here's my machine.
IMG_6985.jpg

And some things it's made.
The valance for this station building (15 thou plasticard)
IMG_6986.jpg

The silver window surround (probably 10 thou plasticard)
IMG_6987.jpg

These nameplates (10 thou plasticard letters and surround stuck onto another piece of plasticard using the transfer tape method) - this was tricky to get right...
IMG_6988.jpg

Masks which allowed me to paint the lettering onto the sides of my private owner wagons. (sticky vinyl masks applied to the model using the transfer tape method)
IMG_6990.jpg

Hope that helps!
James
 
  • Like
Reactions: 1 user

Madman

Registered
25 Oct 2009
17,136
2,950
Pennsylvania, USA
Best answers
0
Country flag
Nice work !
 

dunnyrail

DOGS, Garden Railways, Steam Trains, Jive Dancing,
Staff member
GSC Moderator
25 Oct 2009
26,164
4,989
75
St.Neots Cambridgeshire UK
Best answers
0
Country flag
Hi Jon,
I've got a Silhouette Portrait 2 with the regular auto blade and a deep cut blade. It comes with Silhouette Studio software which allows you to draw and send to the machine. I'm on Mac too. I do usually draw the parts in a 2D CAD software (PowerCADD which is on it's way to becoming obsolete) as I've been using that in my work for some 20 years and am very accustomed to it. I then import the drawings into Silhouette Studio as a DXF which works well. No reason that I couldn't draw them directly in Silhouette Studio though.
I think the Cricut and Silhouette machines are much of a muchness. As I understand it both brands come with similar software and work much the same. The one I got was simply the cheapest and also quite small - working to about A4 size, the bigger machines do A3 size. I think some of the newest Cricut machines also have a more powerful cutting action, which may help them to get through thicker plasticard - . My experience on this, which seems to chime with what I've read, is that 0.010" (1/4mm) plasticard will easily cut right through with a couple of passes, so I use this for very fine pieces. 0.015" (1/3mm) plasticard will not quite cut through on my machine - I do about six passes and have to finish it off by either snapping the pieces out or going over the cuts with a scalpel. It will score thicker plasticard - up to 2mm will go through the machine, so you could then snap those pieces out.
I find mine very useful and am pleased that I got it. I do think that it's important to have expectation management though. I had ideas about getting it to cut thin wood and 1mm plasticard - things that might be more structural, but it just doesn't to do that - though it will score them. There's just a limit to the pressure on the blade and the the machines ability to pull it through tough material. However - it is as easy to use as a printer once you've got it setup and does allow very intricate shapes to be cut out - as long as you can draw them.
A useful technique if you were cutting out letters on a sign or making a painting mask from stick vinyl, is to cut out the shapes, then before removing the pieces from the cutting mat stick a piece of stick back plastic (transfer tape) over the top, remove the whole lot from the mat on the stick back plastic, carefully remove the unwanted pieces, then stick either the cut out shapes or the mask onto the final surface. Hope that makes some sense!
Here's my machine.
View attachment 288537

And some things it's made.
The valance for this station building (15 thou plasticard)
View attachment 288538

The silver window surround (probably 10 thou plasticard)
View attachment 288539

These nameplates (10 thou plasticard letters and surround stuck onto another piece of plasticard using the transfer tape method) - this was tricky to get right...
View attachment 288540

Masks which allowed me to paint the lettering onto the sides of my private owner wagons. (sticky vinyl masks applied to the model using the transfer tape method)
View attachment 288541

Hope that helps!
James
James many thanks for the explanation yes that helps a great deal. I have had a little bit of experience with Vinyl cutting as I worked for a Builders Merchant that had a massive cutter to do Tea and Rugby Shirts. Never worked out why they went into that as none of the family that ran the business were in the slightest bit PC savy which I think is why they got me in board for a while.

I now fully understand the concept of lettering using that method and do like using that for doing PO painting as well. I think that will work nicely with the double spray then third spray technique that I and others here use for multiple colours. You do an initial colour spray of body colour, mask or in your case do the fake vinyl leaving the letters out. Spray again with the body colour which helps seal the joins so that the letter (or different) colour when eventually sprayed does not bleed through. Plenty of dry time between each job though!
 

Rhinochugger

Retired Oik
27 Oct 2009
36,708
4,240
North West Norfolk
Best answers
0
Country flag
I thought Brandbright only used wood
No, some early Brandbright coaches were resin. I think they also did a Cambletown and Macrihanish coach, but they didn't reproduce the prototypical 'sag' in the middle :D:D although the leading coach is looking pretty straight in this photo.

1628169499760.png
 

3 minutes of fame

3d printing, electronics and trams
14 Dec 2020
574
154
Lincolnshire
www.mgnr.uk
Best answers
0
Country flag
Hmm.. might need to dust off the vinyl cutter! It's possible that the laser cutter can do something similar, but not tried really thin materials as yet.

Thanks for the tips!
 

jimmielx

45mm gauge track - approx 16mm scale (1:19)
24 Oct 2009
786
41
Hastings, UK
Country
United-Kingdom
Best answers
0
Country flag
Progress is being made again after a couple of weeks off.

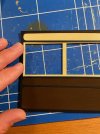
I have made the side panels - a 3 layer sandwich: outer, glazing, inner.

I had intended just to do the black layer of panelling...
IMG_7151.jpg
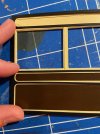
but offering it up it just didn't look right, so I'm adding the additional cream layer beneath.
IMG_7152.jpg

Another sent of prints on the vinyl cutter.

Because of the layering and glazing, I've had to paint as I go rather than at the end. It all certainly need some touching up round the edges once assembled, but will produce a better result in the long run.

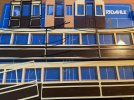
I'm currently in the process of sticking the panelling layers on with super glue - the 'slow' grab stuff, which offers about 10 seconds of wriggling. I was a bit worried about this bit, but so far so good.

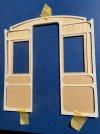
The only parts from the kit in the picture below are the centre door (squared top, I think not correct) and the perspex for the glazing.

IMG_7155.jpg

Next will probably be back to the chassis and I think the under frame. But I do also have to fit the window frames which are white metal parts from the kit. Plenty left to do!