Tunnels

gamecoder.nz

Registered
Country flag
Hi everyone,

What is your method for building tunnels? I don't like the pipe method. The paver method seems good but then I would have to mortar the bits together, which is beyond my skills, or leave them loose which I worry about it falling over. I was thinking treated timber.
 
Hi everyone,

What is your method for building tunnels? I don't like the pipe method. The paver method seems good but then I would have to mortar the bits together, which is beyond my skills, or leave them loose which I worry about it falling over. I was thinking treated timber.
Depends on the situation really. What is the tunnel for?
 
Treated timber could be an idea but recycled decking plastic timbers would be a better bet if earth is to be in constant contact with the tunel. Another thing to remember that the length should not be more than the combined reach of your arms at each end of said tunnel, things hide in tunnels causing potential derailments.
 
I used hardboard formers, then covered with concrete, formers left in place, and will rot away in time.
 
Do you have termites in NZ?
I would avoid wood, if you do..
You can make a tunnel longer than arms length x two, but need an access point(s) just in case..

Are there any 'nasties' like on the bigger island north of you?
You don't want slitherin' beasties suddenly appearing.

Here in the UK, our biggest problems are leaves, cobwebs, and cats.. :giggle:

Keep track through a tunnel straight and level. Fix the track at the entrances. - If a curve moves due to expansion, stock can clip the tunnel entrance.

PhilP.
 
The paver method seems good but then I would have to mortar the bits together,
An alternative to mortar would be to use a 'builders' type of adhesive from a cartridge to hold any blocks and slabs in position. Gravity and friction alone work well without making it more complicated and hard work by mixing cement.

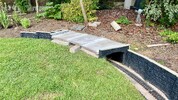
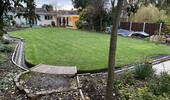
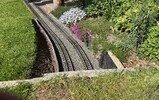
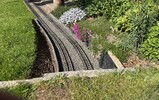
I use building blocks and paving slabs as seen here when I widened the single track tunnel to a double track, no mortar used-

IMG_20200312_162452282.jpg
Because the tunnel is on a curve I had to use an angle grinder with a diamond blade to cut the roof slabs to size.
The side blocks that form the tunnel walls are merely placed on the ground, slightly embedded and a paving slab used as a base for the track. I made sure that the ground for the side blocks is consolidated by pounding with an old fence post and adding stones to obtain the correct height for the new track bed.

If you zoom in you will see that I used aluminium tubes into the tops of the side blocks to stop them from being pushed inwards by the soil. I regard the soil in my garden as a very thick liquid that always wants to flow sideways and downwards. The slabs on top are bedded on some 'builders' adhesive but I added the tubes as an extra precaution while the adhesive sets.

I have always avoided the use of concrete or mortar for my railway because it adds a permanence that restricts changes and dismantling when the time comes.
In the case of this tunnel, changing from a single to a double width was straightforward because no concrete or mortar was used.

AL

IMG_20200323_164533115.jpg
IMG_20200630_174629002_HDR.jpg
 
Hi folks,

As well as the 9 inch clay water-pipe method I have used the upturned 'deep plastic trough planter' method. This involves cutting the ends off a large oblong planter, digging a trench, laying a level tunnel invert (concrete), screwing down the track, setting the upturned planter in the trench, checking clearances for the train, then covering in a layer of concrete (50 mm?), and then soil and grass. It's a bit of a faff. The plastic planter can stay in place as long as it hasn't deformed during the process.
 
An alternative to mortar would be to use a 'builders' type of adhesive from a cartridge to hold any blocks and slabs in position. Gravity and friction alone work well without making it more complicated and hard work by mixing cement.

I use building blocks and paving slabs as seen here when I widened the single track tunnel to a double track, no mortar used-

View attachment 349495
Because the tunnel is on a curve I had to use an angle grinder with a diamond blade to cut the roof slabs to size.
The side blocks that form the tunnel walls are merely placed on the ground, slightly embedded and a paving slab used as a base for the track. I made sure that the ground for the side blocks is consolidated by pounding with an old fence post and adding stones to obtain the correct height for the new track bed.

If you zoom in you will see that I used aluminium tubes into the tops of the side blocks to stop them from being pushed inwards by the soil. I regard the soil in my garden as a very thick liquid that always wants to flow sideways and downwards. The slabs on top are bedded on some 'builders' adhesive but I added the tubes as an extra precaution while the adhesive sets.

I have always avoided the use of concrete or mortar for my railway because it adds a permanence that restricts changes and dismantling when the time comes.
In the case of this tunnel, changing from a single to a double width was straightforward because no concrete or mortar was used.

AL

View attachment 349496
View attachment 349498

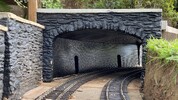
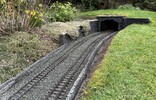
This cutting looks fantastic!!
 
An alternative to mortar would be to use a 'builders' type of adhesive from a cartridge to hold any blocks and slabs in position. Gravity and friction alone work well without making it more complicated and hard work by mixing cement.

I use building blocks and paving slabs as seen here when I widened the single track tunnel to a double track, no mortar used-

View attachment 349495
Because the tunnel is on a curve I had to use an angle grinder with a diamond blade to cut the roof slabs to size.
The side blocks that form the tunnel walls are merely placed on the ground, slightly embedded and a paving slab used as a base for the track. I made sure that the ground for the side blocks is consolidated by pounding with an old fence post and adding stones to obtain the correct height for the new track bed.

If you zoom in you will see that I used aluminium tubes into the tops of the side blocks to stop them from being pushed inwards by the soil. I regard the soil in my garden as a very thick liquid that always wants to flow sideways and downwards. The slabs on top are bedded on some 'builders' adhesive but I added the tubes as an extra precaution while the adhesive sets.

I have always avoided the use of concrete or mortar for my railway because it adds a permanence that restricts changes and dismantling when the time comes.
In the case of this tunnel, changing from a single to a double width was straightforward because no concrete or mortar was used.

AL

View attachment 349496
View attachment 349498
Thank you so much for your detailed explanation. This is the route I will go
 
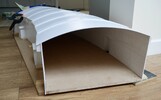
I took a rather unconventional approach when I made the tunnel on the Wychbold and Stoke Prior Railway. I made it out of foam board.
P1070023.JPG

This allowed me to add details, including refuges.
p1070024-jpg.349511


Once I had positioned it in the garden I poured concrete around it and cut slabs to form a solid base to walk on.
IMG_0355.jpeg

A view looking through the tunnel.
IMG_0354.jpeg

Looking down the garden.
IMG_0757.jpeg

The tunnel now carries a grassy path
IMG_5160.JPG

A view from on top of the tunnel.
img_5348-jpg.349517


The tunnel was constructed in 2001. The last couple of pictures were taken this year. As it carries a path to the top of the garden it is walked over most days and so far it has held up well.
 

Attachments

  • IMG_5348.JPG
    IMG_5348.JPG
    1.1 MB · Views: 0
  • P1070024.JPG
    P1070024.JPG
    272.3 KB · Views: 26
  • IMG_5348.JPG
    IMG_5348.JPG
    1.1 MB · Views: 30
Hi everyone,

What is your method for building tunnels? I don't like the pipe method. The paver method seems good but then I would have to mortar the bits together, which is beyond my skills, or leave them loose which I worry about it falling over. I was thinking treated timber.
Tunnel, Portal, Wings- & Cribbing Design & Construction

Every Garden Railroad Needs a Tunnel! Ours is based on classic American wood timber tunnels. It’s a fancy design with portals, wing abutments, and log cribbing for the roadbed. Real log timber frames line the inside, attached to a durable hollow rectangular tube made of strong rot-proof composite decking material. Buried sturdy foundations supported the entire assembled structure above ground before we added the mountain. It even has interior incandescent lights in the ceiling.

Roadbed cribbing just outside of the tunnel has wood logs stacked like a log cabin. The cribbing was filled with rocks bigger than the ¾” gaps between the logs. The ballasted roadbed sits on top of the rocks. There are five Sub-Assemblies that make up the Full Tunnel Assembly: The Tunnel, The Portal, The two Wing abutments, and the Cribbing. All of these have their own buried foundations except the portals which do not need it because they’re screwed firmly into the end of tunnel. They are joined on-site in the railroad before we added the mountain.

Everything is made from redwood and composite wood for decking. Wood rots or gets eaten by termites when touching soil. I designed this so real wood does not touch any soil. All soil contact is with the rot-proof composite wood or silicone asphalt sealer. The tunnel is 14 years old and still looks perfect- even better than new I think!

Feel free to copy, use or modify any of the images and video shorts you see here. I hope this video shines a light at the end of your tunnel project. Good luck with yours! Thanks for watching, John Carmichael

See Other Projects at Cholla Patch Garden Railroad Design & Construction Series:
Cholla Patch Garden Railroad Design & Construction Series
 
Back
Top Bottom