Sundry Battery Conversions. Swiftsixteen Railcar Railbus battery fit Piko 35008, IP Jessie fit. LGB 2092 Fosworks. Piko class 80 Also Piko 35008

dunnyrail

DOGS, Garden Railways, Steam Trains, Jive Dancing,
Staff member
GSC Moderator
25 Oct 2009
26,076
4,976
75
St.Neots Cambridgeshire UK
Best answers
0
Country flag
There was a thread about these some time back.
I have had a sort of long time longing for one but never got round to buying one before they went off the market for a while.
They appear to be available again, though may never have been unavaiable!

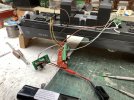
I got mine through an add in the 16mm Journal, built at a good knock down price. As it had a Plane type of RC I asked for that to not be included also the speed control which was not the sort that I like. So when the beast arrived I put it on the track and had a good look.
254E85A8-3359-44B0-A1F6-6B3889705515.jpeg
Hm tricky to fit RC without filling the compartments. Also not having built the kit I am u sure of the parts makeup, certainly theH roof was well attached and possibly moulded in 1 part with the front and sides.
EDIT just looked at the instructions and yes the body os a 1 part mould.
Thus it sat on the workbench while the Flexicity Tram was being faffed about with.
649866F6-2975-413C-8A28-4B6817F95782.jpeg
Much thought was to be involved with fitting a MLS Sould Unit and Rx n Speed Control.

To be continued….
 

dunnyrail

DOGS, Garden Railways, Steam Trains, Jive Dancing,
Staff member
GSC Moderator
25 Oct 2009
26,076
4,976
75
St.Neots Cambridgeshire UK
Best answers
0
Country flag
Fitting the various bits looked like a real problem, but Swift suggests putting it all in the roof. Good idea but not quite so easy when the floors have been inserted. So I decided to cut out the footwells at the entrance, glue some plasticard between the seat bottoms and rest the the boards there.

As in my request about the capacitors I decided to not fit them and having rewired the motor run the wires (black of course) under the seats to the boards.

I elected to use the Piko 35040 Tx/Rx and combined speed controller as this gave 1 board less to fit from my normal Viper, Fosworks Rx and MLS Sound Card. Below you can see how the Stikalite T shaped battery fits, the 2 footwells to be removed are either side of it. I have fitted the latest incarnation of the MLS My Loco Sound Universal Railcar board in the beast. As the Piko can only call 2 sounds I have gone for a Claxon and the Bell. These are what gets used most on my line. The sound starts up automatically with a slight press on one of the direction buttons.
6BC96CCB-C9F3-42A1-B687-854C8FDD783E.jpeg
Here I have shoved all the boards in place and mounted the switch and charging socket on the side. I could have mounted them on the plate that goes on top of all the wiring but that makes things less accesible. A slop of paint and some heatshrink on the switch looses these parts somewhat.
05C5E62C-5E60-4D31-9C7B-FEFD3A083DA8.jpeg
D26B1775-BB1E-4891-B294-C9E28DA5E997.jpeg
Last job was to fashion some couplings. Fortunately the existing buffer matched LGB stock nicely so some wire was bent up and drilled to fit below. Now the RC can drag the odd wagon or two. As it only has one power bogie I am not sure that it will be able to drag a standard consist about, but that will need to be tested at some time.

That droopy buffer will need to be attended to, the other end is not so bad.
75B59630-8F71-468C-A4CA-4C5F37CA82C7.jpeg
I need to decide what number it is to have and loose the destinations from the previous owner. As the RC will traverse the complete line specific stations are not appropriate. I think it may end up with Sonderzug (special train) as a compromise. Oh and possibly an extra pipe at each end as well.
 

dunnyrail

DOGS, Garden Railways, Steam Trains, Jive Dancing,
Staff member
GSC Moderator
25 Oct 2009
26,076
4,976
75
St.Neots Cambridgeshire UK
Best answers
0
Country flag
The final jobs have now been done to the Railcar. First was to modify the couplings droop, this was undertaken by superglueing a small piece of suitably a sized, depth of plasticard below the arm. Result can be seen below. Arm still is movable.
834D3F44-1983-4D2C-B06D-593CC9EB91F2.jpeg
Then the numbering and sundry other items of identification were printed on my usual sticky paper. As my Lazer printer is now deceased I am using printer ink in my Epson that needs a quick spray of UV protection. You can in the pictures see some derisory weathering intended to capture lack of cleaning on the lower half in an Automated washer, or perhaps the worse effects on the lower body of brake dust and other carp that gets onto trains in service. Oh in case you are wondering the yellow on the front window shows the 1 end, this means I plonked the car on the track the wrong way round for this photo shoot.
62612572-692B-4A6D-AD43-B66581DE9B8D.jpeg228F317A-F92F-44C8-8AF0-9A8250FE93C9.jpegE69FABDD-6699-4F5B-A767-80EC96477D4A.jpeg
Finally a further away shot with the recently completed open wagon bash.
5A7254E4-2456-4640-9E82-BB246C5BCC6C.jpeg
I do rather like these SwiftSixteen Railcars and am very pleased that the original buyer chose my preferred livery.
.
 

dunnyrail

DOGS, Garden Railways, Steam Trains, Jive Dancing,
Staff member
GSC Moderator
25 Oct 2009
26,076
4,976
75
St.Neots Cambridgeshire UK
Best answers
0
Country flag
I finally managed to have a good 2 hour running session with the RC and Railcar today. A few points of interest, I have found good and not so good with the Piko RC. It may of course only be the Railcar motor but the fine control from the Piko RC is a bit iffy. The last press from moving to stop is a bit of a jump down in speed to stop. This makes shunting a bit of a trial. Also having 2 buttons that do both direction then accelerate/decelerate, the other then does slow down takes some getting used to. You need to remember which one is say forwards the use the other to slow but reverse that process when going the other way. Just I guess trickier for an oldie. But it works and I have to say quite well.

I also took the opportunity to test out the Railcar haulage capability, much to my surprise in managed my reference train of 24 axles up the grade seen in the background, 1:48 on. 4ft radius curve. I never expected that with just 1 motor bogie, but the Railcar body is quite heavy so result.
0C16C3E2-2E49-4A29-974B-38C2E2CA3FB8.jpeg
 

dunnyrail

DOGS, Garden Railways, Steam Trains, Jive Dancing,
Staff member
GSC Moderator
25 Oct 2009
26,076
4,976
75
St.Neots Cambridgeshire UK
Best answers
0
Country flag
Another Piko 35040 fit to an IP Engineering Jessie kit built loco.

Back this Autumn I was asked by a friend in Somerset (his 32mm gauge line featured in Mini Mike’s adventures) if I could RC his IP loco. It was fitted with 6AA cells and had to have the bonnet removed every time they were changed. So I brought it St.Neots and pondered for a while. Removing the Bonnet it became clear that the Piko Rx would not fit in the bonnet with the revised 9 cell batter pack I was planning to install. So a bit of revised thinking decided that the cab roof may be the place. A false bendy under belly to the cab roof out of 20thou plasticard with holes for the roof screws worked out nicely. Plus joy of joys the RC worked to perfection with no hole for the Rx as the reception was perfect. I tested this all out using existing batteries and kit that I had to hand so sent off orders as follows:-
£67.48 Piko 35040 x Tooslots including post
£27.00 9 cell AA battery pack x fosworks
£9.50 Fosworks wiring loom includes on/off switch, charge socket and plugs for battery pack and to controller

Caveat to these costs, one would need to add post from fosworks and a plug from the wiring loom to Piko plus some wire oh and a Smartcharger unless you have one, but it may not have a compatible plug to the wiring loom. Pics below show how it all goes together.

Below showing the original pack in place and testing out the Rx in the roof with my test chassis.
D4965418-48CD-4162-8801-70336E88C67E.jpeg
Showing the RX wiring, pink and black x battery, 2 x black x motor (red sheaf to left wire socket so that up button is forwards) yellow to front light, orange common + for light. Rear light would go between those 2 and both would work according to direction. The light is on so long as power is on with this setup.
DEC63C47-D854-4D26-A9D9-13252C4D672E.jpeg
A few views showing how well the Rx is hidden in the roof.
80798D73-6F53-4419-BD62-97A3DD857834.jpeg78260B20-B40C-4634-B929-C721EDB7C9B4.jpeg
2E63C1E7-D0B1-40CE-BC8E-38D003557E99.jpeg
This view shows the setup prior to installing or rebuilding the loco, note the battery and fuse pack is still loose. A Peco PL-37 Cable Clip keeps the wires neat in the cab heading towards the Rx in the roof.E9E0088F-C3CE-4FC9-B7D8-A332B9091686.jpeg
Underneath things a bit busy. On/off switch to the left, i do not favor sliders myself but as it had sliders when delivered I decided to use a Fosworks loom thus fitted. Charging socket to new hole to the right. The red plug to the right extends the battery cable to the bonnet which was a little short. The black RC type plug to left goes to the Rx (power in) with the loom I bought. E2CC43BD-5374-4852-AA70-791F1C841D79.jpegFinall showing how the Battery Pack is held in place in the bonnet using some butyl liner held in place with some 8 ba screws tapped into the footplate within the bonnet. The Rad has been altered from a glue fit to an interference one to facilitate ease of access to light, battery but most important the fuse. I did this by cleaning off the horrible glue used to fit it and superglueing some thin plasticard to give the tight fit required.9EC610E8-146C-4EC3-ACAB-426D7B6470F7.jpeg
I am quite pleased with how this installation turned out, I tidied up the wiring plus made things so that they can be changed with relative ease. The LED had its original resistance fitted and a blocking diode the other side for if a replacement bulb was wired in the wrong way it would not get trashed.
 

dunnyrail

DOGS, Garden Railways, Steam Trains, Jive Dancing,
Staff member
GSC Moderator
25 Oct 2009
26,076
4,976
75
St.Neots Cambridgeshire UK
Best answers
0
Country flag
My latest conversion has been to an LGB 2062 0-6-0 Diesel for casey jones snr casey jones snr of this parish. It looked like it had had a hard life, Casey had removed the coupling rods and new Axle Guards fitted. Not sure if the blue paint is an original but the book picture shows it as blue, certainly the PR and 400 numbers have been added at some stage. Seen almost complete Note the missing Axle Guard.D4510CD8-25B4-4A90-BC5D-D532CB343756.jpeg
Getting this apart was a bit of a task, never having had contact with one of these before. The LGB breakdown as ever only somewhat of use. Having undone all the visible underneath body screws the too was still reluctant to come off, superglued footsteps at the rear end did not help but there wapere clearly some screws in the muddle holding up proceedings. This turned out to be 2 more screws (one each side) in the middle. Only accessible by removing the cente wheel as shown in red below. Here you can see the replacement Brass axle guard prior to painting.
C5A3C74C-DFCA-4905-B291-E50B60608219.jpeg
As this is a 3 pin jobby I sort ofvexpected a full pull apart, but removing the plungers and pickups with a power test to the Brown and Green wires on the board revealed ok running with lights working as well making this a pretty easy job. Paul did not want sound so that made things easier as well. Parts came to just over £200 sovs so this may sound a lot of money, but the Fosworks Tx-4.10R accounted for as good as half the amount. The Tx will take another 9 locomotives making additions to the Fosworks Battery fleet much cheeper. A Smart Charger was in hand at the CFR to help with costs. Below you can see the on/off switch and charge socket. Much midnight oil was expended trying to work out their best position. One of the Air Cylinders was cut down to facilitate access here. This can be seen in the picture above.777F430F-ACB0-4912-A7AC-540D8BEB9E48.jpeg
Test fit of the 12AA cell pack, wiring loom, Rx and sped controller x Fosworks below.
D513D1EC-21C3-4B6C-AECA-A8FA889C409D.jpegBelow you can see the wires x the chassis leading to the venerable or veteran if you like original LGB circuit board, now at least 25 years young.
54B81A8D-F526-4B95-B80C-679698B534E9.jpeg
Getting the wires from the swith and charge socket to the bonnet was facilitated by cutting some plastic from the cab interior detail and routing as shown below.
2EA2361A-C3F7-42AC-85A6-F986492C5253.jpeg
The driver and his seat temporarily removed. The plasticard scraps to the right were for a desk to disguise the wires.
CFB0ED04-E8F0-4AB2-B8C7-247A4D6519D1.jpeg
A0B63A6E-F314-4700-91BA-49AB98A79AA6.jpeg
A bit of wood was screwed into the body where the Chimney is, this enable fitting a Cable Tie to hold the battery in place.
18F06B4C-85B7-4A68-A5AA-8FFF42CDA04D.jpeg
Below I have arrowed where the power wires x the speed controller will be wired in.
76A5335B-AD53-43F0-AC9C-58D41102C1D6.jpeg
The Rx and Speed Controller plus sundry wires could be routed either side of the battery. If you look closely at the LGB board you can see where I will connect the 2 power wires to the White and Briwn connections. I routed these via a Choc Block to make change easier if I wired them up wrong way round to the Tx Forward/Rear orientation. I got it right first time!
8A237899-0B57-44C5-9352-9A241FE1E0CF.jpeg
 
  • Like
Reactions: 1 user

dunnyrail

DOGS, Garden Railways, Steam Trains, Jive Dancing,
Staff member
GSC Moderator
25 Oct 2009
26,076
4,976
75
St.Neots Cambridgeshire UK
Best answers
0
Country flag
Sorry for some of the spelling foul ups above. Making a big first thread with lots of pictures sometimes makes editing after a post impossible. Sure you will be able to make out what was meant.

Final couple of pics on the DR at Magdesprung to test out running on a fine day. Will not take any speed record cups, speed in the scale 23-27km bracket. Just awaiting collection now.
0882A228-C564-4B70-A82C-FCAF43DC2514.jpegC0FEF1F0-BBAA-4754-B2D1-BA622B72318A.jpeg
PS the fat controller approved of the sedate well controlled running of the beast. Hope Paul does.
 
  • Like
Reactions: 1 user

dunnyrail

DOGS, Garden Railways, Steam Trains, Jive Dancing,
Staff member
GSC Moderator
25 Oct 2009
26,076
4,976
75
St.Neots Cambridgeshire UK
Best answers
0
Country flag
Ok latest one in this saga completed today is a Piko class 80 0-6-0 tank engine. Quite an oldie with the horrible early wheels so a good candidate for Batteryfication. I was asked to do tgis by Paul palstig palstig late last year and have been delaying the job till now due to a battery issue that I will not dwell upon.

So this has a Piko RC 35008 unit in. A simple enough job except for the pull apart issues related here:-
https://www.gscalecentral.net/threa...rt-sorted-but-what-a-pain.319481/#post-690817
but once sorted the fit was quite simple, the batteries are Fosworks 8xAA pack in a 4 square by 2 long format, giving 2100 mAh they should be ample for this uncomplicated loco even with lights. There is not even a circuit board inside. There was a spare sort of plug unconnected to anything, I think this may have been to feed Track Power to a Smoke Unit if one fitted. This on test turned out to be ideal for supply of power to the motor with only connections from this to the Rx. You can see this below with the 2 wires that were to be soldered to a couple of wires from the Rx, shown pink in the next picture. Once the loco was bench tested red heat shrink was placed over the joins. That next picture shows the Fosworks plug and play setup Wiring Loom which includes the On/Off Switch, Charge Socket plus plugs for. Attery and Power to the Rx.
C48FB5B3-568D-4962-961A-ACA83932AFAF.jpeg
6E83300A-3F37-4C46-BECE-AD10CE09940C.jpeg
To fit the batteries some bodgelling was required to remove the Weight Holder, the weight has had to be sacrificed but the batteries + Rx do make up some of the loss. On a small line like Paul’s I don't think that will be an issue.
EFEDB9E2-DD78-435E-B70A-6397B703F322.jpeg
Here I have fitted the second battery holder (a cut off of an old tyre inner tube) and am pondering the fit back of boiler and cab. Charge Socket and Switch also located beneath the cab. The fuse and plugs will be in this tank side that onle needs 2 screws removing to access them.94C35914-C2C0-4F4A-B358-56DF5689C7E8.jpeg
6D6CD38E-ED38-4BDB-BD01-B52C39D23296.jpeg
Boiler temporary fit showed some bodging of boiler to fit the wires and battery holding bodge. None of this will be seen once the Tanks are in place.
C3EBED61-0198-49CF-89BD-7CD9067968A4.jpeg
Showing the effect of loosing most of the wires once the Tank is removed. A small cutout front of the cab also required for wire fitting.
F7CF488E-2A76-454A-9421-E789AE33AB68.jpeg
The beast is having the battery charged just now so tomorrows work will be removal of pickups and hopefully that will be done ready for Paul to collect.
 

dunnyrail

DOGS, Garden Railways, Steam Trains, Jive Dancing,
Staff member
GSC Moderator
25 Oct 2009
26,076
4,976
75
St.Neots Cambridgeshire UK
Best answers
0
Country flag
Ok so after battery charge final job was to remove the pickups and ensure the wheels are all correctly quartered.

In the first pic you can see that one sides pickups and connections have been removed to be followed by the other side. You can also see the nasty non plated wheels that Piko used on their early models, unless you are going to battery up an early one if offered second hand I would not recommend it as a good buy. Newer ones with nice shiny plated wheels are fine. DBEA649C-1CA6-4D5A-8791-368CB7146EA6.jpeg
This second pic shows the wheels as correctly quartered.
BBB49816-9AA1-4075-9509-70B31859EFBF.jpeg
Final job a loaded test run to see if the weight is ok. If not I will pack some in the side tanks, this will likely be some sort of metal held in place with car body filler. I have the weight of the battery and weight that it replaced so will be able to get a close approximation if required.
 

dunnyrail

DOGS, Garden Railways, Steam Trains, Jive Dancing,
Staff member
GSC Moderator
25 Oct 2009
26,076
4,976
75
St.Neots Cambridgeshire UK
Best answers
0
Country flag
So sun was shining for a while so decided to do the test with the Ruschbahn Fuel Train of 14 axles up my steepest grade which is around 1:30 on a 4ft radius curve so a decent challenge of haulage. Happy to report all went well with that so ready for collection when Paul palstig palstig is ready.
FBA7F104-FF61-4B6F-ACEC-AC7DB6C63DAE.jpeg
Prior to run-round to return train to low level storage yard in the shed.
9697D01C-B37C-401E-8754-A4A69B085C32.jpeg
Of course the guests Lottie and Toby were required to give their approval also.
429EE4BC-C209-41EE-8AA3-396DFC7E16B6.jpeg
 
Last edited:

palstig

Registered
12 Sep 2016
381
41
57
Rushden
Best answers
0
Country flag
I just wanted to say a big thank you to Jon Dunnyrail for converting my Piko BR 80 to battery remote control power, and for posting pics of the conversion work involved. I'm very pleased with how well it runs consistently at slow speed. As Jon has mentioned, it has had one weight removed to allow for the battery pack, but as the battery pack itself is heavy there has only been a small loss in weight with little impact on its haulage capabilities. The loco can be used all year round without me having to get down on my hands and knees (except doing so for my wife LOL). I shall be testing and recording it's battery time and reporting back in the next week or so.

Regards,

Paul :)
 

dunnyrail

DOGS, Garden Railways, Steam Trains, Jive Dancing,
Staff member
GSC Moderator
25 Oct 2009
26,076
4,976
75
St.Neots Cambridgeshire UK
Best answers
0
Country flag
NOTE others in the forum have done sundry superb things with these super little locomotives including repaints, sizing up and battery conversions.
EDIT SOME LINKS TO OTHER PROJECTS
My Railcar Conversion:-
Jimmy’s Battery Conversion:-
Mike’s big up bash:-

This is my take on the loco.

During sundry other battery conversions my Playmobil 4010 Swiss Style loco has had a job done to it. This one was bought cheep from Ebay as a ‘spare or repair’ job. The main point for me was that the bodywork was good as I intended to put new power bogies in, this loco will be expected to work for a living and the single bogied plastic wheeled chassis did not cut the mustard for me. Thus I visited GRS to get a couple of USA Trains bogies.
This would mean some serious revisions for how the bogies would fit, but I have done this before with 2 of my Railcars so was not unduly phased by the job. For Radio I elected to use a Piko 35040 Radio Control system, though this will only be able to utilise 2 of the My Loco Sound additional sounds, this was fine by me. Fosworks batteries and wiring loom complete the consumables, oh plus nuts n bolts of BA size and some metal.

EDIT I only used the Piko unit for testing the bogies.

The bogies were fitted by my normal method for these, utilising screw holes at each end of 1 bogie for a left/right flop and new holes drilled central for 8ba screws on the other bogie for a forwards/backwards flop. Theses were mounted on u shaped formers converted from lengths of 8x1mm nickel silver strip. This has sundry holes drilled for the fitting screws together with a hole for the central bogie pivot. These utilised 6ba nuts and bolts threded through a glued piece of wood on the chassis to block the bogies down to an acceptable operating depth. Lock nuts secured the assembles to the inside of the cab.
3F1BA4F2-6A6A-40C3-B490-A2CC999DBD5F.jpeg52CE96DB-33E7-4A9C-A203-AB4C79E413F7.jpeg
With the bogies fitted and tested it was now time for battery fit. The ideal place was the centre of the loco where some metal weights lived, these have been removed to fit the batteries. Below you can see my test setup utilising old batteries prior to an order to Fosworks for the made up packs. As you can see the 2 sets of 6x2 AA’s nicely fit meaning the the original screws can hold the body in place.
F917CC8C-0680-4DF7-980E-F5CA392549CB.jpeg6B951B8B-A9F6-4B1F-B73E-BAE94FB9CFC2.jpeg
This view shows a high level view with the original lighting loom in place, though I used the lamps I elected not to use the circuit board. Also you can see the test setup of the Piko Rx with a spare battery for testing out the bogies. I used the switch only for this test as my normal choice gpfor battery setups is a Fosworks wiring loom that includes both on/off switch but also a charging socket plus easy plug and play setup for battery and wire feed.
0997E997-859A-4379-A7AD-4538CCCFA11A.jpeg375A12C7-670D-4305-A1B0-95A99CAC32C4.jpeg
Here I am butchering the original bogies to steal the couplings for use on the loco. The cutout section will be screwed to the front of the chassis at the suitable height.

Final pic shows the 2 butchered bogies, I ypthink the motor may work but possibly not the RC. Probably now located in the loft somewhere.
8A3A1F3D-1BED-470E-AF2B-E8D1DF38E990.jpeg6769CBDC-F210-44D8-9983-CBC9ADCD94B2.jpeg
More soon.
 
Last edited:

dunnyrail

DOGS, Garden Railways, Steam Trains, Jive Dancing,
Staff member
GSC Moderator
25 Oct 2009
26,076
4,976
75
St.Neots Cambridgeshire UK
Best answers
0
Country flag
I have updated the first post with some links to other bashes to the 4010, these may help others that want to butcher these locomotives in some way or other. There is another thread with lots of reprints that I have not unearthed as yet.
 

dunnyrail

DOGS, Garden Railways, Steam Trains, Jive Dancing,
Staff member
GSC Moderator
25 Oct 2009
26,076
4,976
75
St.Neots Cambridgeshire UK
Best answers
0
Country flag
I had intended to use the PM circuit board for the lights, but somewhere along the way this went belly up.
E1919DA2-28C0-4961-991C-5B5D086CFDCD.jpeg
So I wired the lights via a screw in chock block as seen below. I did not bother to make them directional, they all come on together. This and the Fosworks wiring loom made things a bit simpler and tidy for this installation, luckily there was soace behind the cab for all of this.
391E6556-0D61-431A-B0DA-B0EFDC7E0433.jpeg
At some stage I elected to change from Piko to Fosworks Rx Speed Controller and a My Loco Sound card. This all fitted nicely the other end. Red plugs are the Fosworks wiring loom. Note I changed from using the Piko setup, I have Edited the earlier post to reflect this.
C7FB780A-1290-4E7B-B2B8-C81D1F77BA1E.jpeg
Looks a bit busy with the wires but all threads nicely into the body, the original wire holding and Peco PL37 Wire Holders keep things together well enough.
96CC740C-4686-4675-A3EB-2250F5458738.jpeg
 

Attachments

  • 257A77BD-071C-45C0-8EF9-9789B78CDEED.jpeg
    257A77BD-071C-45C0-8EF9-9789B78CDEED.jpeg
    691.3 KB · Views: 0

JimmyB

Now retired - trains and fishing
23 Feb 2018
6,891
910
69
Weston-super-Mare
www.tumble-down-falls.co.uk
Best answers
0
Country flag
dunnyrail dunnyrail not to anything away from your conversion, I did use the playmobil lighting board, and also li-Ion batteries in my conversion:


dunnyrail

DOGS, Garden Railways, Steam Trains, Jive Dancing,
Staff member
GSC Moderator
25 Oct 2009
26,076
4,976
75
St.Neots Cambridgeshire UK
Best answers
0
Country flag
dunnyrail dunnyrail not to anything away from your conversion, I did use the playmobil lighting board, and also li-Ion batteries in my conversion:

Yes somehow in my attempts to wire the lighting board in it got trashed somehow. Not the normal thing for me to screw up a simple wiring job like that but as they say sxxt happens. And yes we do have different views about battery technology.
 

dunnyrail

DOGS, Garden Railways, Steam Trains, Jive Dancing,
Staff member
GSC Moderator
25 Oct 2009
26,076
4,976
75
St.Neots Cambridgeshire UK
Best answers
0
Country flag
Been getting behind on this job reports in here, it has been completed for a month or so now. Othet jobs getting in the way, I still need to take a picture completed out on the line.

This shows how I have wired in the lights to the chock strip with the. Working. Both end will be lit at this time.
79474D1E-D714-4553-813C-B86D2453F891.jpeg
Here you can see how the MLS ans Fosworks Rx together with Speed Controller have been placed with the relevant wiring Fosworks loom. Ths 2 red plugs are from the switch/charge part of the loom and connect to the battery and wire to the chock block for power to the circuits.
E3B6EFA1-1872-4ED1-9DD6-817900E76FFF.jpeg
Body cleaned up of lettering and lining awaiting a Spray Job. It will get Halfords Red Primer for undercoat then my standard Harz BMW Imola Red 11. Speaker can be seen, a rather nice smallish bixed jobby from Fosworks. casey jones snr casey jones snr loco also on the bench on the left.
608270C7-4024-4C4E-A909-2014B39D6ED6.jpeg
Spraying the cabs with Halfords rattle can red undercoat, done indoors with lots of masking to protect the windows. I use only Tamiya for this job at the edges to prevent bleed through, however I find that larger areas between can use cheeper tape so long as it is stuck to a good width of Tamiya tape.
9225004F-11A4-4C53-978F-0351909A7154.jpeg
All now in the Halfords Harz BMW Imola Red 11
B136ACAB-E359-4111-AC96-9D89E1D89ED3.jpeg
 

Attachments

  • FC06017A-9DCD-4181-AC04-4FFCE84349AC.jpeg
    FC06017A-9DCD-4181-AC04-4FFCE84349AC.jpeg
    660.5 KB · Views: 0
Last edited:

dunnyrail

DOGS, Garden Railways, Steam Trains, Jive Dancing,
Staff member
GSC Moderator
25 Oct 2009
26,076
4,976
75
St.Neots Cambridgeshire UK
Best answers
0
Country flag
So this afternoon I gave it a test run and took pics to show the final result thus far. For running it is nice and steady on the slowest viper setting plus it hauls all I will ask it to do in regular service up the curved 1:40 gradients on my line.

As you can see below a stack of some sort has been added for diesel exhaust plus some numbering. I feel some data panels may complete the lettering at some stage, plus perhaps some indication of cab doors and windows. The white line is car shop Go Faster Stripe cut smaller in depth to represent livery on Kamels on the Harz.
3F190E6D-FDF7-47FA-BFB2-95C18357E47F.jpeg
Pulling the load I expect of it.
CA771C9D-11F9-43D0-9108-EB4FFFC016C9.jpeg
Up the 1:40 curved grade here.
BC3F271F-157D-44CF-B5C5-11A7A8D20817.jpeg
Note I have edited the previous post to denote the Halfords rattle can colours used for this project.

Now this has all been written, next up the destruction of an Austrian U2 to something more akin to a loco that ran on the Harz. Already seen in the Workbench thread.
 

Attachments

  • 3F7FDD07-999A-4AA8-805C-DF708B04E959.jpeg
    3F7FDD07-999A-4AA8-805C-DF708B04E959.jpeg
    977.9 KB · Views: 0
Last edited: