Southwold Railway Coach

ge_rik

British narrow gauge (esp. Southwold and W&LLR)
Country flag
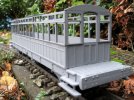
For the past few weeks I've been beavering away quietly - trying to draw, print and construct a model of one of the original Southwold Railway six-wheel coaches. I'm almost there!!
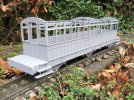
IMG_1271.JPGIMG_1272.JPGIMG_1274.JPG

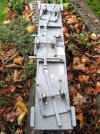
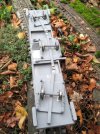
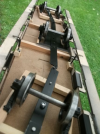
The trickiest part has been trying to modify the six-wheel Cleminson undercarriage to enable it to negotiate the tight curves (approx R2) on my railway.
IMG_1268.JPGIMG_1269.JPGIMG_1270.JPG

This has necessitated moving the two swivelling end single-axle bogies in closer to the centre by 35mm and also widening the centre sliding truck by 15mm each side. It's fascinating watching the centre truck sliding across as it travels around the track. I still need to add some sort of compensation to the outer 'bogies' to ensure they remain in contact with the track as it traverses some of the more uneven sections of my trackbed and also, of course, the bodywork needs finishing off, but it's an interesting, if somewhat different, challenge.

Rik
 
For the past few weeks I've been beavering away quietly - trying to draw, print and construct a model of one of the original Southwold Railway six-wheel coaches. I'm almost there!!
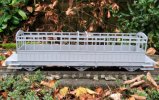
View attachment 276640View attachment 276641View attachment 276642

The trickiest part has been trying to modify the six-wheel Cleminson undercarriage to enable it to negotiate the tight curves (approx R2) on my railway.
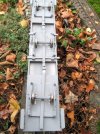
View attachment 276644View attachment 276645View attachment 276646

This has necessitated moving the two swivelling end single-axle bogies in closer to the centre by 35mm and also widening the centre sliding truck by 15mm each side. It's fascinating watching the centre truck sliding across as it travels around the track. I still need to add some sort of compensation to the outer 'bogies' to ensure they remain in contact with the track as it traverses some of the more uneven sections of my trackbed and also, of course, the bodywork needs finishing off, but it's an interesting, if somewhat different, challenge.

Rik
Brilliant - Northsider has just done something similar in more traditional materials with a Manx Northern coach - the wheelbase principles are the same :nod::nod::nod:
 
Brilliant - Northsider has just done something similar in more traditional materials with a Manx Northern coach - the wheelbase principles are the same :nod::nod::nod:
Guilty as charged! That's a beautiful model you've built there, Rik. Without really intending to, I gave the centre truck a few millimetres of mine some vertical movement above and below the 'normal' position, which takes up the variations of the permanent way.

And yes, watching the way the centre truck navigates is mesmerising!
 
Looks fantastic Rik, I never appreciated just how long they are from the photos of the Southwold. You've done very well to get it to go around R2s.
 
Guilty as charged! That's a beautiful model you've built there, Rik. Without really intending to, I gave the centre truck a few millimetres of mine some vertical movement above and below the 'normal' position, which takes up the variations of the permanent way.

And yes, watching the way the centre truck navigates is mesmerising!
Yes, it was your coach that inspired me to have a go. Thanks :clap:

Rik
 
The SLR Cleminsons are a thing of beuty that you have replicated to perfection, as for your wish to articulate the wheels have you thought about something like the 3 point suspension used for Goods Wagons in P4? I think if you did that on one outer and the inner wheel sets that may solve your issues.
 
I still need to add some sort of compensation to the outer 'bogies' to ensure they remain in contact with the track as it traverses some of the more uneven sections of my trackbed

Rik
Rik, Gauge 0 use 3 point suspension as well, however as your wheel sets are in bogies, allowing more movement (up and down) around the pivot would give a reasonable amount of play to ensure good contact.
 
Thanks Jon and Jimmy. I think I'll try putting a dome shaped washer on each of the pivot bearing to see if the does the trick. At present it's a large flat washer.

Rik
 
Thanks Jon and Jimmy. I think I'll try putting a dome shaped washer on each of the pivot bearing to see if the does the trick. At present it's a large flat washer.

Rik
Try just one bogie for starters, otherwise the carriage might rock and roll a bit.
 
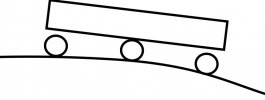
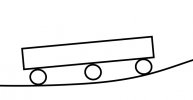
Hmmm.... this is more of a conundrum than I thought. Six-wheelers throw up problems I've not had to contend with before - especially as the coach has a long wheelbase. I added domed washer compensation to the outer two 'bogies' and it coped well with slight variations in the track - but then I encountered another issue - gradients! I have a couple of 1:40s on my railway and there's one particular summit which is quite pronounced. I eased the bolts on the bogie mounts to allow the outer bogies to drop down to keep the wheels in contact ......


6-wheel summit.jpg

..... but then ran into another problem at the bottom of the slope.
6-wheel dip2.jpg

I think I'll try mounting the middle wheels lower than the outer bogies and see if I can ease the bogie bolts a few more millimetres to allow them to rise as well as fall. I might have to put some weak springs on the bogie pivot bolts to keep the wheels in contact and also to stop the coach from rocking like a see-saw on the centre axle!

I might end-up fixing the two outer bogies (but still allowing some compensation for uneven track) and seeing if I can find a way of making the centre axle float up and down, while also allowing it to slide from side to side on curves.

I can see why six-wheel coaches were replaced with bogie coaches- they cope far more readily with uneven track.

Rik
 
You can always cheat >:)>:) if the centre axle has plenty of vertical movement, you could try using wheels of a slightly smaller diameter :emo::emo:
 
If you let the little link plates have some vertical movement, the centre truck should rise and fall; but my centre truck has a slab of 5 x 40mm steel bolted to it (just visible in the photo below, despite it being sprayed black). I suspect that, like my softwood ones, your 3-D printed trucks just don't have the mass required to keep everything sitting on the railhead.

1606337801713.png
 
To what extent does the central bogie actually need to be retained vertically? Ignoring the inconvenience of picking it coach up and having it drop out. Assuming in model form it does not actually need to carry any load, would it be possible to take a few mm off of the top of the centre bogie's frame to give it room to go vertically upwards, and drop the retaining tabs a few mm to allow it to travel down?

As Northsider has found I think the centre bogie would need a fair bit of mass to keep it down on the track and still make it guide the outer bogies, but it looks like your existing set up would keep it pointing in the correct direction.

Alternatively, I had some success a few years ago 3D printing simple, single leaf springs for miniature racing cars. No mechanisms or moving parts other than the flexing of the material itself. If you can add some more play, might there be space to squeeze in something similar and use the mass of the whole coach to assist?

IMG_0309.JPG
 
Instead of round bushes for your axles, how about elongated ones, and perhaps utilise the centre bar as a spring. I'm not too sure exactly how it could be done to be honest but I'm sure there must be a thought there somewhere!
 
Thanks chaps. These suggestions remind me of my 00n3 days when I constructed a Southwold Cleminson 6 wheel open wagon and used piano wires and folded brass u shaped bearing brackets.

But I think I've cracked it overnight, well theoretically anyway. Furthermore, I think I can use some existing printed parts - ones I rejected because their dimensions were wrong.

Problem 1. Raising the centre axle without sacrificing the sliding mechanism. I can do this simple by replacing the existing axle box/ hanger assembly by one where the bearing holes are higher in the axle boxes. A bit like Paul's suggestion but simpler to manage. I'll need to cut a slot in the bearing plate under the carriage chassis but, as long as the flanges stay within the boundaries of the solebars, it should work

Problem 2. Allowing the centre axle to float up and down without fouling the sliding mechanism. I can get round this by replacing the four L shaped retaining brackets with taller ones. Again, I got the dimensions wrong initially and printed four taller ones earlier.

Problem 3. Adding compensation to the outer bogies. I already have a large 'washer' which I can use for the laterally 'rigid' bogie and then print out a triangular strip to sit on top of the rocking bogie.

I'll give it a try later and let you know the outcome
1f644.png


Rik
 
A back up plan could be a dummy centre axle, as Bachmann did for Emily’s coach in their thomas range.

however

the coach looks like a pretty large vehicle, so by having a long 4 wheel uncompensated chassis it might just make some things better and some things worse.

I’m sure you find a way, as you’ve seems to solve every other railway problem you’ve come across so far!

Dan
 
If you let the little link plates have some vertical movement, the centre truck should rise and fall; but my centre truck has a slab of 5 x 40mm steel bolted to it (just visible in the photo below, despite it being sprayed black). I suspect that, like my softwood ones, your 3-D printed trucks just don't have the mass required to keep everything sitting on the railhead.

View attachment 276708
I've ended up doing something similar, but added some lead to the centre truck and three-point compensation to the outer trucks.

I realised I could easily raise the middle wheels simply by having the holes for the axles a few mm higher in the axle boxes and also raising the outer trucks by 1.5mm. I also increased the height of the L shaped brackets holding the centre truck by 3mm to allow it to float downwards further.

It seems to work OK, but I need to do more extensive testing over the whole railway.

Rik
 
Last edited:
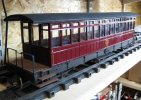
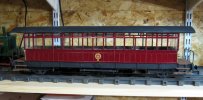
More or less finished the coach.

Not the best photos. The weather was awful here yesterday and so not been able to take it out into the garden for a test run and get pictures in decent lighting.
IMG_1288.JPG

IMG_1287.JPG

I've not yet managed to give it a proper run over the whole line, but it now seems OK over the most undulating section .....

Weather permitting, I can test out its running characteristics at some point over the weekend

Rik
 
More or less finished the coach.

Not the best photos. The weather was awful here yesterday and so not been able to take it out into the garden for a test run and get pictures in decent lighting.
View attachment 277064

View attachment 277065

I've not yet managed to give it a proper run over the whole line, but it now seems OK over the most undulating section .....

Weather permitting, I can test out its running characteristics at some point over the weekend

Rik
Looks fantastic :clap: :clap: :clap:
 
Back
Top Bottom