South Cerney Garden Railway (Piko G)

JimmyB

Now retired - trains and fishing
23 Feb 2018
6,959
925
69
Weston-super-Mare
www.tumble-down-falls.co.uk
Best answers
0
Country flag
I have just checked and one of the slopes is 1 in 24 or around 4% and this is where I had the derailment going downhill, not sure I can do much about reducing that but I have a few options if it becomes more of a problem, thanks again!
A couple of my slopes are 1:24, and stock without traction tyres can struggle with more than 4 axles with a lot of wheel slip. If you can reduce it I would :)
 

ARIA31

Registered
3 Oct 2017
250
54
74
Toulouse - France
Best answers
0
Country flag
Taking benefit from a fluent navigation of your trains without derailment risks and stress with a simple 90° crossing ? :) :mm:
 

wandgrudd

Registered
24 Oct 2009
443
57
....
Best answers
0
Country flag
I have just checked and one of the slopes is 1 in 24 or around 4% and this is where I had the derailment going downhill, not sure I can do much about reducing that but I have a few options if it becomes more of a problem, thanks again!

I was thinking you could split the slope in to two separate sections have the first section in front of the compost then flatten it out for the curve then after the curve start the slope again thus reducing the current slope from one step section into two less step areas, not sure it would work with out seeing it but might be worth a look?
 

Dodod driver

Registered
31 Aug 2013
18
0
Best answers
0
Country flag
A couple of my slopes are 1:24, and stock without traction tyres can struggle with more than 4 axles with a lot of wheel slip. If you can reduce it I would :)

A very interesting approach to track support. It should work well. I have also sent you a Private Message.
 

dunnyrail

DOGS, Garden Railways, Steam Trains, Jive Dancing,
Staff member
GSC Moderator
25 Oct 2009
26,209
4,998
75
St.Neots Cambridgeshire UK
Best answers
0
Country flag
A couple of my slopes are 1:24, and stock without traction tyres can struggle with more than 4 axles with a lot of wheel slip. If you can reduce it I would :)
Hm I wonder if Snot would work for you, there is a product called that amusingly that comes in a tube orvtub that works for traction tyres. From US I think if anyone stateside can comment.
Planning
Before I could start construction I needed to come up with a detailed design so that I could order the track. The site measures about 4.8m by 4.6m and slopes down by about 15cm. My son was keen to have at least one bridge and so I came up with some designs that exploited the slope to gain height whilst keeping the track at ground level.

South Cerney Station
As I mentioned in my original post I wanted to use the track layout from the former station in my village:
View attachment 271738

This has quite a complex layout for a small station and it was a challenge reducing the length to 3.6m to fit lengthways with a first radius curve at each end. I did consider having the station on a diagonal to give me more space but I did not like the appearance as much.

In the absence of any suitable track layout software I used Visio on my work laptop to come up with a few designs using a modified LGB template that I found online.

This was one of the early drafts:

View attachment 271739
This seemed to work quite well so I calculated what track I needed and added a couple of points and a few extra straights as I was keen to have a passing loop.

My biggest challenge was that I wanted to get two of the Piko Roncalli Battery RC Starter Sets but these were only on pre-order and I needed the curves in these sets to complete the layout. I emailed Darren atTop Slots n Trains who as well as offering a great price also offered to send me the curves now and would then remove them from the sets when he received them so that I could start building immediately, a top bloke!

A few days later I received a very large box containing the following:
View attachment 271740

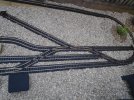
I quickly checked that I could recreate the station layout as planned
View attachment 271741

All looking good, in my next post I will start on the construction side of things.
Many would look at your Station layout and wonder ‘why a x’over’ where it is. But as you have shown it is prototypical and in fact many single line and even dual line Stations had such a layout. The logic is so that a Down Train (from Cheltenham) can either Set Down or Pick Up Wagons in the Siding marked 23 on the Track Diagram. Likely to be shunted/having been shunted in place to/from the Yard by either a Local Trip working or possibly Horse Traction.
 

Rhinochugger

Retired Oik
27 Oct 2009
36,776
4,243
North West Norfolk
Best answers
0
Country flag
I have just checked and one of the slopes is 1 in 24 or around 4% and this is where I had the derailment going downhill, not sure I can do much about reducing that but I have a few options if it becomes more of a problem, thanks again!
Reducing the main slope, keeping the curve on the level at a slightly higher level, then carrying on the slope down the next straight would be one option :wondering::wondering:
 

SouthCerney

Piko G Scale
5 Jul 2020
13
5
Gloucestershire UK
Best answers
0
Country flag
I was thinking you could split the slope in to two separate sections have the first section in front of the compost then flatten it out for the curve then after the curve start the slope again thus reducing the current slope from one step section into two less step areas, not sure it would work with out seeing it but might be worth a look?
Hi, it does already do that as the raised bed in front of the compost bags is on a slope dropping by about 6cm over the 2.4 metres, I worked out the track heights from the lowest point under the bridge, I will try and find the piece of paper with them on! Thanks for all the help and advice!
 

SouthCerney

Piko G Scale
5 Jul 2020
13
5
Gloucestershire UK
Best answers
0
Country flag
Many would look at your Station layout and wonder ‘why a x’over’ where it is. But as you have shown it is prototypical and in fact many single line and even dual line Stations had such a layout. The logic is so that a Down Train (from Cheltenham) can either Set Down or Pick Up Wagons in the Siding marked 23 on the Track Diagram. Likely to be shunted/having been shunted in place to/from the Yard by either a Local Trip working or possibly Horse Traction.
Hi, it does make for quite an interesting station and there are a number on the same line with very similar track layouts. At the moment I only have one loco but even so it gives me a number of shunting scenarios. Basing it on my local station was part of the fun and I am gathering photos that show the station when it was operating so I can recreate the scene even if the rolling stock is alien!
 

SouthCerney

Piko G Scale
5 Jul 2020
13
5
Gloucestershire UK
Best answers
0
Country flag
Reducing the main slope, keeping the curve on the level at a slightly higher level, then carrying on the slope down the next straight would be one option :wondering::wondering:
Most of my straights are already on slopes, and tried to keep the curves level but I do have some scope to alter the gradients if I have any problems. I am impressed with how helpful everyone is on this forum and it has been a great source of information and inspiration when planning my railway. Cheers!
 

Rhinochugger

Retired Oik
27 Oct 2009
36,776
4,243
North West Norfolk
Best answers
0
Country flag
Hi, it does make for quite an interesting station and there are a number on the same line with very similar track layouts. At the moment I only have one loco but even so it gives me a number of shunting scenarios. Basing it on my local station was part of the fun and I am gathering photos that show the station when it was operating so I can recreate the scene even if the rolling stock is alien!
Much of the purpose of this track layout was to avoid facing points into a goods yard - something that we sometimes forget in our modelling world :wasntme::wasntme:
 
  • Like
Reactions: 1 user

SouthCerney

Piko G Scale
5 Jul 2020
13
5
Gloucestershire UK
Best answers
0
Country flag
Track Bed
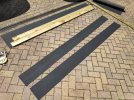
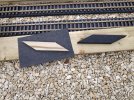
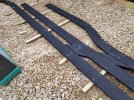
Once I had decided that my railway would be constructed using Railway Sleepers I then turned my attention to the track bed as I wanted the same look for the track whether it was on the ground or on the sleepers. I settled on sawn treated timber from Wickes, 19mm x 100mm and in 2.4m lengths, these were delivered with the sleepers along with some Shed Roofing Felt although this was black rather than the dark grey I had hoped for.
7908FF3A-B22D-4CE5-BC96-1A5B86A2DC80.jpeg

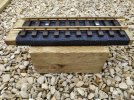
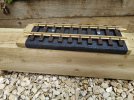
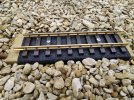
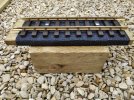
Although the raised bed used sleepers laid normally for some of the slopes I laid them on their sides as I could not easily cut them at an angle if laid flat. This gave me three scenarios for track laying as follows.

1. Flat Sleepers
DB89C6CF-5B72-44B7-AD37-B1F344409904.jpeg

2. Sleepers on Edge
DEC8F924-CBB2-4D14-8617-F25BDA5B03AE.jpeg

3. On the Ground
5CD14275-EDDA-4D62-81DD-42D562B8FC83.jpeg


The roofing felt was 10m x 1m and for the straight track I cut strips 2.5m x 20cm to wrap the track.
3530771F-0D3D-41A2-9977-ED3675E24883.jpeg

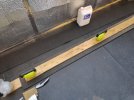
This was then glued to the timber using waterproof PVA.
A14B8860-5BB0-449D-93CA-D779B630981E.jpeg

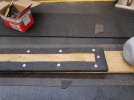
And then screwed at the back using some screws I had left over from some stud walling which had big enough heads not to pull through the felt although if using an electric screw driver adjust the torque control.
B16A11B3-5F70-4F8A-A313-EFCD9B8E8973.jpeg

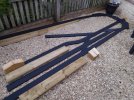
For the curved sections I cut the timber into small sections to follow the curve which were glued and screwed in the same way.
6EA34085-D469-4926-A6F1-DCFB45A761CB.jpeg


In the station area smaller pieces were required to infill around pointwork etc.
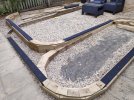
5AA4A1B1-C2B2-4ACD-980F-21FC6BF2D157.jpegIt is beginning to look like a railway even before the track is laid!
78CD0200-9259-49DE-8305-B7CF19282D8D.jpeg
 

Attachments

  • 8AF6EC92-9F1F-4AD7-957C-89D3B302B1DA.jpeg
    8AF6EC92-9F1F-4AD7-957C-89D3B302B1DA.jpeg
    832.6 KB · Views: 0
  • Like
Reactions: 1 user

wandgrudd

Registered
24 Oct 2009
443
57
....
Best answers
0
Country flag
Track Bed
Once I had decided that my railway would be constructed using Railway Sleepers I then turned my attention to the track bed as I wanted the same look for the track whether it was on the ground or on the sleepers. I settled on sawn treated timber from Wickes, 19mm x 100mm and in 2.4m lengths, these were delivered with the sleepers along with some Shed Roofing Felt although this was black rather than the dark grey I had hoped for.
View attachment 272112

Although the raised bed used sleepers laid normally for some of the slopes I laid them on their sides as I could not easily cut them at an angle if laid flat. This gave me three scenarios for track laying as follows.

1. Flat Sleepers
View attachment 272111

2. Sleepers on Edge
View attachment 272110

3. On the Ground
View attachment 272109


The roofing felt was 10m x 1m and for the straight track I cut strips 2.5m x 20cm to wrap the track.
View attachment 272108

This was then glued to the timber using waterproof PVA.
View attachment 272107

And then screwed at the back using some screws I had left over from some stud walling which had big enough heads not to pull through the felt although if using an electric screw driver adjust the torque control.
View attachment 272106

For the curved sections I cut the timber into small sections to follow the curve which were glued and screwed in the same way.
View attachment 272104


In the station area smaller pieces were required to infill around pointwork etc.
View attachment 272114It is beginning to look like a railway even before the track is laid!
View attachment 272102
Not normally a fan of roofing felt ballast as most people aren’t so up on making it look so neat but that looks fantastic.
 
  • Like
Reactions: 1 user

Rhinochugger

Retired Oik
27 Oct 2009
36,776
4,243
North West Norfolk
Best answers
0
Country flag
:clap::clap::clap::clap:
 
  • Like
Reactions: 1 user

SouthCerney

Piko G Scale
5 Jul 2020
13
5
Gloucestershire UK
Best answers
0
Country flag
Track Laying and Planting
This will be the last instalment before catching up with real time and covers the track laying and initial planting.

For the elevated track the felt covered sections were screwed to the railway sleepers and the track was then laid on top and also screwed

DEE7EE70-8CDF-4F9B-92E8-72FCABC22466.jpeg

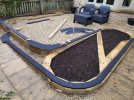
For the track at ground level the timbers were joined up using perpendicular strips to keep it rigid and allow the whole structure to be levelled and sunk so that the top surface of the felt could be level with the gravel:

85C8D717-BFCF-4B81-AAF3-01E3EC0AFB9E.jpeg

The finished result:
81E0CA02-A7EE-438B-86A8-4A7AB3BDC37C.jpeg
The next stage was to fill the raised beds with compost, this needed a large amount, plus some more as it compresses much more than you expect:
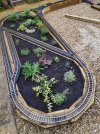
5F84B9A5-B3F4-4FBB-A78D-D5C4A244A32F.jpegAnd then after a trip to the garden centre plants were placed strategically in the beds, although some had to be moved later:
22163798-BFB2-4F06-9915-CD59264916DC.jpeg
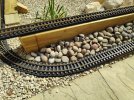
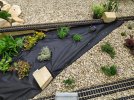
Originally we planned to leave the compost in the raised beds showing but after a few day’s realised that the birds made a real mess covering the track in compost so added a membrane around the plants:
5ABD681E-7F10-42FE-898C-188B8CA1DFDD.jpeg

A top dressing of gravel was spread on the membrane to finish it off:

CE2E6D73-748C-4F49-A900-2E9100672165.jpeg

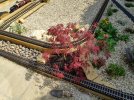
Suitable plants were added to the rockery constructed from Cotswold Stone from our local garden centre:
6E51A063-E2F0-452C-AC80-AE0E19134EFA.jpeg
 

Paul M

Registered
25 Oct 2016
11,912
1,699
61
Royston
Best answers
0
Country flag
Looking good, it wont be long before it looks as if it's been there for years
 
  • Like
Reactions: 1 user