Servo Controlled Points

GAP

G Scale Trains, HO Trains, 1:1 Sugar Cane trains
14 Jun 2011
4,059
944
Bundaberg Queensland, Australia
Country
Australia
ringbalin-light-railway.blogspot.com
Best answers
0
Country flag
OK folks just some clarification;
The mid winter overnight temperature here rarely goes below 10C at the coldest time of the year.
The installation has been installed for over 2 weeks and subjected to over 80mm of rain over the 4 days of Easter plus heavy dew every night since.
The baseboard is fibre cement shower lining so it is fairly impervious to water ingress even before it was painted with cement paving paint (red side up grey side down). You may not realise that the baseboard is 800 mm above ground so airflow above and below is extremely good.
The temperature today was 31C and when I was under the baseboard tidying up some wiring I was dripping sweat after 25 minutes.
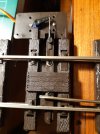
The servos were sold as "waterproof" for model boat use and do not have the visible joins that are on my other servos.
So after some user trials, where the moisture inside the tester enclosures and at the servos was monitored closely, I am confident that moisture ingress will not be a major issue.
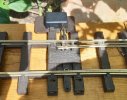
Yes the servos are mounted with the majority of their body below the baseboard with the top protruding through a hole cut in the baseboard; so technically they are not mounted under the baseboard but it is close enough.
The hole through the baseboard is larger than the servo body so water ponding is not an issue.
I think I remember posting that I am smearing some silicone grease around the shaft to improve water repellence.
Also all the circuit boards and any moisture ingress points are coated with printed circuit board coating.
I am not planning on covering the servo; mainly because a cover will be a place where condensation could form and be trapped under, probably better leaving it open to the air and let evaporation do its thing.
Hope this explains the situation.

And PhilP the layout is always powered off at the end of a running session
 
  • Like
Reactions: 1 user
8 Mar 2014
7,806
972
San Diego
Country
Armenia
www.elmassian.com
Best answers
0
Country flag
It's clear, just that the servos are "in" the baseboard, not below or above... that word "under" is what I took exception to... the sides of them are not the issue, just the place the shaft comes out, and I agree you have no ponding, and have done everything you can do, also, your "X" shaped arm further shields the shaft from direct water ingress.

I would agree you have done the best you can do... I did ask if you will put some type of cover over the assembly, which is what I would do, just to do everything I can.

Greg
 

GAP

G Scale Trains, HO Trains, 1:1 Sugar Cane trains
14 Jun 2011
4,059
944
Bundaberg Queensland, Australia
Country
Australia
ringbalin-light-railway.blogspot.com
Best answers
0
Country flag
It's clear, just that the servos are "in" the baseboard, not below or above... that word "under" is what I took exception to... the sides of them are not the issue, just the place the shaft comes out, and I agree you have no ponding, and have done everything you can do, also, your "X" shaped arm further shields the shaft from direct water ingress.

I would agree you have done the best you can do... I did ask if you will put some type of cover over the assembly, which is what I would do, just to do everything I can.

Greg
As I said before, I am not planning on covering the servo; mainly because a cover will be a place where condensation could form and be trapped under, probably better leaving it open to the air and let evaporation do its thing.

This picture shows how I mounted the servo and the tester enclosure (tester needs re attaching to double sided glue pad and wiring tidying up.).
Servo mounting.JPG

Servo mounting top.JPG

Tester Enclosure mounted.JPG
 
8 Mar 2014
7,806
972
San Diego
Country
Armenia
www.elmassian.com
Best answers
0
Country flag
True, a cover could collect condensation, here with sunshine most of the time, the sun would evaporate the condensation, I was thinking a loose cover, not sealed... but I'd say that your design also lets you periodically check the "shaft grease" easily.

Did you put small weep holes in the bottom corners of the electronics box?

Greg
 

GAP

G Scale Trains, HO Trains, 1:1 Sugar Cane trains
14 Jun 2011
4,059
944
Bundaberg Queensland, Australia
Country
Australia
ringbalin-light-railway.blogspot.com
Best answers
0
Country flag
True, a cover could collect condensation, here with sunshine most of the time, the sun would evaporate the condensation, I was thinking a loose cover, not sealed... but I'd say that your design also lets you periodically check the "shaft grease" easily.

Did you put small weep holes in the bottom corners of the electronics box?

Greg
It is 9am here and the sun has been on the points for over an hour, any dew that formed overnight is now well and truly gone but there is still moisture under a couple of plastic pieces I left on the baseboard, so I reckon a cover would do the same thing.
No I have not put weep holes in, but that is a good idea. The lid is watertight and the cable entry is not sealed into the plastic, its just a press fit, but weep holes wouldn't hurt.
 
8 Mar 2014
7,806
972
San Diego
Country
Armenia
www.elmassian.com
Best answers
0
Country flag
I have been very surprised how moisture can get into a "sealed" enclosure. 2 small weep holes, like maybe 1mm or less will help pump out any moisture that can collect, i.e. they breathe as the temp goes up and down. Being out of the sun should help really minimize anything, but I left weep holes out of an enclosure recently, and a loose screw on top (not fully seated) let a little water in, ruined about $200 worth of electronics over the winter, I have learned my lesson!

Greg
 
  • Like
Reactions: 1 user

GAP

G Scale Trains, HO Trains, 1:1 Sugar Cane trains
14 Jun 2011
4,059
944
Bundaberg Queensland, Australia
Country
Australia
ringbalin-light-railway.blogspot.com
Best answers
0
Country flag
I have been very surprised how moisture can get into a "sealed" enclosure. 2 small weep holes, like maybe 1mm or less will help pump out any moisture that can collect, i.e. they breathe as the temp goes up and down. Being out of the sun should help really minimize anything, but I left weep holes out of an enclosure recently, and a loose screw on top (not fully seated) let a little water in, ruined about $200 worth of electronics over the winter, I have learned my lesson!

Greg
In a high humidity environment like ours condensation is the big killer, unless I can fill my enclosures with positive pressure nitrogen I will never get away from that.
Another way is using dehumidifier crystals or even rice but that just add to the preventative maintenance regime.
Can't fight mother nature just have to work with her.
And to add that I found moisture under a piece of fibre board left on the layout at 2pm this afternoon so once it wicks in it ain't goin' no where in a big hurry.

I did have a test run of about 90 minutes today and no problem presented themselves but more testing is required methinks. ;);)
 

Paul M

Registered
25 Oct 2016
11,881
1,696
60
Royston
Best answers
0
Country flag
In a high humidity environment like ours condensation is the big killer, unless I can fill my enclosures with positive pressure nitrogen I will never get away from that.
Another way is using dehumidifier crystals or even rice but that just add to the preventative maintenance regime.
Can't fight mother nature just have to work with her.
And to add that I found moisture under a piece of fibre board left on the layout at 2pm this afternoon so once it wicks in it ain't goin' no where in a big hurry.

I did have a test run of about 90 minutes today and no problem presented themselves but more testing is required methinks. ;);)
Lots more, I would have thought. All theories must be thoroughly tested
 

GAP

G Scale Trains, HO Trains, 1:1 Sugar Cane trains
14 Jun 2011
4,059
944
Bundaberg Queensland, Australia
Country
Australia
ringbalin-light-railway.blogspot.com
Best answers
0
Country flag
Lots more, I would have thought. All theories must be thoroughly tested
I have begun testing for the new layout with a sugar cane mill as the centre point.
The locos and wagons have to have coupler heights checked plus extensive running on the track to see if all is OK, before transfer to the new layout track and once there further testing to see if the change from code 332 to code 250 track does not introduce any issues.
Well that is what I tell SWMBO when she asks "why are you running trains so much lately?".
 

GAP

G Scale Trains, HO Trains, 1:1 Sugar Cane trains
14 Jun 2011
4,059
944
Bundaberg Queensland, Australia
Country
Australia
ringbalin-light-railway.blogspot.com
Best answers
0
Country flag
I have published a page on my blog which shows the whole install of the servo controlled points, it contains links to the original article and the components used.


Michael

Registered
26 Jan 2010
139
16
Best answers
0
Country flag
Thanks very much GAP for this thread. I've been thinking of doing something similar and didn't realise how simple it would be.

I'm just adding a new extension to my railway which includes 2 points, one indoors, one outside so I've giving it a try. It fits nicely on the Peco mounting plate that normally holds the LGB motor points.

They are controlled from an ESP32 in my main control unit and work OK with 10 metres of cable. They are buffered using an SN75441 motor drive, which was going to be used for the LGB motors. 'Chattering' has been solved by switching off the 5 volt supply to the servos after each operation. This also allows me to manually change the points.

Thanks also to Greg for the video links, I've used Plasti Dip for the lower part of the servos and grease for the gears and moving parts. The indoor one will be left open as I like to see it work!

If successful, I will swap out my other 6 unreliable LGB motors. Much cheaper too!
 

Attachments

  • servo_1.jpg
    servo_1.jpg
    330.6 KB · Views: 0
  • servo_2.jpg
    servo_2.jpg
    260.1 KB · Views: 0

ge_rik

British narrow gauge (esp. Southwold and W&LLR)
24 Oct 2009
10,701
1,244
Cheshire
www.riksrailway.blogspot.com
Best answers
0
Country flag
Following Graeme's example and Dave Bodnar's lead, I've now added servos to the points leading to the storage sidings. My adaptation isn't quite as sophisticated as Graeme's - but it seems to work!

Rik
 
  • Like
Reactions: 1 user

ge_rik

British narrow gauge (esp. Southwold and W&LLR)
24 Oct 2009
10,701
1,244
Cheshire
www.riksrailway.blogspot.com
Best answers
0
Country flag
Following Graeme's example and Dave Bodnar's lead, I've now added servos to the points leading to the storage sidings. My adaptation isn't quite as sophisticated as Graeme's - but it seems to work!

Rik
Link to the blog post describing what I did

Rik
 

GAP

G Scale Trains, HO Trains, 1:1 Sugar Cane trains
14 Jun 2011
4,059
944
Bundaberg Queensland, Australia
Country
Australia
ringbalin-light-railway.blogspot.com
Best answers
0
Country flag
Following Graeme's example and Dave Bodnar's lead, I've now added servos to the points leading to the storage sidings. My adaptation isn't quite as sophisticated as Graeme's - but it seems to work!

Rik
Rik,

A bit of clarification from some more testing I did.

To overcome the startup routine I found the use of the linkage stoppers allows the tester to go through its routine before settling on the default position.
The stopper pivots to lets the link arm go over centre and return to the it's set position at start up.

I found the best way to identify which tester does the start up is the colour of the circuit board, the red ones do not but the green ones do. I ended up with 2 green ones in a buy of 12.

To overcome the servo driving all the time (buzzing) is one reason for the trimpot, it sets the length of point travel and allows fine adjustment of the points against the stock rail so that they stay hard up against the rail with the servo drawing minimum, if any, current (so low it was just measurable on the lowest current range of my multimeter).
My servos are fitted to a mix of LGB, Piko and Aristocraft points so fine adjustment was necessary.

I noticed that when a servo was still trying to drive, the other servos connected to the common power supply started to twitch; adjusting the trimpot and the linkage stoppers till they stopped was a good visual indication.

Bit of tweaking is involved at the start but they have now been in operation since April with no problems (touch wood).

In fact I am now considering in converting more points.
 
Last edited:

The Shed

Citizen of the Republic of the North East.
8 Mar 2020
1,070
238
Darlington, County Durham.
Country
England
Best answers
0
ge_rik ge_rik , neat, concise and clear to follow, good work.:clap:

Your solution opens up several avenues to tinker and explore......... ;)

 
Last edited:

PhilP

G Scale, 7/8th's, Electronics
5 Jun 2013
33,566
3,521
Nottingham
Best answers
0
Country flag
If you blow the image up, there is a micro-switch mounted horizontally below the servo..
 

GAP

G Scale Trains, HO Trains, 1:1 Sugar Cane trains
14 Jun 2011
4,059
944
Bundaberg Queensland, Australia
Country
Australia
ringbalin-light-railway.blogspot.com
Best answers
0
Country flag
ge_rik ge_rik , neat, concise and clear to follow, good work.:clap:

Your solution opens up several avenues to tinker and explore......... ;)

View attachment 286419

View attachment 286420
That is a very good idea I could use that to turn on and off signal lights so I can see the position of the points from a distance.
I am toying with the idea of adding another servo to the output of my point controlling testers that would move a semaphore signal.
This may be a simpler solution.