musket the dog
Registered
Evening all,
I've posted some of the progress I've been making with restoring my vintage Roundhouse Lady Anne over in the Daily Workbench thread, however in the last few weeks I think I've started to make enough progress to justify starting my own thread.
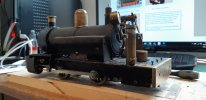
For a while, when I was quite young, I used to 'work' occasional Saturdays in the model railway shop where I spent a good amount of my pocket money. For many years up on a tall shelf stood a strangely modified Lady Anne (or Dylan). It was one of the earlier ones, with 4 wheels and a meths burner. It looked as if a previous owner had tried to make it into an approximation of a gauge 1 locomotive. It had a very low cab, and new cast brass buffer beams with twin sprung buffers and a chain coupling.
It looked very well used and very well made, but being a bit of oddity, out of proportion with everything else around it, she sat on the shelf for years. That was until several years ago, when I began my apprenticeship. A couple of months later, with a bit of money saved up from my starting bonus and my first paychecks, I asked how much the shop's owner would sell it to me for. With my 'staff discount' applied it turned out to be a very good price and I left with my first live steam loco.
.jpg")
Once I had established in an old thread that no one knew what it was, I started to plan what to do with her. My basic, quick plan was to chop off the top of the cab and extend the chimney to make something akin to a open cabbed quarry loco. I quickly ran out of the necessary skills as the only thing holding the bunker on was where it attached to the rear of the water tanks. University came and went, I bought a house and started working on that and nothing really progressed on the loco. This year though I have been making a concentrated effort to finish off unfinished projects.
I've posted some of the progress I've been making with restoring my vintage Roundhouse Lady Anne over in the Daily Workbench thread, however in the last few weeks I think I've started to make enough progress to justify starting my own thread.
For a while, when I was quite young, I used to 'work' occasional Saturdays in the model railway shop where I spent a good amount of my pocket money. For many years up on a tall shelf stood a strangely modified Lady Anne (or Dylan). It was one of the earlier ones, with 4 wheels and a meths burner. It looked as if a previous owner had tried to make it into an approximation of a gauge 1 locomotive. It had a very low cab, and new cast brass buffer beams with twin sprung buffers and a chain coupling.
It looked very well used and very well made, but being a bit of oddity, out of proportion with everything else around it, she sat on the shelf for years. That was until several years ago, when I began my apprenticeship. A couple of months later, with a bit of money saved up from my starting bonus and my first paychecks, I asked how much the shop's owner would sell it to me for. With my 'staff discount' applied it turned out to be a very good price and I left with my first live steam loco.
Once I had established in an old thread that no one knew what it was, I started to plan what to do with her. My basic, quick plan was to chop off the top of the cab and extend the chimney to make something akin to a open cabbed quarry loco. I quickly ran out of the necessary skills as the only thing holding the bunker on was where it attached to the rear of the water tanks. University came and went, I bought a house and started working on that and nothing really progressed on the loco. This year though I have been making a concentrated effort to finish off unfinished projects.
.jpg")
.jpg")
.jpg")
.jpg")
.jpg")
.jpg")

.jpg")
.jpg")
.jpg")
.jpg")
.jpg")
.jpg")
.jpg")
.jpg")
.jpg")
.jpg")
.jpg")
.jpg")
.jpg")
.jpg")

") I've heard of the Dacre, but I've never been able to find any real information or pictures at all. I'll have a look around for a copy of the book
I've heard of the Dacre, but I've never been able to find any real information or pictures at all. I'll have a look around for a copy of the book