Programming Trainline45 Point Decoder

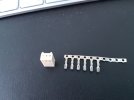
Sure - picture attached (for those who've not used these before, you crimp a wire into one of the silver terminals and then simply push this into the back of the "latch" block. The connectors are designed to be spring loaded so then when you push the "latch" onto the pins the tension ensures good contact and helps retain the "latch" in place.

However, Gizzy's approach of soldering direct to the pins and covering with heat shrink etc. is an excellent one (which I may end up adopting if I can't satisfactorily weatherproof the "latch" connector).
 

Attachments

  • 20160705_113945.jpg
    20160705_113945.jpg
    99.7 KB · Views: 0
Ah... those connectors. I been using them on my N gauge empire since the 1990s, and I've still not forgiven Maplin for ceasing to stock the 6 pin version (I have to go elsewhere now). Must have assembled dozens of those for my standard individual point CDU modules.

I've always soldered wires to the terminals rather than crimp.
 
Last time I played with these, they only had one breather hole in the bottom, which allowed condensation to build up inside. Drill small holes in the extreme corners, all 4 if the existing hole is not in the corner. The "breathing" inside will expel any condensation as the unit heats. It's almost impossible to truly waterproof anything outside.

Greg
 
Ah... those connectors. I been using them on my N gauge empire since the 1990s, and I've still not forgiven Maplin for ceasing to stock the 6 pin version (I have to go elsewhere now). Must have assembled dozens of those for my standard individual point CDU modules.

I've always soldered wires to the terminals rather than crimp.

Unfortunately my hands aren't that steady these days so soldering small'ish stuff can be a challenge. I did once find a Web site which supplied bundles of wires with connectors already soldered on. But as I wasn't looking for these at the time I didn't bookmark it....
 
Last time I played with these, they only had one breather hole in the bottom, which allowed condensation to build up inside. Drill small holes in the extreme corners, all 4 if the existing hole is not in the corner. The "breathing" inside will expel any condensation as the unit heats. It's almost impossible to truly waterproof anything outside.

Greg

Greg
Thanks for the tip. I have to open them up to install the train line microswitch so I can drill the breather holes at the same time as I drill the one for the wires to/from the switch
Have to confess I'm thinking that I'd have been better off spannering the points to get them working with an lgb point motor and supplementary switch. I'll carry on down the trainline route for now, though.
 
Back
Top Bottom