Norfolk & Western GP18 Project

trammayo

Interested in vintage commercial vehicle, trams, t
24 Oct 2009
22,679
4,691
75
Co. Mayo
Country
Ireland
Best answers
0
Country flag
I have followed your thread from the very beginning. I stand in awe, observing your skills, attention to detail, and the superb results.

I haven't commented before because I have little knowledge of US Diesels but I could refrain no longer! I look forward, with great interest, to the ongoing work and subsequent fruits of your labours.
 

supagav

USA standard gauge in the late 1960's, in 1:29th.
30 Oct 2009
1,427
6
Oban, Scotland
www.facebook.com
Best answers
0
Thanks for the kind words Mick :)

I got a little a more done today, finished off all the side skirts and started on some of the piping detail underneath the loco frame. Here is a quick shot of some of the pipes on the side of the fuel tank. The pipes just end as they will disappear beneath the side skirts and be hidden behind the trucks when they go back on:

DSCN1811 (Copy).JPG

DSCN1819 (Copy).JPG
 

supagav

USA standard gauge in the late 1960's, in 1:29th.
30 Oct 2009
1,427
6
Oban, Scotland
www.facebook.com
Best answers
0
Hi,

A little more done this morning on the piping detail, this time from the air reservoirs mounted under the loco frame.

I want to just show the origins of all these pipes as firstly they all disappears underneath the body of loco anyway and thus can`t be seen, whilst secondly I don`t want to risk fouling up the swing of trucks once they`re back in place. As with all of this, I`m not going for a 100% rivet accurate museum model here, I just want to capture the flavour of all the essential components so that when you look at closely it appears to look "right", ie: things appear to be where they should be! :)

DSCN1820 (Copy).JPG

DSCN1822 (Copy).JPG

Thanks again, G


PhilP

G Scale, 7/8th's, Electronics
5 Jun 2013
33,656
3,535
Nottingham
Best answers
0
Country flag
Awesome modelling!
<Geek mode> Has to be a Phoenix soundcard lurking in that tank! <Geek sleeps..>?
;) :happy:
 

supagav

USA standard gauge in the late 1960's, in 1:29th.
30 Oct 2009
1,427
6
Oban, Scotland
www.facebook.com
Best answers
0
Thanks Phil!

You are exactly right, it is a Phoenix board!

It's one of their older versions, a 2K2 if I remember correctly. We normally use the newer chips like the P8 but we've had this loco a while so it still has one of the older ones inside. If you're interested, the other board on top of the rear weight is an NCE 808SR decoder for the lights and motor control. Whilst it is a little dated, this type of chip is rock-solid reliable and has some great lighting functions, in particular all the US style oscillating lights, so it will also come in handy to drive the new Mars light on the front.
 

Dtsteam

G Scale, Travel, Steam Boats, Mechanical Music
24 Oct 2009
5,401
15
Preston
Best answers
0
Country flag
supagav said:
As with all of this, I'm not going for a 100% rivet accurate museum model here, I just want to capture the flavour of all the essential components so that when you look at closely it appears to look "right"....

If this is "capturing the flavour" I dread to think what "100% rivet accurate" looks like ???
More power to your elbow mate - this is inspirational stuff !
 

beavercreek

Travel, Art, Theatre, Music, Photography, Trains
24 Oct 2009
17,704
705
Colchester, United Kingdom
www.facebook.com
Best answers
0
Country flag
This is just not right coming from a bloke so young! You have the skills of men four times your age (I exaggerate a tad, but you get my drift).

Gav, as ever, this is superb.
I hadve decided to not put anymore of my 'bashes' or 'amendments' onto the forum as they pale into insignificance to the extent of being laughable. The guys like you on the forum are just toooo darned goood!
Keep it going, I can't wait for the 'primer coat'....
 

supagav

USA standard gauge in the late 1960's, in 1:29th.
30 Oct 2009
1,427
6
Oban, Scotland
www.facebook.com
Best answers
0
Thanks guys, you are all far too kind!

Mike please don't stop sharing your stuff, I love your line and all your stock, and my only problem with it all has nothing to do with the standard of work, but the mere fact that we live at different ends of this island and can't run our stock together! I said the same to Richie at G-Rail too, as he was complaining about a clearly non-existant lack of skill on his part, obviously completely forgetting all of the fantastic work he put in building his snow plough which was featured on this site a while back. I remember quite clearly at the the time he was trying to go down the lines of: "oh I've never really built anything, never kit-bashed before, have no skills, have no idea what I'm doing...etc" and then he comes out with a model like that!!!

Thanks again though guys, your praise really does mean a lot :)
 

supagav

USA standard gauge in the late 1960's, in 1:29th.
30 Oct 2009
1,427
6
Oban, Scotland
www.facebook.com
Best answers
0
Hi,

Not much new to report here, although I did a little bit more work yesterday evening. I tweaked the last of the piping detail and gave it and the tank a wee touch of matt black to see how it would look, as well as pop the trucks back on for a test fit. I`m just to impatient to wait!

I apologise as these photos aren`t the most interesting but show where I am at so far:

DSCN1831 (Copy).JPG

DSCN1823 (Copy).JPG

DSCN1825 (Copy).JPG

DSCN1826 (Copy).JPG

DSCN1829 (Copy).JPG

Thanks again for keeping up with all this!
 

trammayo

Interested in vintage commercial vehicle, trams, t
24 Oct 2009
22,679
4,691
75
Co. Mayo
Country
Ireland
Best answers
0
Country flag
What type of filler are you using - it looks to stick extremely well judging by the fine finish you obtain between the pastic and the substance?
 

supagav

USA standard gauge in the late 1960's, in 1:29th.
30 Oct 2009
1,427
6
Oban, Scotland
www.facebook.com
Best answers
0
Hi Mick,

To be honest it's something I have never really given much thought to! We've always had Squadron Putty on our work bench and it seems to give really good results. It also dries quite quickly which is always nice as I really have no patience for these things! I've tried other brands briefly like Humbrol etc but I must admit that I haven't noticed a huge difference, maybe just the Squadron Stuff seems to be the easiest to work with so far. I'm currently using the white putty as most of our plastic is white or light grey, but I don't know if that makes any difference either?
 

supagav

USA standard gauge in the late 1960's, in 1:29th.
30 Oct 2009
1,427
6
Oban, Scotland
www.facebook.com
Best answers
0
I`ve also come across some detail I`m not quite sure about. The two white arrows in the two following pictures point to the what I`m talking about:

GP18 scan(1) (Copy).JPG


Attachments

  • GP18 for forum - scan(1) (Copy).JPG
    GP18 for forum - scan(1) (Copy).JPG
    54.7 KB · Views: 27

trammayo

Interested in vintage commercial vehicle, trams, t
24 Oct 2009
22,679
4,691
75
Co. Mayo
Country
Ireland
Best answers
0
Country flag
Thanks Gavin - I didn't realise that Squadron Putty was its actual name! Doh!
 

supagav

USA standard gauge in the late 1960's, in 1:29th.
30 Oct 2009
1,427
6
Oban, Scotland
www.facebook.com
Best answers
0
Don't worry Mick, me neither until I saw it on our work bench one day! I think my father must have bought it at a model railway exhibition.
 

3Valve

Railways; Air cooled VW's; Soul Music
24 Oct 2009
15,402
286
Shropshire
Best answers
0
Country flag
supagav said:
I've also come across some detail I'm not quite sure about. The two white arrows in the two following pictures point to the what I'm talking about:

Ah yes the famous inverted flange hose and widget fitting. Amazed you didn't know about that mate :D :D

In other words, I got no clue.
 

supagav

USA standard gauge in the late 1960's, in 1:29th.
30 Oct 2009
1,427
6
Oban, Scotland
www.facebook.com
Best answers
0
Hi,

Not much physical progress to report on the loco at moment, but I`ve doing a bit more research on some of the details. After a bit of kind help from the guys on a US forum it turns out that the pipe thingy-ma-bob that was confusing me is actually part of the locomotive coolant system. As US diesels didn`t use anti-freeze (I was told, and I`m not sure if that is still the case today either), when they are shut down in cold weather they must be drained out. It seems this wee thingy is a valve for filling or draining.

Here is a diagram they gave me for a SD40, although it`s wrong loco, these details don`t seem to vary much between the different EMD models:

sd40-3-6.gif

Apart from that I was looking at Titchy Train Group to see if I can find some rivets to build up some of the detail I lost while sanding down the top of the body for the fans. I ordered a whole selection of sizes to see what suit best as I`m sure I`ll use them for other things! Here is the website if anyone is interested:

http://www.tichytraingroup.com/Default.aspx

Thanks again for following and I promise I`ll post some more interesting pictures soon! G
 

PhilP

G Scale, 7/8th's, Electronics
5 Jun 2013
33,656
3,535
Nottingham
Best answers
0
Country flag
All the pictures, and the build, are awesome..
I know you do a bit at a time, but you must have the patience of a saint!
 

garrymartin

My Family,Railways, Beer and the Seaside
30 Oct 2009
10,036
5
Now Derbyshire !
Best answers
0
Country flag
Well you learn something every day :)
 

supagav

USA standard gauge in the late 1960's, in 1:29th.
30 Oct 2009
1,427
6
Oban, Scotland
www.facebook.com
Best answers
0
A little bit more to show today!

I made up a small part to represent the drain valve that I mentioned before. It`s not exact but I had to adjust the placement and shape a little to make sure it didn`t foul the swing of the trucks or bump the brake cylinders. It should be much closer to the cylinder on the left but I`m sure I can live with it ;)

DSCN1839 (Copy).JPG

DSCN1836 (Copy).JPG

The brass wire is 1.5mm, and there are two small collars made of styrene tube slipped over the end. The hose is 1.5mm heat shrink which I gently warmed with a hair dryer to reduce the overall diameter a little. I left a little extra of the brass rod and the tubing was slipped over the end and glued in place.

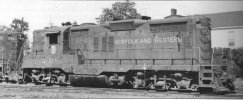
Here is another quick shot showing a dab of mat black paint to see how it would look. The extra hoops beside are features on these N&W units, and would be where they would hang the re-rail frogs that they used to help get equipment back on the rails in case of a minor de-railment:

DSCN1857 (Copy).JPG

I`d love to actually model these too but sadly I think they would interfere with the swing of the trucks. Some of these locos had them missing, particularly in later years, so I think it`s easier just to show the hooks themselves.

NW07326 (Copy).jpg

On the NKP GP18 above (before the NKP was absorbed into the N&W) you can see the layout of the re-railer and the hose over the rear truck. You can see they should be more spaced out but I think a little modellers`s licence is more than allowed in the name of operational reliability! Right??? ;)

Thanks again, G
 

supagav

USA standard gauge in the late 1960's, in 1:29th.
30 Oct 2009
1,427
6
Oban, Scotland
www.facebook.com
Best answers
0
Hi folks,

Not a huge amount of visible progress, but I finally got all the major bodywork detail finished! I decided to put it back together for a quick progress shot as I needed to take a wee break and take stock of where I am with all this:

DSCN1917 (Copy).JPG

DSCN1918 (Copy).JPG

DSCN1943 (Copy).JPG

DSCN1925 (Copy).JPG

DSCN1932 (Copy).JPG

DSCN1950 (Copy).JPG

DSCN1955 (Copy).JPG

The louvers were challenging, let`s just put it that way (!!!), but I must admit that I am pleased with the look as they do help to separate this from the standard USAT GP7 frame.

There are a few more detail parts left to complete such as the nose mounted bell and bracket and the spark arrestor covers over the exhausts, but it is finally getting there! I`ve just got to wait on a few more bits and bobs like the rivets arriving through the post so that I can move on with this project.

Thanks again for keeping up, G