You are using an out of date browser. It may not display this or other websites correctly.
You should upgrade or use an alternative browser.
You should upgrade or use an alternative browser.
Norfolk & Western GP18 Project
- Thread starter supagav
- Start date
.JPG")
.JPG")
supagav
USA standard gauge in the late 1960's, in 1:29th.
Work is very slow at the moment on this as the detail is a real pain, although I`m sure it`ll be worth it whens it`s done! (He says trying to convince himself...!) I cut off and smoothed out all the louvers on the loco sides that are wrong for a GP18, and began slowly building up the louver groups. There are six groups of ten louvers that need to be done for each side so this is a pretty slow job. It will improve the loco though as these are one of the main differences that distinguish all the different EMD GP models apart.
Firstly the louvers off the end, leaving just a single set as per the prototype:
.JPG")
Next the groups of ten louvers, originally 14 inches in size on the prototype I believe:
.JPG")
.JPG")
Again these are far from perfect on close inspection, though if I can keep them neat enough I know it will capture the look once they are all finished!
Thanks, G
Firstly the louvers off the end, leaving just a single set as per the prototype:
Next the groups of ten louvers, originally 14 inches in size on the prototype I believe:
Again these are far from perfect on close inspection, though if I can keep them neat enough I know it will capture the look once they are all finished!
Thanks, G
supagav
USA standard gauge in the late 1960's, in 1:29th.
Hi,
Progress is still slow on this loco but I`m slowly getting there with all the small details. The main issue is the all the louvers on the loco sides as these really do take a while to cut, file, measure and glue but I`ve finally got one side completed! The problem is that if they don`t look neat and regular then I fear that overall impression would be lost. First up though is the handbrake. I cut off the moulded on detail and replaced this with some fine scale chain:
.JPG")
.JPG")
On to the louver detail on the long hood of the loco. These really do help differentiate this as a later model EMD geep:
.JPG")
.JPG")
.JPG")
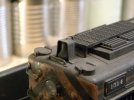
And finally I got one of the larger diameter 48" cap top fans installed:
.JPG")
These were taken from a USA Trains dynamic brake blister as they are exactly the right shape and size for this. Later models of EMD`s geeps, from the phase 3 GP9s onwards, had a pair of these style 48" fans instead of four smaller sized fans found on the GP7. Unfortunately I only have one of these spare so I`m currently waiting on another coming over from the US from USAT spares department.
And lastly an overview of the work so far:
.JPG")
Thanks again for looking! G
Progress is still slow on this loco but I`m slowly getting there with all the small details. The main issue is the all the louvers on the loco sides as these really do take a while to cut, file, measure and glue but I`ve finally got one side completed! The problem is that if they don`t look neat and regular then I fear that overall impression would be lost. First up though is the handbrake. I cut off the moulded on detail and replaced this with some fine scale chain:
On to the louver detail on the long hood of the loco. These really do help differentiate this as a later model EMD geep:
And finally I got one of the larger diameter 48" cap top fans installed:
These were taken from a USA Trains dynamic brake blister as they are exactly the right shape and size for this. Later models of EMD`s geeps, from the phase 3 GP9s onwards, had a pair of these style 48" fans instead of four smaller sized fans found on the GP7. Unfortunately I only have one of these spare so I`m currently waiting on another coming over from the US from USAT spares department.
And lastly an overview of the work so far:
Thanks again for looking! G
supagav
USA standard gauge in the late 1960's, in 1:29th.
I also forgot to mention that I started removing all the lettering with the help of some T-Cut and a packet of cotton buds. This stuff works a treat so long as you go slowly and carefully as too much rubbing can take off the body paint too.
I was previously hoping to keep some of the lettering but unfortunately from more closer research into some colour photos of the loco, the lettering and heralds on each nose are actually yellow so these will all need to be re-done in due course. With hindsight knowing this, I wish I had just stripped the whole loco down to start with but I didn't realise it would turn out to be such a big project!
Oh well, I'm sure it will be fine, just a little more work in the end!!!
russiansandy49
Southern Railway(USA),L&N,IC RR
Gav
More excellent progress with this loco.
The louvres all look fantastic and make a real difference.
The 48" fan looks great too---well done!
Looking forward to the finished article---keep up the good work.
Sandy
More excellent progress with this loco.
The louvres all look fantastic and make a real difference.
The 48" fan looks great too---well done!
Looking forward to the finished article---keep up the good work.
Sandy

beavercreek
Travel, Art, Theatre, Music, Photography, Trains
A fine piece of work and testament to your perseverance!
Better you than me Gav........
Better you than me Gav........
supagav
USA standard gauge in the late 1960's, in 1:29th.
Thanks for the kind words!
I know Mike, these wee bits have been a bit of a pain but I can feel it starting to come together.
I'm 3/4 of the way through the louvers and then they are done at last! Just the rear fan and to mount the bell on the nose then that's all the body work complete.
I still have a little work to do the side skirts as they aren't quite right with the fuel filler in the wrong place but that should be fairly straight forward I hope.
I find if I just keep plodding away, a wee bit each day, it soon begins to take shape, or at least that's my theory...!
Thanks again,
G
supagav
USA standard gauge in the late 1960's, in 1:29th.
Hi folks,
Progress has been slow on the GP18 as I`ve been away for a few weeks, and also waiting on some more bits and pieces to arrive.
The first thing to show is the new blanking plate for the large hole in the loco pilots. USA Trains leave a large hole on each end of the loco which I assume is to allow the engine to work on very tight curves with the older LGB style hook and loop couplers. When you fit a more accurate USA style coupler like Kadees, you are often left with a large gap around the coupler box which just never seemed to look right to me. I used to just cut some sheet styrene to fit but this time I decided I would prefer to make a specific part which I could use again on future locos.
Thus I made up a simple 3D print from Shapeways which would allow me to have a specific piece which could just pop right in to the loco without any major cutting and filing. The following pictures show the two parts as they came, with small tabs to allow the plate to be glued to loco frame:
.JPG")
.JPG")
They may need a little putty to achieve a nice smooth finished when they`re installed, but it does save me a bit of time and helps get a neater finish.
Progress has been slow on the GP18 as I`ve been away for a few weeks, and also waiting on some more bits and pieces to arrive.
The first thing to show is the new blanking plate for the large hole in the loco pilots. USA Trains leave a large hole on each end of the loco which I assume is to allow the engine to work on very tight curves with the older LGB style hook and loop couplers. When you fit a more accurate USA style coupler like Kadees, you are often left with a large gap around the coupler box which just never seemed to look right to me. I used to just cut some sheet styrene to fit but this time I decided I would prefer to make a specific part which I could use again on future locos.
Thus I made up a simple 3D print from Shapeways which would allow me to have a specific piece which could just pop right in to the loco without any major cutting and filing. The following pictures show the two parts as they came, with small tabs to allow the plate to be glued to loco frame:
They may need a little putty to achieve a nice smooth finished when they`re installed, but it does save me a bit of time and helps get a neater finish.
supagav
USA standard gauge in the late 1960's, in 1:29th.
Here are a few more pictures showing a test fit of the new pieces. As you can see from the photos, the new additional parts still allow the coupler draft box enough flexibility to pivot but help cut down on the wasted space and improve the overall aesthetic. Once these are painted they will disappear into the existing front end:
.JPG")
.JPG")
.JPG")
I received the second larger fan so I will get that installed in the loco body and hopefully get the last of the side louvers finished up soon so that I can move on with this project!
PS: As I mentioned previously, all the pieces I`m making for loco this will be available if anyone is interested, and you can order them through my own page on the Shapeways website. I`ll let you know as things progress.
supagav
USA standard gauge in the late 1960's, in 1:29th.
A little more progress made on the GP18, though still nothing much to report!
After a bit of drilling, cutting, filling and gluing I got the rear 48` fan installed:
.JPG")
.JPG")
That just leaves the last of the louvers to finish, as well as a nose mounted bell bracket which I am in the process of making.
Apart from that I did a little work on our SP S4 as a little change from this project.
I had originally moved the bell up on to the hood as per the prototype, but I was never really happy with the finish. I had tried to use styrene strip to make the bracket but it just never looked right, and to be honest it was a bit of a bodged effort! I knew I had to re-do it in brass to get the curvature right, so I finally bit the bullet and made a new piece. I also used some finer brass wire to represent the control wire which goes to the mechanism inside. A little weathering helped to blend it all in:
.JPG")
Thanks again for looking and keeping up with progress!
After a bit of drilling, cutting, filling and gluing I got the rear 48` fan installed:
That just leaves the last of the louvers to finish, as well as a nose mounted bell bracket which I am in the process of making.
Apart from that I did a little work on our SP S4 as a little change from this project.
I had originally moved the bell up on to the hood as per the prototype, but I was never really happy with the finish. I had tried to use styrene strip to make the bracket but it just never looked right, and to be honest it was a bit of a bodged effort! I knew I had to re-do it in brass to get the curvature right, so I finally bit the bullet and made a new piece. I also used some finer brass wire to represent the control wire which goes to the mechanism inside. A little weathering helped to blend it all in:
Thanks again for looking and keeping up with progress!
Attachments

supagav
USA standard gauge in the late 1960's, in 1:29th.
Just a quick update on progress so far.
In a nut shell... not much!!!
I`ve been trying to rework the pilot areas to see if I can achieve a more prototypical look. It`s not 100% accurate but I feel it`s starting to get a little closer to what I`m after. I carved up the original USAT steps to try and make something more like the GP18 front end:
.JPG")
Here they are in place. Still needs a bit more work but it`s starting to get there:
.JPG")
.JPG")
Thanks again for looking, G
In a nut shell... not much!!!
I`ve been trying to rework the pilot areas to see if I can achieve a more prototypical look. It`s not 100% accurate but I feel it`s starting to get a little closer to what I`m after. I carved up the original USAT steps to try and make something more like the GP18 front end:
Here they are in place. Still needs a bit more work but it`s starting to get there:
Thanks again for looking, G
3Valve
Railways; Air cooled VW's; Soul Music
Now I'm not into American me, so I tend to just skim-read American kit bashing threads, or wait for the finished result.
I mean absolutely no offence to any of our superb American bashers out there, but the progress shots mean very little to me when I've not a clue what the differences are between the various American prototypes.
However, I'm so glad I've taken the time to watch this thread in detail. Superb bashing sir, and a lot of techniques that are entirely relevant to any flavour of Garden Railway regardless of country or origins.
I shall now be re-visiting all those American kit-bash threads that I previously I skim-read.
Top Job Gav. Those louvers dude, how the hell do you maintain your patience
supagav
USA standard gauge in the late 1960's, in 1:29th.
Thanks Gareth! Your kind words mean a lot to me. The real pleasure is be able to share it with people ")
I do know exactly what you mean though about all of this as I find the same with British diesel prototypes. I guess maybe I was just born too young... I have a few friends up north from the Stirling MRC who very kindly let me join the Facebook page for their club even though I`m not officially a member. On that page they are making some very nice models in BR blue, but I get completely lost when the discussion turns to the details. Is it the right lamp-iron or head-code box? Should it be a large BR logo or small? Or when should it have a white stag or a scottie dog!!!
As for the patience, I guess I just do what I can be bothered doing, and if I can`t, well there is always tomorrow... I mean I still haven`t finished them yet! I just do things in small bits here and there so I don`t feel the urge to jump out the window! I mean this morning I had a spare 30-40 mins after my better looking other half left for work, so I just did a little bit more on a few things. After a week or so of 30 mins here and there, you realise it`s almost all done and you can finally move on!
Thanks again, I really appreciate it!
Here are a few showing the overall current progress:
.JPG")
.JPG")
.JPG")
I do know exactly what you mean though about all of this as I find the same with British diesel prototypes. I guess maybe I was just born too young... I have a few friends up north from the Stirling MRC who very kindly let me join the Facebook page for their club even though I`m not officially a member. On that page they are making some very nice models in BR blue, but I get completely lost when the discussion turns to the details. Is it the right lamp-iron or head-code box? Should it be a large BR logo or small? Or when should it have a white stag or a scottie dog!!!
As for the patience, I guess I just do what I can be bothered doing, and if I can`t, well there is always tomorrow... I mean I still haven`t finished them yet! I just do things in small bits here and there so I don`t feel the urge to jump out the window! I mean this morning I had a spare 30-40 mins after my better looking other half left for work, so I just did a little bit more on a few things. After a week or so of 30 mins here and there, you realise it`s almost all done and you can finally move on!
Thanks again, I really appreciate it!
Here are a few showing the overall current progress:
supagav
USA standard gauge in the late 1960's, in 1:29th.
Hi,
I got a little more done today on the frame on the geep. Now that I`m a bit happier with the front ends, I reached a point where I had to decide what to do with the side skirts. For this later model GP diesel they need a bit of chopping and re-working to get them more like the prototype. On the real thing they are narrower with a slightly different shape, as well as having the fuel filler cap in a different place. I had been putting this off as I wasn`t really sure how I would tackle it, but I decided I must stop procrastinating and make a start on it...
Here is another quick black & white shot of a real N&W GP18 (Ex NKP), where you can see that the skirts are wider near the fuel filler but narrows out along the length of the fuel tank:
.jpg")
Here it is before hand, with some of the raised detail cut back:
.JPG")
And after, showing the new narrower profile that widens round the filler and emergency fuel cut-off switch:
.JPG")
The new fuel filler, still needs a recessed cap and some light rivet detail round the outside edge:
.JPG")
.JPG")
It`s still looking a little rough at the moment but that will improve as I finish up the detail. Thanks again, G
I got a little more done today on the frame on the geep. Now that I`m a bit happier with the front ends, I reached a point where I had to decide what to do with the side skirts. For this later model GP diesel they need a bit of chopping and re-working to get them more like the prototype. On the real thing they are narrower with a slightly different shape, as well as having the fuel filler cap in a different place. I had been putting this off as I wasn`t really sure how I would tackle it, but I decided I must stop procrastinating and make a start on it...
Here is another quick black & white shot of a real N&W GP18 (Ex NKP), where you can see that the skirts are wider near the fuel filler but narrows out along the length of the fuel tank:
Here it is before hand, with some of the raised detail cut back:
And after, showing the new narrower profile that widens round the filler and emergency fuel cut-off switch:
The new fuel filler, still needs a recessed cap and some light rivet detail round the outside edge:
It`s still looking a little rough at the moment but that will improve as I finish up the detail. Thanks again, G
Similar threads
- Replies
- 8
- Views
- 325
- Replies
- 8
- Views
- 247
- Replies
- 22
- Views
- 1K
- Replies
- 10
- Views
- 511
- Replies
- 31
- Views
- 2K