New to battery power and RC

JimmyB

Now retired - trains and fishing
23 Feb 2018
6,891
910
69
Weston-super-Mare
www.tumble-down-falls.co.uk
Best answers
0
Country flag
Hello, everyone!
Thought I might give everyone an update as to my progress.
I finally decided to remove the LGB MTS card from my loco and the hardware required to transfer track power to the loco motor. Next I rewired the loco and tender for radio control (DelTang Tx22 transmitter with Rx65c or Rx66receivers) and battery power (4s Li ion battery from RLD Hobbies). I found that the pads A, B, and C of the receivers actually yield 3.3 v and the negative leads of the headlight LEDs should be soldered to them. The positive leads should be connected to either the L pad or the positive terminal of the high current Rx65 adaptor. All of the other pads P1 through P8 are wired with positive lead to the pad. I used a 47 or 75 ohm resistor in line with the LEDs to reduce the brightness to the desired level. The firebox is wired in with a full wave rectifier to the motor leads so polarity is always appropriate; the trigger lead for the firebox is wired to the negative lead so the LEDs will light when voltage is supplied to the motor). So far, so good. My big mistake was connecting the 65001 sound module to my "franken-loco." I thought that since the 65001 in analog mode was originally connected to track power I could simply connect the same leads to the motor leads from the Rx65 or the Rx66. Bad idea. Train ran for a few seconds, sound blaring. Then the sound stopped and then I stopped the train. I inspected the first the Rx65 which was extremely hot! I removed the 65001 and tried to move the train again. No luck. Nothing worked. I replaced the Rx65 with the Rx66. Really bad idea as I got the same result (extreme overheating and no LEDs on the receiver lighting up). Now the Rx65c has been replaced with an Rx65c adapted for higher current. It works fine without the 65001 (I'm afraid to try it with the sound module installed). Both of the dead Rx65 and Rx66 have been returned to my DelTang vendor for analysis. The original Rx65 is diagnosed "as dead as it can be;" I haven't heard about the Rx66 yet. This is getting expensive!
Does anyone know anything about the voltage requirements for the 65001 sound module?
Oh, for those of you who have made suggestions about the voltage required to run my Mogul - with all of the now obsolete MTS parts the Loco starts up at about 3 v and runs at nearly full speed around 10 volts. Seems much lower voltages are required if the MTS is removed. My 4s battery puts out about 16.5 volts when fully charged. I haven't operated the loco enough to run the battery down yet.
Thanks for all of your suggestions! My saga continues as I explore the world of sound modules.

Scott
San Diego, CA
My first question was are your Rx 65/66 upgraded to 18 volts, as otherwise these are only recommended for 13 volts, and you could have fried both. Second what is the current draw including the 65001, which seems to be current heavy :)
 

PhilP

G Scale, 7/8th's, Electronics
5 Jun 2013
33,455
3,504
Nottingham
Best answers
0
Country flag
Hello Scott, everybody...

Right, firstly, back to the very beginning..
Secondly, a look at the Rx6n receiver specifications, and what the pins actually do/are..
Thirdly, a blow-by-blow through the above post. where it is incorrect, and tie everything together.


Act One:
Scott states he has Mogul, wants to go battery RC etc.
Over the first dozen posts in this thread, we learn he wants to keep lighting (including firebox). That the loco has an early MTS card, and there is a generic steam sound unit ( a 65001) in the tender.
Post #2 scott has a Deltang vendor offering a way of doing things.. Several others chip-in with what they did, how battery DCC may-may-not be an easy install (it is, IF you want DCC, if you have the knowledge, and IF you do not need to alter anything via CV's).

But basically, by post #12, all the information is there to make an 'easy' transition to battery RC (granted, without sound at this point) and with a bit of reading and fore-thought, a working system. - No smoke.

We have learnt Scott has a deltang-derived Tx22 transmitter/controller, and access to Deltang Rx65c and Rx66a receivers/ESC's.
He also has a 4S Lithium-based battery-pack.

Act Two:
The Deltang Rx65c receiver/ESC is specified to work between 3-13V. So 3-8 NiMH cells, or 1-3 Lithium cells, etc. - A 4S battery exceeds this.
The fact it worked at all, is very lucky.. Either the batteries were below full-charge, or it was just luck that the particular Rx65c did not immediately self-oscillate, and destroy itself.
The motor outputs are a PWM signal, where 'full battery voltage' is switched off and on very rapidly.. If the 'on' part of the cycle is a lot smaller than the 'off', then the motor will rotate slowly.. If the 'on' part of the cycle is larger than the 'off' then the motor will rotate faster. - Please note, this is the 'lies to children' version. In reality, it gets a lot more complex than this, but we do not need to know that here.

Aside:
This off/on 'full-voltage' will have confused the hell out of the LGB 65001 sound module. - More on this later.

The 'A', 'B', and 'C' outputs on the Rx65c are 'reinforced outputs'. - Basically a transistor switch, which is either open (when off) or a connection to 'ground (0V) when on. Supposedly, capable of sinking 2 Amps each, but this all goes throught the tracks on the PCB, and the device is rated for a TOTAL CURRENT of 3 Amps. - That is for everything, motor, lights, driving the receiver..

The 'L' pin is an input for monitoring the voltage of a single Lithium cell, when a step-up device is used to increase the voltage to the receiver, but a single-cell is used because of space limitations.

The other output pins, are 'logic-level' outputs/inputs, from/to the chip on the PCB. They can theoretically sink 12mA per pin, so will drive a LED (or two with care) or can be used to provide a trigger to an external device. - Say, a soundcard.
They switch between 3.3V and 0V. - Which is the internal supply voltage of the processor etc. on the board. This 3.3V regulated supply is provided by a teeny-tiny 2mm square regulator chip, so it is self-evident, you can't pull lot's of current from these pins!
These 'logic-level' pins can drive LED's with a suitable resistor. - But watch your total-current draw!

All these pins can have their configuration altered by programming. Some of the defaults (as examples) are:
Pad 'A' Front Light (auto action) 0V when 'on', disconnected when 'off'. - So, as this is a 'reinforced output' you could drive a suitable voltage (battery supply) bulb for a front light. It would be wired between Pad 'A' and battery positive.
Pin 1 Front Light (auto action) 3.3V when 'on', 0V when 'off'. - So you could drive a LED directly from this output (with a series resistor). It would be wired from Pin 1, through a resistor, to the LED, and then then other leg of the LED would connect to 0V.
Pad 'C' On/Off Momentary action, Channel 5 (the Bind button). - Gives 0V when the button is pressed, so could be used to sound a whistle/horn by triggering a soundcard.
NOTE: NOT the 65001 soundcard!

Act Three:
I finally decided to remove the LGB MTS card from my loco and the hardware required to transfer track power to the loco motor

Decision made: remove MTS, so you are going to have to wire lights etc. yourself, work-out how to get them directional etc.

Next I rewired the loco and tender for radio control (DelTang Tx22 transmitter with Rx65c or Rx66receivers) and battery power (4s Li ion battery from RLD Hobbies).

The 4S battery exceeds the specification of the Rx65c. Theoretically, it should be OK with a Rx66a, but I would not personally do it. - Both these receivers can be obtained from certain suppliers with a replacement regulator. We guarantee the installation to 18V with this modification.

I found that the pads A, B, and C of the receivers actually yield 3.3 v and the negative leads of the headlight LEDs should be soldered to them. The positive leads should be connected to either the L pad or the positive terminal of the high current Rx65 adaptor.

This is not correct! - See Act Two, above, for the correct information on the Pad 'A' to 'C' output specifications.
This is not the correct usage of the 'L' Pad.

To use LED's with these pads, you would wire the LED's between the pads and Battery Positive. - You would need to calculate suitable series resistor values for your LED characteristics, using your battery-voltage.


I used a 47 or 75 ohm resistor in line with the LEDs to reduce the brightness to the desired level.

I would recommend you increase the value of the resistors to 150 ohms.

I like your approach to the Firebox LED's.. - Did you make it so you can turn this off/on from your transmitter?


I thought that since the 65001 in analog mode was originally connected to track power I could simply connect the same leads to the motor leads from the Rx65 or the Rx66. Bad idea. Train ran for a few seconds, sound blaring.

Remember what i said about the motor output? - You were putting pulses of full-battery-voltage into the 65001. This was thinking the loco was running very fast, and was also probably trying to work-out if there was a MTS data signal amongst all these pulses.

You have discovered the Buhler motors are pretty efficient, and will start turning with2-3 Volts. The MTS circuits require a good 5-6 Volts before they are 'happy' and start to join the party.
This is why many analogue LGB loco's will start moving well-before the sounds will start. - Some have an on-board battery, which will keep sounds going whilst an analogue loco is stationary. This battery can be charged from the track, but does require the loco to be run at quite a speed, for there to be enough voltage for this.

When the 65001 is fed from an analogue controller, it receives a smooth, constant voltage. This increases the faster the loco is made to run, so the unit can interpret this information and give a variable 'chuff' to match.
When the 65001 is fed a PWM signal, it gets (lots!) of pulses of full-voltage (value is roughly your battery-voltage). The card thinks these big pulses mean 'very-fast', and tries to keep-up.
You can use an 'opto-isolator' to convert the pulses to a smoothly increasing voltage, or you can fit a special filter circuit which will do the same thing. Unfortunately, whichever of these you choose, there will be some delay before the sound starts, as the 65001 needs 5-6 Volts before it will operate correctly.
If the unit had the necessary parts, then an external 'chuff-trigger' could be used to drive the 65001 to correctly chuff to the wheel rotation. Unless the sound unit had extra wires down to the wheels (other than for power-pickup) I doubt it is equipped to do this, sorry.


Now the Rx65c has been replaced with an Rx65c adapted for higher current. It works fine without the 65001 (I'm afraid to try it with the sound module installed).

This module will be quite power-hungry, so this is a wise decision. - It 'could' be fed through a suitable isolation device, but this would require a certain level of knowledge to do safely.
A slight correction/query: You say the replacement Rx65c is "adapted for higher current"? - You would only be able to pull more current by using an external ESC.. I believe you probably have a Rx65c with a little extra board on it (not a big one covering the whole receiver)? If I am correct, then this is an alternative regulator, allowing the Rx65c to work with a higher battery supply voltage.

It may be your supplier still had the older Rx65b available? - In which case there would be a second board, as big as the original receiver, This board would increase the current capacity of your system.
The older (now no longer available) Rx65b was good to approximately 18V, as supplied.


Scott,
This has not been meant a s a dig at you, but an explanation of what went wrong.
Hopefully, it is of use, and may help other who stumble across it in the future?

Enjoy your trains!
Phil Partridge.
phil@rctrains.co.uk
 

FatherMcD

Registered
13 Mar 2014
377
34
Idaho
Country
United-States
Best answers
0
Country flag
Hello sm-brown

That answers how the lights work currently
I rarely, if ever remove stock loco wiring.
To keep an installation as simple possible, I like to leave installed stuff like MTS.
I separate the motors from the on board wiring.
So that the lights, smoke etc can keep on working I power the stock on board wiring (MTS) from the traction batteries.
The voltage polarity (relay coil) is controlled by a small dpdt powered and controlled by the directional light output on the ESC. Usually reverse.
Doing it this way you will achieve a good steady top speed on a battery voltage 14-15 volts the chosen ESC can handle.
Apart from the relay, no rewiring is needed.

If you can decide on that basic way of installing your equipment, adding sound triggers is easy.
Tony, does one of the How To's on your website cover this? I have an LGB Queen Mary Forney that has factory installed sound. Haven't opened it up yet, but it behaves like sm-brown's Mogul. Thanks, Ken
 
8 Mar 2014
7,806
972
San Diego
Country
Armenia
www.elmassian.com
Best answers
0
Country flag
I think Phil gets an award for helpfulness, and clear and straightforward explanation, it's a fundamental thing that most people go through when they are excited to just get started.

The PWM description, how it interacts with analog devices, and also to a lesser degree, the current limiting resistor needs to be calculated, a simple thing to do with online calculators for those who do not quite get Ohms law.

Great job Phil.
 

dunnyrail

DOGS, Garden Railways, Steam Trains, Jive Dancing,
Staff member
GSC Moderator
25 Oct 2009
26,076
4,976
75
St.Neots Cambridgeshire UK
Best answers
0
Country flag
Great stuff Phil, you have given me some pointers in my lack of Deltang understanding.

One of the things to gain from this I think is that battery control and DCC do not go together unless you have a specific Battery DCC setup. There are a few in US but only ones I know of readily available in UK are Fosworks and Crest. I cannot see the point with either of these (or indeed any others) in attempting to make them work from Track Power.

As for the ability of updating CV’s once a Battery setup has been created, these days I am putting in a 2 pin plug and DPDTCO directly connected to the dcc input. This can then act as a sort of programming track with 2 crock clips connected to a DCC Central Station. The DPDTCO switches between Battery Power or Track Power for Cv updates. I do remove all ability to run on Track Power.
 

GAP

G Scale Trains, HO Trains, 1:1 Sugar Cane trains
14 Jun 2011
4,039
936
Bundaberg Queensland, Australia
Country
Australia
ringbalin-light-railway.blogspot.com
Best answers
0
Country flag
Questions about battery and DCC and why they not go together.
The main difference I can see is that the controller and the onboard electronics are not running from the same power source, am I correct or are there other considerations?
I have a basic understanding how DCC works by sending signals plus applying drive voltage, through the rails; so I am surmising that the signals would have to be fed via some wiring that replaces the rails.
Disclaimer; I base my limited knowledge of DCC on running it on my HO layout where the controller, the track and the chips all share the same power source.
 

Rhinochugger

Retired Oik
27 Oct 2009
36,552
4,234
North West Norfolk
Best answers
0
Country flag
I think Phil gets an award for helpfulness, and clear and straightforward explanation, it's a fundamental thing that most people go through when they are excited to just get started.

The PWM description, how it interacts with analog devices, and also to a lesser degree, the current limiting resistor needs to be calculated, a simple thing to do with online calculators for those who do not quite get Ohms law.

Great job Phil.
I think, when we look at this issue, Phil's assistance to Max on the K27 / Sierra thread, and Phil's offline input on my Galloping Goose, we should be realising that RC Trains is the goto place for RC solutions here in the UK :clap::clap::clap:
 

dunnyrail

DOGS, Garden Railways, Steam Trains, Jive Dancing,
Staff member
GSC Moderator
25 Oct 2009
26,076
4,976
75
St.Neots Cambridgeshire UK
Best answers
0
Country flag
Questions about battery and DCC and why they not go together.
The main difference I can see is that the controller and the onboard electronics are not running from the same power source, am I correct or are there other considerations?
I have a basic understanding how DCC works by sending signals plus applying drive voltage, through the rails; so I am surmising that the signals would have to be fed via some wiring that replaces the rails.
Disclaimer; I base my limited knowledge of DCC on running it on my HO layout where the controller, the track and the chips all share the same power source.
I think why Track Power and battery DCC systems may not be compatible is due to the fact that you are supplying something (the Battery DCC setup) that needs a stable IE battery powervrather than a variable or even messed about current with possibly quite high amp ratings. But I need to bow to other experts in this description.

I still ask the question if you have bought a battery setup to loose the issues of track power (dirty rails, poor track joins, voltage loss through long wire runs, track cleaning) why would you want to use track power?
 
Last edited:

JimmyB

Now retired - trains and fishing
23 Feb 2018
6,891
910
69
Weston-super-Mare
www.tumble-down-falls.co.uk
Best answers
0
Country flag
I still ask the question if you have bought a battery setup to loose the issues of track power (dirty rails, poor track joins, voltage loss through long wire runs, track cleaning) why would you want to use track power?

On a couple of my smaller locos where the battery and electronic magic live I put in a DPDTCO switch so that I could change to track power, though I have never used the facility, and won't be doing it again.
 

PhilP

G Scale, 7/8th's, Electronics
5 Jun 2013
33,455
3,504
Nottingham
Best answers
0
Country flag
Questions about battery and DCC and why they not go together.
The main difference I can see is that the controller and the onboard electronics are not running from the same power source, am I correct or are there other considerations?
I have a basic understanding how DCC works by sending signals plus applying drive voltage, through the rails; so I am surmising that the signals would have to be fed via some wiring that replaces the rails.
Disclaimer; I base my limited knowledge of DCC on running it on my HO layout where the controller, the track and the chips all share the same power source.
The DCC signal is (in layman's terms) a on/off square wave, which is centred around '0V'.
The output of the ESC used in (most) RC systems, is a pulse width modulated square wave, where the 'on' and 'off' period widths define the 'voltage' seen by the motor, and hence its speed..

All the DCC electronics is sitting between the incoming power/signal and the motor.
This electronics tries to make some sort of sense of the PWM signal, but it is not a valid signal. So the decoder does not know what to do.

With conventional track-power DCC, the command from the central station travels (with the power) over the rails.
This is picked up by the loco's which look to see if every command applies to their address.

With battery RC DCC systems, the central station is effectively within the loco.
The batteries are analogous to the transformer.
The commands are transmitted to the receiver within the loco, and then converted to a DCC signal to feed into an ordinary DCC decoder, OR the decoder is combined with the receiver.
The former allows for the simplest convertions, as the battery and receiver only needs to be connected to the track power wires.
Where the decoder is integral to the receiver, is 'better' for a completely new installation, rather than converting an already DCC equipped loco.

PhilP
 

dunnyrail

DOGS, Garden Railways, Steam Trains, Jive Dancing,
Staff member
GSC Moderator
25 Oct 2009
26,076
4,976
75
St.Neots Cambridgeshire UK
Best answers
0
Country flag
The DCC signal is (in layman's terms) a on/off square wave, which is centred around '0V'.
The output of the ESC used in (most) RC systems, is a pulse width modulated square wave, where the 'on' and 'off' period widths define the 'voltage' seen by the motor, and hence its speed..

All the DCC electronics is sitting between the incoming power/signal and the motor.
This electronics tries to make some sort of sense of the PWM signal, but it is not a valid signal. So the decoder does not know what to do.

With conventional track-power DCC, the command from the central station travels (with the power) over the rails.
This is picked up by the loco's which look to see if every command applies to their address.

With battery RC DCC systems, the central station is effectively within the loco.
The batteries are analogous to the transformer.
The commands are transmitted to the receiver within the loco, and then converted to a DCC signal to feed into an ordinary DCC decoder, OR the decoder is combined with the receiver.
The former allows for the simplest convertions, as the battery and receiver only needs to be connected to the track power wires.
Where the decoder is integral to the receiver, is 'better' for a completely new installation, rather than converting an already DCC equipped loco.

PhilP
I have in effect done both types as mentioned in you last paragraph Phil, putting in a new Massoth Decoder to replace a factory fitted on that had issues with chuff sensing. Both systems were Trainline45 Mallets and both perform admirably with their revised system of DCC operation using Fosworks DCC.
 

dunnyrail

DOGS, Garden Railways, Steam Trains, Jive Dancing,
Staff member
GSC Moderator
25 Oct 2009
26,076
4,976
75
St.Neots Cambridgeshire UK
Best answers
0
Country flag
On a couple of my smaller locos where the battery and electronic magic live I put in a DPDTCO switch so that I could change to track power, though I have never used the facility, and won't be doing it again.
I can see the logic for some of having the ability to power via track or battery but not the battery system via track a very different scenario that Phil has so eloquently mentioned in post #50 above.
 
8 Mar 2014
7,806
972
San Diego
Country
Armenia
www.elmassian.com
Best answers
0
Country flag
I'm trying to understand this statement.

"Where the decoder is integral to the receiver, is 'better' for a completely new installation, rather than converting an already DCC equipped loco."

So this is the wireless receiver and decoder in one board? Like the very successful AirWire products by CVP, who were the first to do "wireless DCC"?

Now there are quite a few wireless receivers that basically have the DCC track output and you choose any one of these and pair it with any standard DCC decoder.

This gives quite a lot of flexibility in choosing your wireless system without being locked into any specific manufacture of decoders.

Great leg up, and solves the issue of buying a loco that comes with DCC installed, no longer do you have to "throw away" the stock decoder and buy a new DCC decoder specific to your wireless control system.

Getting very popular with battery people here in the US, more choices is good.

Greg
 

GAP

G Scale Trains, HO Trains, 1:1 Sugar Cane trains
14 Jun 2011
4,039
936
Bundaberg Queensland, Australia
Country
Australia
ringbalin-light-railway.blogspot.com
Best answers
0
Country flag
In laymans terms if I wanted to convert my battery locos I would require a new;
1. transmitter
2. a receiver for every loco.
3. a DCC decoder for each loco

The receiver would feed signals from the transmitter to the DCC decoder which would then control to the existing ESC, all powered by the battery. There would be outputs on the decoder for whistle, light control etc.

Am I correct here?
 
8 Mar 2014
7,806
972
San Diego
Country
Armenia
www.elmassian.com
Best answers
0
Country flag
So, given your battery locos already have a receiver, and an ESC and no decoder.

So you do NOT use the ESC... a module that has the receiver, and the "brains" to directly drive a DCC decoder, like the Revolution DCC unit, or the Airwire Convrtr, or any of the other like systems.

Then a DCC sound decoder of your choice.

The decoder would drive the motor, lights, sound, smoke, etc.

Not trying to change what you have, the original point on the thread was a loco that had a DCC decoder already, just add the receiver and batteries no other rewiring necessary.

Maybe I am misinterpreting what you are asking....

Greg
 

GAP

G Scale Trains, HO Trains, 1:1 Sugar Cane trains
14 Jun 2011
4,039
936
Bundaberg Queensland, Australia
Country
Australia
ringbalin-light-railway.blogspot.com
Best answers
0
Country flag
So, given your battery locos already have a receiver, and an ESC and no decoder.

So you do NOT use the ESC... a module that has the receiver, and the "brains" to directly drive a DCC decoder, like the Revolution DCC unit, or the Airwire Convrtr, or any of the other like systems.

Then a DCC sound decoder of your choice.

The decoder would drive the motor, lights, sound, smoke, etc.

Not trying to change what you have, the original point on the thread was a loco that had a DCC decoder already, just add the receiver and batteries no other rewiring necessary.

Maybe I am misinterpreting what you are asking....

Greg
No that has cleared up things.
DCC would involve throwing away the ESC and sound cards I already have so not for me at this point in time.
 

dunnyrail

DOGS, Garden Railways, Steam Trains, Jive Dancing,
Staff member
GSC Moderator
25 Oct 2009
26,076
4,976
75
St.Neots Cambridgeshire UK
Best answers
0
Country flag
In laymans terms if I wanted to convert my battery locos I would require a new;
1. transmitter
2. a receiver for every loco.
3. a DCC decoder for each loco

The receiver would feed signals from the transmitter to the DCC decoder which would then control to the existing ESC, all powered by the battery. There would be outputs on the decoder for whistle, light control etc.

Am I correct here?
Answer for sound.
Not quite as I have things. Please remember that I have converted to battery DCC using sound Decoders. Thus external sound Decoders not relevant though I have proven the system Battery DCC systems work with an LGB Decoder and an LGB Sound Box. Effectively with the battery DCC Systems I have used (FOSWORKS and Crest) the Battery DCC receiver replaces the central station, but you do need in each loco as I have done.

Answer for Lights
if a DCC decoder is in place already no revisions to lights required.

Answer for numbered questions
So yes 2 and 3 are correct for a conversion.
1 however FOSWORKS now Dow’s a transmitter that can be used for up to 10 Locomotives thus a big saving. Recent adds have apparently upped this total but I am not sure how this has been achieved as yet.
 

The Shed

Citizen of the Republic of the North East.
8 Mar 2020
1,064
238
Darlington, County Durham.
Country
England
Best answers
0
The scenario:

Regrettably this will never reach a conclusion as he sadly passed away a short time ago.

He had a ground level PIKO DCC track powered garden railway and due to his age and onset of Arthritis found track cleaning was becoming a chore.

He also wished to retain all the features that he was familiar with using the PIKO DCC system, and had no wish or desire to learning something new, plus he had a huge investment in time, labour and of course money tied up in equipment and stock.

The solution:

Minor rewire of the layout infrastructure, which was fairly simple to accomplish, in simple terms all links to the tracks were disconnected, and subsequently rejoining to the existing simplified 'BUS' system to create a simpler form of LCC, (Layout Command Control) whereby all the existing point decoders, signals etc were operable directly from the handheld Navigator.

Loco's proved even simpler to accomplish using batteries as the on board power source, using products from Tam Valley, Tam Valley Depot

In fact so simple it's hardly worth the explanation!

DRS1 Transmitter and PIKO Receiver at present located in the shed, some 50 feet away, not in direct line of sight and a fairly substantial brick wall between them and the rest of the test equipment in the kitchen.

DRS1 MKIII TRANSMITTER 869 MHZ.png


Set up in the kitchen.
DRS1 MKIII Receiver 869 MHZ.png

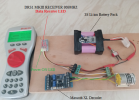
Whilst the PIKO Navigator and the DRS1 Receiver are only a few inches apart, the transmission signal out from commands are sent from the PIKO Navigator to the PIKO receiver in the shed, then resent from the DRS1 transmitter back to the DRS1 receiver in the kitchen.

No problem works a treat, minimal work required to the decoder input, in disconnecting the track power IN wires, and replacing with the outputs from the DRS1. Other items shown are optional, just makes it easier to show as a complete setup.

And that's it, no faffing or messing about required!
 
8 Mar 2014
7,806
972
San Diego
Country
Armenia
www.elmassian.com
Best answers
0
Country flag
Yes, very similar to what AirWire pioneered years ago, with the pros and cons of using a protocol designed for a hardwired environment over wireless. Normally works well enough with a few tweaks, like number of horn packets.

I know Duncan, but he now sells the dead rail stuff out of a different place. He's quite an ingenious guy, I have used his frog juicers too, great for live frogs.

Greg