Now I imagine that some on here will be wondering why he is doing that when there exists a Battery Powered one already? Well the answer is that I have no need for a Track Cleaning Loco, I want one that is controllable (the Track Cleaner to the best of my knowledge can only be made to go Backwards or Forwards), I want Sound and I was not prepared to pay the premium cost of the Track Cleaner. Finally the Track Cleaner has Traction Tyres a particular hate of mine!
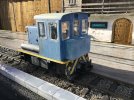
So I searched the net and found that Tops Slots in Blackpool were offering a Blue one for £159.99 plus £2.99 Postage. Great deal I thought so I ordered one for it to be delivered in a day or so.
First job was to pull it to bits to see if I could fit what I needed to and where. This is a small loco and space is at a premium. But I figured with some faffing, cutting and ingenuity I could do the job. But a health warning here, if you are not prepared to accept add ons, hacking and inspirational fitting of things this may not be the conversion for you. You have been warned!
So a few pics of inspiration from the net, these three appeared to offer some idea's even though one is not a 25 Tonner.


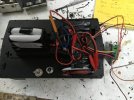
The insides were removed as the space they took would be needed. For the record here are the Circuit Boards though the Grey Speaker Enclosure will be replaced inside the Roof with a Speaker. At this stage I also began to work out how Batteries may be fitted and the third pic with the £2 Coin shows my standard Lash of AAA Batteries that will fit into the varying spaces. The 4 at the rear under the Cab Floor and the 6 inside the Hood. This means that some of the necessary Weight for Haulage will be lost. Careful work with the Kitchen Scales revealed a loss of 383g with the big one the Batteries only replacing some 191g of that so some more weight to find. The Batteries and varying Sound and Control were thus ordered from Fosworks that were happy to make up my required Battery Configuraion. The picture helps Fosworks enormously in this respect.


Then we came to Cutting and generally messing up the investment in a Piko Loco. The cab bottom has screw places to fit some of the Boards. So these were chopped out. Also as it was suggested and turned out to be the only place to fit some of the new cards Coupling Mountings has to go as well. More of this later.

Having made space below as it were a trial fit of the varying components showed that the Receiver and Speed Controller would indeed fit where the Coupling Mountings had been removed. But this required extensions to the joining wires, while I was about it I also extended the wires from the Speed Controller that go into the Sound Card as well. All in all a pain in the butt to do, but the only way. The next three pictures shows what fits and where, Speed to the Rear Receiver to the Front and with the Chassis Wedged in plus the view from above. Bit of a jumble but I now knew that it was going to happen, to this point I was beginning to wonder!


Next up was the issue of where to fit the Switch and Charging Socket. My recent Railbus Conversion was always seen as a possibility and the Black Non 25 Tonner Pic with the Tank on the running plate the inspiration for my solution. But first a pic of the two items mounted on the footplate and the wires that slot out of the Back go to the Sound Card which is to be mounted in a Utility Box.

Couplings needed to be addressed, the prototype helps us here and the Mounting Plate outside had the Central Lug removed to make way for Buffers and the inevitable screws that would be used to hold the Couplings in place. Here you can see an unmodified one but with theCoupling Drop Down Spacing Of 6mm in place, together with the other end with a Coupling held in place by 10ba Nuts and Bolts. I used a leftover pair of Newquid ones as they are easy to saw off the unwanted buts.


More plastic removal, I found that the lugs that hold the rear of the Cab down had to go as they would not go in place after the varying bits had been put in place . Also getting the Cab off if required in the future would be the devils own job. So off they came. I also cut out a couple of bits from the cab rear (sadly no pic) just to the middle if the two lugs to enable wires to exit to the rear for the soundcard.

Thus a start was made on the rear Utility Box and the sides can be seen on both this and where the Tank Will go that is removable for Charging and On/off Switch. A couple of small 12 BA Screws can be seen that help to hold it in place.
Now you see it.

Now you dont.

Rear view if the cab showing theSound Card and the bits leading to it. This will be lost inside the Utility Box.

But it all works, runs satisfactorily and pulls a more than adequate load for its intended shunting use.
Finishing off and where I fitted the lead to come.
So I searched the net and found that Tops Slots in Blackpool were offering a Blue one for £159.99 plus £2.99 Postage. Great deal I thought so I ordered one for it to be delivered in a day or so.
First job was to pull it to bits to see if I could fit what I needed to and where. This is a small loco and space is at a premium. But I figured with some faffing, cutting and ingenuity I could do the job. But a health warning here, if you are not prepared to accept add ons, hacking and inspirational fitting of things this may not be the conversion for you. You have been warned!
So a few pics of inspiration from the net, these three appeared to offer some idea's even though one is not a 25 Tonner.
The insides were removed as the space they took would be needed. For the record here are the Circuit Boards though the Grey Speaker Enclosure will be replaced inside the Roof with a Speaker. At this stage I also began to work out how Batteries may be fitted and the third pic with the £2 Coin shows my standard Lash of AAA Batteries that will fit into the varying spaces. The 4 at the rear under the Cab Floor and the 6 inside the Hood. This means that some of the necessary Weight for Haulage will be lost. Careful work with the Kitchen Scales revealed a loss of 383g with the big one the Batteries only replacing some 191g of that so some more weight to find. The Batteries and varying Sound and Control were thus ordered from Fosworks that were happy to make up my required Battery Configuraion. The picture helps Fosworks enormously in this respect.
Then we came to Cutting and generally messing up the investment in a Piko Loco. The cab bottom has screw places to fit some of the Boards. So these were chopped out. Also as it was suggested and turned out to be the only place to fit some of the new cards Coupling Mountings has to go as well. More of this later.
Having made space below as it were a trial fit of the varying components showed that the Receiver and Speed Controller would indeed fit where the Coupling Mountings had been removed. But this required extensions to the joining wires, while I was about it I also extended the wires from the Speed Controller that go into the Sound Card as well. All in all a pain in the butt to do, but the only way. The next three pictures shows what fits and where, Speed to the Rear Receiver to the Front and with the Chassis Wedged in plus the view from above. Bit of a jumble but I now knew that it was going to happen, to this point I was beginning to wonder!
Next up was the issue of where to fit the Switch and Charging Socket. My recent Railbus Conversion was always seen as a possibility and the Black Non 25 Tonner Pic with the Tank on the running plate the inspiration for my solution. But first a pic of the two items mounted on the footplate and the wires that slot out of the Back go to the Sound Card which is to be mounted in a Utility Box.
Couplings needed to be addressed, the prototype helps us here and the Mounting Plate outside had the Central Lug removed to make way for Buffers and the inevitable screws that would be used to hold the Couplings in place. Here you can see an unmodified one but with theCoupling Drop Down Spacing Of 6mm in place, together with the other end with a Coupling held in place by 10ba Nuts and Bolts. I used a leftover pair of Newquid ones as they are easy to saw off the unwanted buts.
More plastic removal, I found that the lugs that hold the rear of the Cab down had to go as they would not go in place after the varying bits had been put in place . Also getting the Cab off if required in the future would be the devils own job. So off they came. I also cut out a couple of bits from the cab rear (sadly no pic) just to the middle if the two lugs to enable wires to exit to the rear for the soundcard.
Thus a start was made on the rear Utility Box and the sides can be seen on both this and where the Tank Will go that is removable for Charging and On/off Switch. A couple of small 12 BA Screws can be seen that help to hold it in place.
Now you see it.
Now you dont.
Rear view if the cab showing theSound Card and the bits leading to it. This will be lost inside the Utility Box.
But it all works, runs satisfactorily and pulls a more than adequate load for its intended shunting use.
Finishing off and where I fitted the lead to come.
Attachments
Last edited:


 ) but the entire technology is different, not just the chargers, and I think if you're going to go that way, you've got to have everything on Li-on, otherwise you'd have to have some massive database of what's been charged when, where and how.


