Made a start at last...

So, here's my go at reducing the need to stretch over the track or kneel on the station board to change points.
Plastic tube with plastic inner attached to a ball joint used for various R/C type applications and then attached to a slightly modified switching mechanism. The modification just involved cutting out a nick to allow for full movement of the lever so it's not hindered by the nut holding the ball in place and drilling the operating lever to accommodate said ball.
DSC_0009.JPG
The tube comes white but a spray with some grey primer makes it blend nicely with the felt and is held in place with cable clips.
Not as good as electric motors or servos etc, but certainly a good stop-gap until a time when i can consider electically operating the points.

DSC_0009.JPG
DSC_0010.JPG
At the moment, operation is simply achieved by pulling or pushing on the exposed end of the inner cable - I will come up with something more permanent in due course. However, as a cheap means of operating the awkward to reach points, it seems to be very successful so far.

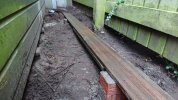
Finally, another photo of the general station area - I think this is likely to be the extent of the trackwork in the station now. I must turn my attention to the main running lines, which might be more of a problem as the track I stockpiled for this railway 0 years ago was the equivalent of a little over a tenner for a 5' length. The equivalent seems to be about 30-40 quid a piece now. Gulp!
DSC_0003.JPG
 
That looks good and I do like the ball joint at the switch end of the linkage.
I am a great fan of mechanical point operation, my 20+ years in '0' gauge peaked with hi-tech brass rod in brass or nylon tube. But it always worked...
If I ever get a G scale layout going - as opposed to just collecting more & more kit in anticipation! (sound familiar?) - I will have to look out for a simple lever frame, as I foolishly let mine go with the "small" stuff and will follow your progress with interest.
 
Thanks for the comments.
Very conveniently, the underside of the operating lever has a blind hole in it which makes it nice and easy to drill neatly through.
A lever frame would be great but at the moment, each operating cable just extends to the edge of the station board.
 
So, after a few days or is it weeks already, of apparent inactivity, things have been progressing nicely on the developing railway.
Last week, my shed (or Operations Control Centre as I grandly call it!) was powered up by the electrician courtesy of the armoured cable buried under the station boards. I now have a proper secure power supply for my Train Engineer and a powered test track in the shed - got to use those surplus Radius 1 curves somewhere!

DSC_0085.JPG

After this, I bought some extra wide Aristo-craft curves as i wanted to create a more flowing curved line rather than just following the back fence in a straight line. The curves ARE big but they look great with the U-class trundling round without the excessive overhang evident on Radius 1 curves in particular.

We (my 9 year old and I) decided that a temporary circuit would be good, just to watch the trains go by, while we continued with other developments, such as the track round the back of the shed which we could now start because the sparky had done his works in that area so we could get on and extend!
DSC_0081 (1).JPG

DSC_0090.JPG
The route behind the shed starts through the tunnel onto a rising gradient initially of about 1 in 50 but I might have to ease it as there is a 90 degree curve at the corner of the shed.

DSC_0088.JPG
This is not a permanent arrangement - just a test at this stage of gradient and alignment.
 
One of the features of the line will be an upper level and lower level main line and having bought the excellent girder bridge from the Doncaster show earlier in the year, I wanted a water feature so I could utilise the bridge properly.
DSC_0109.JPG

Hole in the ground can only mean one thing - pond!

The trouble is, before we had the extension built last year, we had the garden blitzed and a raised piece of ground with a silver birch was removed from the area in the photo so that as the house ate into the garden, we recovered some usable space in the garden - what this means is that digging around in this area means chopping through lots of left over roots (many of which can be seen on the left) and we had to be very careful to remove all so that we didn't get a punctured pond liner.

Filling the liner - I've never made a pond before so was not sure how this would work - seemed like I'd have a flooded garden in no time, but, the instructions were correct in the pond liner package.

DSC_0113-mod.jpg

The water is about a foot deep and the liner did as it said, i.e. sunk into the hole to follow the contours of the pit. I had to get the bridge over it, just to see how it looked.
DSC_0115.JPG

The intention is to create a waterfall so, time to pile up the rock face...

DSCPDC_0001_BURST20170716182817413.JPG

I decided after this that I wanted the waterfall (this is not the final thing btw, just a hosepipe trickling) to be higher and above the height of the bridge the, so after searching through my rock pile, I came up with mark 2.

DSC_0123.JPG

Not sure about the "jagged rock formation" and might have to find some more rounded examples but this view also shows the proposed route of the low level line, using those wide radius curves.

So, that's it for the time being - bits are being done on a fairly regular basis but I must admit, I didn't think I'd have a pond and water feature so well progressed so quickly, but it needed to be done so we can get the track up the gradient behind the shed and now of course,curve it round (thus leaving a good planting area) to join the bridge then curve round the corner of the garden where a passing station will be built. So far, it seems to be going well...
 
Hi Dave, just stumbled on this thread and you and your son seem to be enjoying yourselves!
I am a few years further ahead than you. My lads are now 17/18 years old and no longer much interested, but my system is up and running, it has stood the test of time, and once I clean the track it works perfectly - although time pressures mean it is only once in a while.
I am in Strensall and it would seem you are not far away, since you have used your 'local' model shop in York (mine too!). Perhaps we should compare efforts with a joint running session sometime soon?

I teach for a living so have plenty of time on my hands during the summer hols....do let me now if interested and let's see how we might meet up.

Peter
 
When you do the Waterfall it is always worthwhile putting Pond Liner below the Rocks to make a sort of a river below to ensure that any leaking water goes into the pond. With a shallow one like that the water could soon dissapear on a warm day with a leaky waterfall. You could of course Cement the Rocks together but the Pond Liner thing holds if you do that. Suggest you use G4 on any cement as it seals in the Lime and stops the water becoming foul for pond life. Probably best not to put fish in as they are likely to freeze in ice on a cold winter with such a shallow pond. But Frogs or Newts if around will probably make use of it in the Spring and will love to hide in gaps left in the rocks. Be careful if you ish to add plants, some can get very big but I have seen a dwarf Lilly that might be ok or some small water grasses would fit in. Justbput them in a tray in the bottom. No need to worry about shelves in the pond it is not deep enough.

Like your Point Operation, if you go for Motors (at some time) might be worthwhile just driving the existing push me pull you's that you have installed. That way all the point motors will all be at the front of the layout making installation and wiring so much easier.
JonD
Thanks very much for the advice Jon. As I am a complete novice where ponds are concerned that sounds very useful. The liner does go underneath the rocks (but I suspect that's not quite what you meant?) and I am proposing to cement them in place - so far I have used postcrete on the basis that it works by pouring it into water - however, I'm sure I could remove it and use something more appropriate - excuse my ignorance but what is G4 please?

Not planning on fish but we already have frogs in the garden and a newt (not Great Crested I hope or I might have to stop work!) so I imagine I might get a bit wildlife in there.

I'm still tweaking the height of the main rock supports at the moment to maybe get the gradient less steep. I do want reasonable length trains to be able to use the higher level circuit.
 
Hi Dave, just stumbled on this thread and you and your son seem to be enjoying yourselves!
I am a few years further ahead than you. My lads are now 17/18 years old and no longer much interested, but my system is up and running, it has stood the test of time, and once I clean the track it works perfectly - although time pressures mean it is only once in a while.
I am in Strensall and it would seem you are not far away, since you have used your 'local' model shop in York (mine too!). Perhaps we should compare efforts with a joint running session sometime soon?

I teach for a living so have plenty of time on my hands during the summer hols....do let me now if interested and let's see how we might meet up.

Peter
Hi Peter - small world! I'm not far away at all. Not sure if it's the right way to contact you but I've started a conversation.

Regards

David
 
Hello Peter and David - I didn't know there was so much interest in G scale in our area; I am also not that far away living in Wistow, north of Selby Don't let the India flag with my avatar fool you; I am only out here with work, but the G scale Central site always updates my location.
Regards, Graham..
 
Thanks very much for the advice Jon. As I am a complete novice where ponds are concerned that sounds very useful. The liner does go underneath the rocks (but I suspect that's not quite what you meant?) and I am proposing to cement them in place - so far I have used postcrete on the basis that it works by pouring it into water - however, I'm sure I could remove it and use something more appropriate - excuse my ignorance but what is G4 please?

Reply,
So long as the Liner directs Water back into the Pond that will be OK.

G4 is a sort of Varnish substance that seals in the Lime etc that can be damaging to both Fish and your Pump. You can get it from Proper Pond Centres, not your usual BnQ Chancers that sell some bits of Pond Stuff. Just let it dry for a day or two before getting Water on it.


Not planning on fish but we already have frogs in the garden and a newt (not Great Crested I hope or I might have to stop work!) so I imagine I might get a bit wildlife in there.

Reply,
Best keep quiet on that just in case!


I'm still tweaking the height of the main rock supports at the moment to maybe get the gradient less steep. I do want reasonable length trains to be able to use the higher level circuit.

Used to live in Thorpe Willoughby, in fact my first Garden Railway was built in Foxdale Avenue but I moved away in 1978. Pity not in the area as there would appear to be more G Scalers than where I live in St.Neots. Though Gizzy and another live not too far away.
JonD
 
It's been a while since I have updated my thread but the railway is still progressing but much more slowly due to work commitments, shorter evenings and trying to overcome my trepidation of building with bricks and mortar.

The pond is now paved around the edges and I have laid a solid Postcrete foundation for the prick piers which will support the trackbed as it approaches the bridge over the pond. The main stones to support the bridge are mortared into place and the bridge deck is satisfyingly level and the piers are now going in on the track which will be on the embankment as it appears from behind the shed. My intention is to fill this area with soil again up to track level and then plant either a herb patch or maybe some Alpine type plants with the high level track curving through it - for now, anyone reading this thread will need to use their imagination but I am hoping it will look good in due course, and there will be a low level track skirting the edge of the planted area and the pond as the line will be 2 independent circuits joined at the main junction station.

This part is taking me a long time to develop but I am having to learn how to use the various building materials and boy do I admire the way the bricklayers built our extension when I can't even get the mortar to adhere to a brick! Don't look too closely at the mortar work but the good news is that those piers are remarkably solid, and although in my case, practice will not make perfect, it should certainly make "better looking"!bridge.JPG ramp.JPG
 
Thanks very much for the advice Jon. As I am a complete novice where ponds are concerned that sounds very useful. The liner does go underneath the rocks (but I suspect that's not quite what you meant?) and I am proposing to cement them in place - so far I have used postcrete on the basis that it works by pouring it into water - however, I'm sure I could remove it and use something more appropriate - excuse my ignorance but what is G4 please?

Not planning on fish but we already have frogs in the garden and a newt (not Great Crested I hope or I might have to stop work!) so I imagine I might get a bit wildlife in there.

I'm still tweaking the height of the main rock supports at the moment to maybe get the gradient less steep. I do want reasonable length trains to be able to use the higher level circuit.
Sorry missed the G4 query it is a cement sealer and can be bought from good Pond Shops rather than DIY outlets. Comes in Black or Shiny Clear, best to turn the pump off when you use it for a few days even better to remove pump from the pond. You will get an oily like slick on the surface when used (if you manage to splash any about - inevitable) this can be partially removed with a bit of newspaper but will eventually dry up and make some floating balls that can then be fished out of the pond.
JonD
 
It's been a while since I have updated my thread but the railway is still progressing but much more slowly due to work commitments, shorter evenings and trying to overcome my trepidation of building with bricks and mortar.

The pond is now paved around the edges and I have laid a solid Postcrete foundation for the prick piers which will support the trackbed as it approaches the bridge over the pond. The main stones to support the bridge are mortared into place and the bridge deck is satisfyingly level and the piers are now going in on the track which will be on the embankment as it appears from behind the shed. My intention is to fill this area with soil again up to track level and then plant either a herb patch or maybe some Alpine type plants with the high level track curving through it - for now, anyone reading this thread will need to use their imagination but I am hoping it will look good in due course, and there will be a low level track skirting the edge of the planted area and the pond as the line will be 2 independent circuits joined at the main junction station.

This part is taking me a long time to develop but I am having to learn how to use the various building materials and boy do I admire the way the bricklayers built our extension when I can't even get the mortar to adhere to a brick! Don't look too closely at the mortar work but the good news is that those piers are remarkably solid, and although in my case, practice will not make perfect, it should certainly make "better looking"!View attachment 228261 View attachment 228262

Looking excellent. It may not be completely necessary to build a solid foundation, but once you have got it it is great. You should have a lot of good reliable running.
 
Looking excellent. It may not be completely necessary to build a solid foundation, but once you have got it it is great. You should have a lot of good reliable running.
Thanks. That's what I'm hoping. It all seems so different from wooden baseboards for smaller scale indoor layouts.
 
It's been a while since I have updated my thread but the railway is still progressing but much more slowly due to work commitments, shorter evenings and trying to overcome my trepidation of building with bricks and mortar.

The pond is now paved around the edges and I have laid a solid Postcrete foundation for the prick piers which will support the trackbed as it approaches the bridge over the pond. The main stones to support the bridge are mortared into place and the bridge deck is satisfyingly level and the piers are now going in on the track which will be on the embankment as it appears from behind the shed. My intention is to fill this area with soil again up to track level and then plant either a herb patch or maybe some Alpine type plants with the high level track curving through it - for now, anyone reading this thread will need to use their imagination but I am hoping it will look good in due course, and there will be a low level track skirting the edge of the planted area and the pond as the line will be 2 independent circuits joined at the main junction station.

This part is taking me a long time to develop but I am having to learn how to use the various building materials and boy do I admire the way the bricklayers built our extension when I can't even get the mortar to adhere to a brick! Don't look too closely at the mortar work but the good news is that those piers are remarkably solid, and although in my case, practice will not make perfect, it should certainly make "better looking"!View attachment 228261 View attachment 228262
Mortar is a bit of a black art, too much water and it is all sloppy too little and things tend to not bed in place. Best advice I can give is to mix with little water added by a rose from a watering can, mix that all up and if it feels too thick add a little more then mix again till all the water is absorbed. Keep on till you get a good mix that compresses well but not too much. Oh and a little washing up liquid helps with the mix as well, helps to plasticine I believe the expression is. If you add too much water and it is all sloppy you can always add a little bit more cement and sand. Oh for a better job you do need Building Sand nor Sharpe Sand for Mortaring Bricks.
JonD
 
Yes I had an early wake up call today! I used to be disloeptic but I am KO Now. Washing up liquid is what most people would have around the House, but do not nick all SWMBO's best Fairy Liquid!
JonD
Thanks both for the advice.
I have been using bagged mortar mix from B&Q which I know won't be the cheapest option but seems to be quite easy to use as the proportions are right. However, I shall try the washing up liquid approach to see if that helps.
Yesterday's brief foray into the garden was to set some bricks into postcrete then force mortar down the holes to lock them together.
All seems very firm this evening when I had a look at it and the resultant pillars will be the supports for the gradient to the embankment and bridge.
 

Attachments

  • DSC_1145.JPG
    DSC_1145.JPG
    163.6 KB · Views: 0
Back
Top Bottom