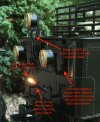
I needed to replace the lower right tender lantern bulb in my RhB G4/5. The manual is not correct about how it is done or the specified bulb - at least for the version I have. The manual says to unscrew the lantern housing unplug the dead bulb from the socket and insert a new 5V E130023 bulb. The version I have has 24V, E130110 bulbs that are soldered to the leads coming through the wall of the tender shell. There is extra lead length inside the tender shell but the shell needs to be removed from the chassis in order to access it. The excess is in a twisted loop to keep it orderly. The leads are soldered to the bulb. Pulling some of the extra lead length out of the shell makes it easy to desolder the dead bulb and solder in a new one. Carefully slit the old shrink tube starting at the bulb to get at the solder joints. Don't lose the small O-ring that acts as a retainer to keep the bulb in the lantern housing. Make sure to put it and new shrink tube on the wires before soldering the new bulb. See the attached pic.

While I was working on the lok I also replaced the lower two water level check "valves" that had broken off. I used small brass nails. I chucked the nails in a drill and turned them down to the right size against a file. I also had to turn down the "stem" to fit the original hole. The holes were cleared by hand of the remaining broken "stem" with a small drill in a pin vice. The nails I had on hand were actually brass plated steel. I touched them up with brass Model Master Metalizer Laquer. I'm pleased with how this turned out. The replaced "valves" are the lower two in the next photo.

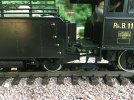
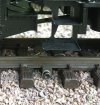
I also made one other visual improvement to the lok that can be seen above. I shortened the lok - tender drawbar length 1 cm by drilling a new attachment hole on the drawbar. I found that this needs to be done on the lok end of the drawbar. I didn't want to cut off the now excess length in case I need to restore it to the the original in the future. There is clearance for the extra length under the lok. There is none on the tender. The tightest curves on my RR are two very short sections with a radius just over that of LGB R2. These were custom bent to make the track fit the location. Otherwise, it is all R3 or greater. The lok still traverses these limiting track sections with the shortened drawbar. It has plenty of clearance.

While I was working on the lok I also replaced the lower two water level check "valves" that had broken off. I used small brass nails. I chucked the nails in a drill and turned them down to the right size against a file. I also had to turn down the "stem" to fit the original hole. The holes were cleared by hand of the remaining broken "stem" with a small drill in a pin vice. The nails I had on hand were actually brass plated steel. I touched them up with brass Model Master Metalizer Laquer. I'm pleased with how this turned out. The replaced "valves" are the lower two in the next photo.

I also made one other visual improvement to the lok that can be seen above. I shortened the lok - tender drawbar length 1 cm by drilling a new attachment hole on the drawbar. I found that this needs to be done on the lok end of the drawbar. I didn't want to cut off the now excess length in case I need to restore it to the the original in the future. There is clearance for the extra length under the lok. There is none on the tender. The tightest curves on my RR are two very short sections with a radius just over that of LGB R2. These were custom bent to make the track fit the location. Otherwise, it is all R3 or greater. The lok still traverses these limiting track sections with the shortened drawbar. It has plenty of clearance.
Last edited:


