idlemarvel
Neither idle nor a marvel
I just acquired this from a fellow forumite. It's had prior owners and taken a few bullets, but I hope to restore it to full working order.


REVIEW
The model is of a Deutsche Bahn E10, prototype built in 1958 onwards, with some variants for different classes of work (E40, E41) some of which still operate today. It's a bit unusual for LGB as it is a model of a standard gauge prototype. There are only a small number of standard gauge locos produced by LGB, some DB diesels (V100, V200) and a few wagons and passenger cars. Standard gauge prototypes is really PIKO G-scale territory now although of course Märklin have the Gauge 1 product line on 45 mm finescale track which are even more pricey than LGB.
The model is 595 mm long over buffers which compared to the prototype length of 16.49 m makes it about 1:28 scale, similar to PIKO models. The model is very simple, a body shell with glazing, a couple of cab clip-in partitions and a chassis. No opening doors, no driver figure, all quite minimalist. The roof electricals are quite detailed, but the pantographs are the flimsiest plastic you can imagine. The motor blocks are standard LGB with bullet-style brushes on all the wheels and pickup skates in between. The coupling hooks attached to the motor blocks are fitted to a self-centring extension piece to handle pulling rolling stock around R1 curves.

The model comes with alternative single buffer beams, not very prototypical but useful if you want to run this with your existing narrow gauge rolling stock. The loco has directional lighting, a single LED each end with light tubes / prisms to illuminate the three lamps at each end.

There are a few LGB variants of this model. The first 20750 is the same as 21750 except it has a 10 pin DCC interface not a 27 pin, otherwise they are the same DB steel blue colour scheme and running number E10 190. Following that 20755 which is an oxide green livery BR 139 variant 139 134-1. This had an mfx sound decoder fitted, as did all subsequent models. The fourth 21751 is blue and beige livery E10 1240, then there was another DB steel blue 21755 number 110 135-1, and finally in 2018 a limited edition 20756 oxide green class 140 variant 140 101-7.
This model 21750 is shipped with the 27 pin DCC interface and a "blanking plug" so it can operate in DC analogue mode. The LGB recommended route for DCC upgrade is to add a 27 pin 55028 mfx sound decoder but these are not available at the moment. You can get 55029 "retrofit" which includes a 27 pin decoder (I assume a 55028) and the 27 pin socket mounting plus a small speaker. These are available, RRP €189. Not a bad price for a G scale motor and sound decoder and speaker but they recommend replacing the supplied speaker.
REPAIRS
I said this model had taken a few bullets. To summarise the immediate issues that needed fixing:
- lights don't work
- one pantograph broken probably beyond repair
- 27-pin decoder interface damaged by poor soldering
- erratic running, slows down randomly then resumes
- squeals and slows down on R1 curves, most noticeably on right hand curves
On the plus side the body, paintwork and lettering are in very good condition, as are the wheels and motor blocks.
Taking the loco apart is relatively easy. It's best to remove the roof hardware first to avoid further damage.

The instructions show the location of the screws. Three out of the five sets were missing on my loco but no matter, easily replaced.


The cab has basic detailing, and you can see why there is no driver figure provided. A normal G-scale driver figure would have difficulty sitting in the hot seat without some dramatic surgery! (As an aside, the E10 was one of the first DB electric locos which allowed the driver to sit down; previously they had to stand which was thought to maintain the driver's attention!)

The LED lights had blown, I am pretty sure because they were hard wired to track voltage with no protective resistor. It is imperative to have a resistor in series with any LED. Some decoders (not Massoth) have resistors built-in to their outputs but you don't want to rely on that. The supplied LEDs are flat topped but I only had domed LEDs, but it doesn't seem to matter.

While I was testing the loco on DC analogue I found that every now and then the loco would slow down then resume speed, at different points on the track. On investigation it appeared the front motor block was stopping and being pushed by the rear motor. I opened up the motor blocks (I wanted to remove the skates anyway, not necessary IMO when you have a 8 pickup wheels on a long wheelbase) and I found the problem. One of the pins that the 4 pin motor block plug connects to had been pushed into the motor block, and was only allowing intermittent contact. Once the pin was pushed back into position the loco ran as expected.


The squealing on right hand R1 curves was more difficult to track down. It transpired the weight at the front, which is located under the chassis, was not screwed in properly on one side, so it was hanging slightly lower on the right hand side, just enough to catch the motor block.

That was easy to fix but then I noticed that the motor blocks would not rotate quite enough. This turned out to be the 4-pin plugs in the motor block catching on the chassis recess at the extremes of rotation. It wouldn't matter on R2 curves or greater, but for R1 curves the bogies couldn't quite turn enough which means the wheel flanges are rubbing against the rails excessively.

Once these three faults were fixed the loco ran smoothly and quietly. I can't abide locos that don't run smoothly, no matter have visually attractive they are.
The damaged pantograph was beyond repair, at least by me. One of the insulators was missing, and the broken plastic struts were quite thin and I don't think glue would have held for long. Luckily LGB/Märklin Germany spares had one in stock, and amazingly they ship to the UK and equally amazingly it arrived from Germany in 3 working days.

DCC UPGRADE
I did think about buying a 27 pin decoder to simplify the DCC upgrade but once I opened the loco I found the circuit board had been damaged by a previous owner (not the one I bought it from) and hard-wired for DC analogue with some very dodgy soldering. Also the plugs had been cut off the 4-wire motor block cables. I wasn't sure this circuit board would still work so I decided to go my default route of adding a Massoth XL decoder with a Massoth S decoder for sound.

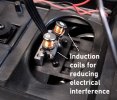
So I made the decision to strip out all the wiring and start from scratch. I did wonder whether to keep the motor block 4-pin plugs which strangely had induction coils fitted, but after some discussion on another thread I decided to keep them. I started off by connecting the wires off the 4 pin motor block plugs together (track + and -, motor + and -) and then connecting track to motor so I could test in DC analogue mode. The inner pins of the 4-pin block go the the track, and the outer pins to the motor.

That all worked so next step was to add a Massoth XL decoder. I used the LGB/Massoth colouring code white/brown/yellow/green for the wires. Once that was tested in DCC and DC analogue the next step was to add the lights. I reused the wires from the blown LEDs with new domed white LEDs and soldered a 1K ohm resistor inline, and connected them to LI-V (front), LI-H (rear) and +22 (+ve common). Without the body shell on it is difficult to know which is the front so I labelled the chassis to avoid confusion. Always test newly installed decoders on programming track (service mode) before putting onto powered track, that way any wiring shorts will show up in programming mode before any damage can be done when you connect power.
With the motor and directional lights working, I added the Massoth S sound decoder and speaker. There is a Massoth sound project for the E10 so I updated the sound decoder before I installed it. I decided to use the SUSI cable connection option rather than connecting the sound decoder to track power. In general SUSI is the easiest installation option but there are some downsides, like there are many configuration options not available in SUSI mode, and it is hard if not impossible to read CV values off the sound decoder when connected this way. You can however write CV settings using "programming on main" mode with the SUSI 900-upwards range of CV addresses. I stuck the sound decoder to a piece of foam, plugged in the SUSI cable and the speaker cable, and proceeded to test. I attached the speaker to the roof of the body shell.


So that's it. Here is the completed loco running with a few coaches. I might have a go at detailing the cab and fitting a driver figure at some point, but for now time to play.

REVIEW
The model is of a Deutsche Bahn E10, prototype built in 1958 onwards, with some variants for different classes of work (E40, E41) some of which still operate today. It's a bit unusual for LGB as it is a model of a standard gauge prototype. There are only a small number of standard gauge locos produced by LGB, some DB diesels (V100, V200) and a few wagons and passenger cars. Standard gauge prototypes is really PIKO G-scale territory now although of course Märklin have the Gauge 1 product line on 45 mm finescale track which are even more pricey than LGB.
The model is 595 mm long over buffers which compared to the prototype length of 16.49 m makes it about 1:28 scale, similar to PIKO models. The model is very simple, a body shell with glazing, a couple of cab clip-in partitions and a chassis. No opening doors, no driver figure, all quite minimalist. The roof electricals are quite detailed, but the pantographs are the flimsiest plastic you can imagine. The motor blocks are standard LGB with bullet-style brushes on all the wheels and pickup skates in between. The coupling hooks attached to the motor blocks are fitted to a self-centring extension piece to handle pulling rolling stock around R1 curves.
The model comes with alternative single buffer beams, not very prototypical but useful if you want to run this with your existing narrow gauge rolling stock. The loco has directional lighting, a single LED each end with light tubes / prisms to illuminate the three lamps at each end.
There are a few LGB variants of this model. The first 20750 is the same as 21750 except it has a 10 pin DCC interface not a 27 pin, otherwise they are the same DB steel blue colour scheme and running number E10 190. Following that 20755 which is an oxide green livery BR 139 variant 139 134-1. This had an mfx sound decoder fitted, as did all subsequent models. The fourth 21751 is blue and beige livery E10 1240, then there was another DB steel blue 21755 number 110 135-1, and finally in 2018 a limited edition 20756 oxide green class 140 variant 140 101-7.
This model 21750 is shipped with the 27 pin DCC interface and a "blanking plug" so it can operate in DC analogue mode. The LGB recommended route for DCC upgrade is to add a 27 pin 55028 mfx sound decoder but these are not available at the moment. You can get 55029 "retrofit" which includes a 27 pin decoder (I assume a 55028) and the 27 pin socket mounting plus a small speaker. These are available, RRP €189. Not a bad price for a G scale motor and sound decoder and speaker but they recommend replacing the supplied speaker.
REPAIRS
I said this model had taken a few bullets. To summarise the immediate issues that needed fixing:
- lights don't work
- one pantograph broken probably beyond repair
- 27-pin decoder interface damaged by poor soldering
- erratic running, slows down randomly then resumes
- squeals and slows down on R1 curves, most noticeably on right hand curves
On the plus side the body, paintwork and lettering are in very good condition, as are the wheels and motor blocks.
Taking the loco apart is relatively easy. It's best to remove the roof hardware first to avoid further damage.
The instructions show the location of the screws. Three out of the five sets were missing on my loco but no matter, easily replaced.
The cab has basic detailing, and you can see why there is no driver figure provided. A normal G-scale driver figure would have difficulty sitting in the hot seat without some dramatic surgery! (As an aside, the E10 was one of the first DB electric locos which allowed the driver to sit down; previously they had to stand which was thought to maintain the driver's attention!)
The LED lights had blown, I am pretty sure because they were hard wired to track voltage with no protective resistor. It is imperative to have a resistor in series with any LED. Some decoders (not Massoth) have resistors built-in to their outputs but you don't want to rely on that. The supplied LEDs are flat topped but I only had domed LEDs, but it doesn't seem to matter.
While I was testing the loco on DC analogue I found that every now and then the loco would slow down then resume speed, at different points on the track. On investigation it appeared the front motor block was stopping and being pushed by the rear motor. I opened up the motor blocks (I wanted to remove the skates anyway, not necessary IMO when you have a 8 pickup wheels on a long wheelbase) and I found the problem. One of the pins that the 4 pin motor block plug connects to had been pushed into the motor block, and was only allowing intermittent contact. Once the pin was pushed back into position the loco ran as expected.
The squealing on right hand R1 curves was more difficult to track down. It transpired the weight at the front, which is located under the chassis, was not screwed in properly on one side, so it was hanging slightly lower on the right hand side, just enough to catch the motor block.
That was easy to fix but then I noticed that the motor blocks would not rotate quite enough. This turned out to be the 4-pin plugs in the motor block catching on the chassis recess at the extremes of rotation. It wouldn't matter on R2 curves or greater, but for R1 curves the bogies couldn't quite turn enough which means the wheel flanges are rubbing against the rails excessively.
Once these three faults were fixed the loco ran smoothly and quietly. I can't abide locos that don't run smoothly, no matter have visually attractive they are.
The damaged pantograph was beyond repair, at least by me. One of the insulators was missing, and the broken plastic struts were quite thin and I don't think glue would have held for long. Luckily LGB/Märklin Germany spares had one in stock, and amazingly they ship to the UK and equally amazingly it arrived from Germany in 3 working days.
DCC UPGRADE
I did think about buying a 27 pin decoder to simplify the DCC upgrade but once I opened the loco I found the circuit board had been damaged by a previous owner (not the one I bought it from) and hard-wired for DC analogue with some very dodgy soldering. Also the plugs had been cut off the 4-wire motor block cables. I wasn't sure this circuit board would still work so I decided to go my default route of adding a Massoth XL decoder with a Massoth S decoder for sound.
So I made the decision to strip out all the wiring and start from scratch. I did wonder whether to keep the motor block 4-pin plugs which strangely had induction coils fitted, but after some discussion on another thread I decided to keep them. I started off by connecting the wires off the 4 pin motor block plugs together (track + and -, motor + and -) and then connecting track to motor so I could test in DC analogue mode. The inner pins of the 4-pin block go the the track, and the outer pins to the motor.
That all worked so next step was to add a Massoth XL decoder. I used the LGB/Massoth colouring code white/brown/yellow/green for the wires. Once that was tested in DCC and DC analogue the next step was to add the lights. I reused the wires from the blown LEDs with new domed white LEDs and soldered a 1K ohm resistor inline, and connected them to LI-V (front), LI-H (rear) and +22 (+ve common). Without the body shell on it is difficult to know which is the front so I labelled the chassis to avoid confusion. Always test newly installed decoders on programming track (service mode) before putting onto powered track, that way any wiring shorts will show up in programming mode before any damage can be done when you connect power.
With the motor and directional lights working, I added the Massoth S sound decoder and speaker. There is a Massoth sound project for the E10 so I updated the sound decoder before I installed it. I decided to use the SUSI cable connection option rather than connecting the sound decoder to track power. In general SUSI is the easiest installation option but there are some downsides, like there are many configuration options not available in SUSI mode, and it is hard if not impossible to read CV values off the sound decoder when connected this way. You can however write CV settings using "programming on main" mode with the SUSI 900-upwards range of CV addresses. I stuck the sound decoder to a piece of foam, plugged in the SUSI cable and the speaker cable, and proceeded to test. I attached the speaker to the roof of the body shell.
So that's it. Here is the completed loco running with a few coaches. I might have a go at detailing the cab and fitting a driver figure at some point, but for now time to play.
Attachments
Last edited:

