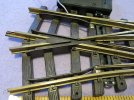
LGB 1235 3 Way Point

Gizzy

A gentleman, a scholar, and a railway modeller....
Country flag
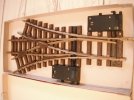
I've mentioned on this forum that I have an LGB R3 three way point, which I believe is quite rare. (The current LGB offering is R1. I have a few of these useful space saving switches on my railway.

I brought this point many years ago on Ebay for a good price, but in those early days, I didn't realise it was R3 and 22.5 deg, so it didn't fit with my R1 points as I wanted.

I brought a 2nd hand R3 point from Adverse Camber and I used it on my first layout, before I moved.

I also used it on my current layout at Pip's Junction. However, it is showing its age, so I am relocating it to the station throat scissors crossing, replacing the current set-up using R1 points, with R3.

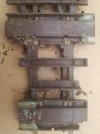
I've had to repair the sleeper ends where the point levers/motors attach. here's a photo or 2 of this rare beast....

thumbnail_20230221_165626.jpg
 
Last edited:
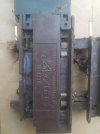
Here is a picture of the underside, confirming the LGB number and the country of manufacture, Switzerland....

thumbnail_20230221_165644.jpg
 
When we were building the Ruschbahn back in 2004/5 we had lots of space issues in the fiddle yard located in the Garage. A couple of them would have been very useful as we used R3 points in there. Pity we never even knew of their existence back then.
 
Looks like even though they are older, they have check rails in the right places, unike the LGB R1's. I also like the fact the point blades are located so they don't clash. I wonder why LGB stopped making them?

If I had known these were a thing before I got my LGB R1 3-way then I would definatley have gone with them:

Dreiweg-Weiche R3, 2 x 22,5°
 
I see the Bertram Heyn R3 3-way has live frogs. That should make the wiring "interesting"! :)
 
I see the Bertram Heyn R3 3-way has live frogs. That should make the wiring "interesting"! :)
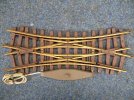
I have a couple of Heyn Diamond Crossovers. The frogs are actually brass coloured plastic.

I wonder if the frogs on the 3YP are the same....
 
I have a couple of Heyn Diamond Crossovers. The frogs are actually brass coloured plastic.

I wonder if the frogs on the 3YP are the same....
From reading the manual for the 3-way, they are indeed live frog.

I see the Bertram Heyn R3 3-way has live frogs. That should make the wiring "interesting"! :)
Looks like two of the frogs are wired together, switching is done with two DPDT switches.
 
The 3YP needed some repairs, having been lifted from Pip's Junction.

Some of the sleeper ends have broken off, especially the ones where the levers/motors are fixed to.

I found one of the ends and super-glued it back in position yesterday. Today, I've reinforced the repair and the other mounting points with Epoxy. Unfortunately, I won't be able to fit LGB point motors. Once the Epoxy has set, I will re-drill the holes for the self tapping mounting screws, and fit a couple of LGB Point levers.

As this point is to be relocated at the station throat, I can accept this compromise....

thumbnail_20230222_113945.jpg
 
Repairing broken sleeper ends.....
Find the broken bit, or create one from loose sleepers
Outside, I repeat, Outside, use a soldering iron and melt the plastic together from the inside face.
This is enough to hold it together, then roughen up the rest of the near surface, and then epoxy glue.

Why outside? The fumes are nasty, a windy day helps.

Obviously, an electric soldering iron, a gas one will leave a molten blob with rails poking out.

Clean the tip well after doing this!

Malcolm
 
Repairing broken sleeper ends.....
Find the broken bit, or create one from loose sleepers
Outside, I repeat, Outside, use a soldering iron and melt the plastic together from the inside face.
This is enough to hold it together, then roughen up the rest of the near surface, and then epoxy glue.

Why outside? The fumes are nasty, a windy day helps.


Malcolm
I have done this with an old soldering iron I used to have in the past Malc, but I didn't want to use my nice new one....
 
I had a re-thunk about the point motors.

I realised that I could fix and screw these in place, so whilst the epoxy resin was still soft, I fitted a motor in place on the left diverging side, and fitted a point lever the right side.

A quick re-jig has been done, and I'll see how things are once the epoxy has set overnight....
 
That’s what work soldering irons are for!

Admittedly, I now use an old iron for melting thermoplastics not my temp controlled one.

Glueing in a point lever base is a good idea, as the internals can be taken out for attention.

Malcolm
 
I wonder why LGB stopped making them?
They were hand assembled in Switzerland and expensive to make, with a real "motor" in the point motor.... and I gather that customers kept asking for a R1 three way point.9C30DBF0-84A8-4AFB-A35D-83C98F04E2ED.jpeg

The original double slip was similar. Both the original 3 way point and double slip disappeared from the product line at the same time.
 
Last edited:
They were hand assembled in Switzerland and expensive to make, with a real "motor" in the point motor.... and I gather that customers kept asking for a R1 three way point.View attachment 310436

The original double slip was similar. Both the original 3 way point and double slip disappeared from the product line at the same time.
One would have thought/hoped that in these enlightened days of cheep build in China they and the better slip could be re-introduced by Marklin, I would certainly be tempted to just squeeze a bit more room in my Garden Shed fiddle yard where every inch matters.
 
There was a version with a single point motor, only suitable for indoors. This single motor could easily be replaced with 2 EPL motors though.

AFAIK, the geometry was identical....
 
This single motor could easily be replaced with 2 EPL motors though.
Actually, it can't.

The original 1225 double slip had two positions, cross or curve (which is actually very useful). This means that each set of point blades had its own tie bar, and those tie bars have to move in different directions when the slip "switched". This is very easy for a child to understand, so has high play value. The downside is that if you need to manually "change the points", you need to turn the knob on top of the point motor.

Due to the dual blade tie bars at each end, you can't just simply fit a pair EPL (or similar) single action point motors and retain the original motion... plus the interface between the tie bars and point motor is different to an EPL point motor.

1F8296D4-8C60-4088-9577-B49F6E1C6350.jpeg


The current double slip also has two tie bars at each end but they are not able to move independently, which means that you can't set a "cross both straight routes" position. This makes setting a route through the slip much harder for a child to grasp (and I have seen adults also struggle with it on occasions too), but you can manually change the linked point blades with a flick of the finger.

951EE43F-DDC3-49EF-B568-D59F9100DBAE.jpeg

The track geometry is the same in both cases.
 
Last edited:
Actually, it can't.

The original 1235 double slip had two positions, cross or curve (which is actually very useful). This means that each set of point blades had its own tie bar, and those tie bars have to move in different directions when the slip "switched". This is very easy for a child to understand, so has high play value. The downside is that if you need to manually "change the points", you need to turn the knob on top of the point motor.

Due to the dual blade tie bars at each end, you can't just simply fit a pair EPL (or similar) single action point motors and retain the original motion... plus the interface between the tie bars and point motor is different to an EPL point motor.

View attachment 310471


The current double slip also has two tie bars at each end but the are not able to move independently, which means that you can't set a "cross both straight routes" position. This makes setting a route through the slip much harder for a child to grasp (and I have seen adults also struggle with it on occasions too), but you can manually change the linked point blades with a flick of the finger.

View attachment 310475

The track geometry is the same in both cases.
I stand corrected, thank you....
 
Back
Top Bottom