Joining PIKO base plates together

POLO_Train

Registered
10 Mar 2020
18
0
40
Atlanta, GA, USA
Best answers
0
Country flag
Hello everyone,
I am trying to build my backlog of PIKO buildings during this lockdown, as I won't be able to start my outdoor layout for more than a year out because I need to remodel my bathrooms and kitchen before I should start on a layout (She insists! haha, but also a ton other projects with my new home).

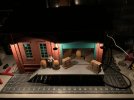
I want to use any buildings built now on my inside Christmas layout this year and wonder if anyone has tried to join PIKO baseplates together under the buildings?

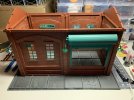
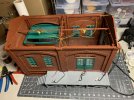
I am building the Sonneberg Depot right now, then finally finish my kitbashed PIKO loco shed, next to the full refinery, and finish with the full brewery (lots of red brick).

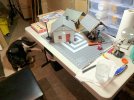
I was thinking if I could use 1/8 steel flat bar and cut out the sections and secure it to strengthen the base plates. You can see in the first picture how I am lining up the Depot on the upside-down base plates to figure out where to bolt through the steel bar. I could be over-engineering it. I do that often.
Has anyone tried anything like this?
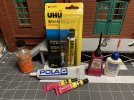
I thought I might cut out the plastic supports on the bottom and run the steel bar on the bottom. I know this is required but was hoping to try on this build in prep or kitbash loco shed and refinery. Also, Should I try to two-part epoxy to glue the steel onto the PIKO baseplate or just use flat head bolts?

Thanks again for your help!
 

Attachments

  • PIKO Sonneberg Depot.jpeg
    PIKO Sonneberg Depot.jpeg
    480 KB · Views: 0
  • PIKO Sonnebergy Depot inside.jpeg
    PIKO Sonnebergy Depot inside.jpeg
    589.1 KB · Views: 0
  • Finsihing some smaller projects.jpeg
    Finsihing some smaller projects.jpeg
    441 KB · Views: 0

phils2um

Phil S
11 Sep 2015
1,522
423
Ann Arbor, Michigan
Country
United-States
Best answers
0
Country flag
If you glue the plates together with ploystyrene cement such as Testors Cement for Plastic Models, Piko Fix, UHU Plast, etc. it should be plenty strong. Make sure you clean any paint from the baseplate edges to be glued. Gently clamp the plates together on a flat surface until the glue is set if needed.
I use waxed paper to protect what's underneath from the glue. I'll put some pics of what I did for my Pola station kits on here tomorrow.
 

dunnyrail

DOGS, Garden Railways, Steam Trains, Jive Dancing,
Staff member
GSC Moderator
25 Oct 2009
26,168
4,993
75
St.Neots Cambridgeshire UK
Best answers
0
Country flag
You could fuse some metal tube between the plates, put on a flat surface then some say 1/8th tube or wire over the ridges then use the heat of a Soldering Iron to press down till the metal is clear of the ridges so that it will sit flat when cooled down. With a big powered Iron you should be able to do this pretty quick with no worries about melting the top. Tube might work better as it will not retain the heat too long to cause any top melting issues.
 

phils2um

Phil S
11 Sep 2015
1,522
423
Ann Arbor, Michigan
Country
United-States
Best answers
0
Country flag
Here are some pics of my Pola station baseplates. The glued joint are circled. This was done with Testors and later followed up with Faller Expert liquid glue. The combo almost makes the joint disappear.

BasePlates.jpg Baseplates - 1 _1_.jpeg

This next pic shows how I keep the structures located on the baseplates. I've glued four scrap pieces to the baseplate that locate the inside corners of the building. Going to have to do some spring cleaning and a little paint touchup!

Baseplates - 1.jpeg
 

POLO_Train

Registered
10 Mar 2020
18
0
40
Atlanta, GA, USA
Best answers
0
Country flag
Here are some pics of my Pola station baseplates. The glued joints are circled. This was done with Testors and later followed up with Faller Expert liquid glue. The combo almost makes the joint disappear.

This next pic shows how I keep the structures located on the baseplates. I've glued four scrap pieces to the baseplate that locate the inside corners of the building. Going to have to do some spring cleaning and a little paint touchup!

Thanks for sharing! I love that RhB engine! Luckily those POLA base plates have that nice "T" key to put them together and in the past for me, that joint is strong because they were such a tight fit. unfortunately, the PIKO base plates have a V channel to fill.

I am trying PIKO fix for this build, I am worried about some of my larger builds. The UHU without sanding failed on my larger build in the past so I am trying PIKO fix the Sonneberg warehouse. It seems stronger with sanding the joints. I haven't tried Faller Expert liquid, but have it.

How do you link those Marklin quick connects?
I bought a bunch to work with LGB street lights for the holiday indoor layout, but they didn't do well with small wires LGB street light wires.

Also any thoughts on two vs one light for the front door of the warehouse?
 

Attachments

  • Glue Options.jpeg
    Glue Options.jpeg
    545.2 KB · Views: 0
  • Sonneberg has lights.jpeg
    Sonneberg has lights.jpeg
    371.2 KB · Views: 0
  • Sonneberg two front lights or single.jpeg
    Sonneberg two front lights or single.jpeg
    571.4 KB · Views: 0

phils2um

Phil S
11 Sep 2015
1,522
423
Ann Arbor, Michigan
Country
United-States
Best answers
0
Country flag
I find the miniature banana plugs and sockets very useful. The pic below shows how I attach the plugs to small gauge wires. Sorry for the kind of fuzzy pic. An iphone is not the greatest at macro shots. The wire in the pic is about 28 awg. I strip a bit of insulation and tin the wire strands then bend the stripped wire back against the insulation. I stick the wire end, insulation and all into the plug. The extra thickness provided by the insulation give the retaining screw something to grip. The conductor gets pinched between the insulation and plug wall assuring continuity.

bananaplug - 1.jpeg

I'll solder bigger leaders to wires finer than about 30 awg. I usually epoxy or otherwise fix the soldered end of the leaders close to the source of the fine wires to give stress relief. The Beli-Beco led building light installation circled below for example.

bananaplug - 1 _1_.jpeg

As to your request for thoughts on lighting the warehouse door, I think I'd mirror what you did on the roller door side and use three lights. This will illuminate the deck and steps just like the roller door side which I think looks great.
 

POLO_Train

Registered
10 Mar 2020
18
0
40
Atlanta, GA, USA
Best answers
0
Country flag
Thanks for the tips!
I was always trying to find an easier way, but your way it is the better way.
Also thanks for the pictures too!