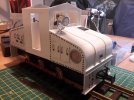
IP Engineering chassis build

Hal Farsed

D.P. Gumby.
7 Apr 2014
2,205
1,451
Staffordshire, England.
Best answers
0
Country flag
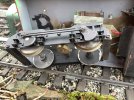
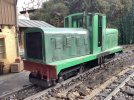
Hello all, bit of a long shot I think. I have cobbled together enough bits to build a chassis out of IPE/LC models bits and pieces. Just enquiring if anyone has any bits for IP Engineerings metal shunters they dont want. Cab sheets bonnets castings etc. Like I said long shot but you never know. If theres nothing available, I will have to let my imagination run riot. Thanks anyway!


0-6-0 new.jpg
 
  • Like
Reactions: 1 user

dunnyrail

DOGS, Garden Railways, Steam Trains, Jive Dancing,
Staff member
GSC Moderator
25 Oct 2009
26,164
4,989
75
St.Neots Cambridgeshire UK
Best answers
0
Country flag
IPE stuff goes together very well, built an Irish Walker Diesel Loco using IPE parts for the chassis, fell together and worked perfect first time. Outside fly cranks and all.
5F4339A1-7828-4859-BFA6-2B612C16B54C.jpeg371A338D-277D-455F-A107-2904967BD0DA.jpeg
 
  • Like
Reactions: 1 users

Rhinochugger

Retired Oik
27 Oct 2009
36,708
4,240
North West Norfolk
Best answers
0
Country flag

Northsider

Modelling the Northern half of the Isle of Man
3 May 2012
2,364
569
Hertfordshire
Best answers
0
Country flag

Paul M

Registered
25 Oct 2016
11,875
1,696
60
Royston
Best answers
0
Country flag
:envy: isn't this an envy emoji?
 

Hal Farsed

D.P. Gumby.
7 Apr 2014
2,205
1,451
Staffordshire, England.
Best answers
0
Country flag
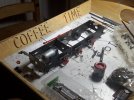
Well, Time flies. I have progressed my little loco on a bit. I have asked around, and IP tin shunter bits seem to be like the proverbial rocking horse poo. I will therefore, have to put a body of my design on it. (Possible disaster alert.) I am now trying not to let it cost me anything but I will probably have to buy some Plastikard, MekPac and (definitely) screws.

So far, I have removed the gearbox as it was not up to the job. The wormwheel is fitted with a 12BA x 1/8” slotted head grubscrew, tightening this with any force at all results in the screw slot splitting and it still not being tight enough to attach the wormwheel to the axle to drive six wheels. I did consider Loctite (the blue stuff), but you risk gluing the lot solid as the wormwheel is captured by the 3D printed gearbox. What I mean to say is that the assembly would have to be glued in situ, therefore there is a (high for me) risk of getting glue on the bearings in the gearbox. I will find a railbus or some light duty vehicle to use it in. I managed to get one of those Indiana Jones Lorries (you know, the German thing with the “canvas” (plastic) cover on the back) before the prices on EBay went potty. It might be a fit in there for its use on rails.

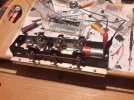
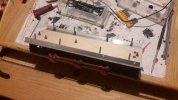
Instead of the proposed gearbox, I have used my usual method of a Slater’s wormwheel assembly, 4mm/2mm coupling and a MFA 15:1 Motor gearbox. (Yes, these were in my bits box, for a long abandoned idea.) I thought I had a sheet of Aluminium to make the footplate, but I couldn’t find it, so I have used some 3mm Plywood, braced with 10mm x 10mm x 1mm Aluminium angle iron (the (6BA) screws are in temporarily until I can get hold of some shorter ones). The angle iron is predrilled to accept the, yet to be made, body on top.

The back story for this loco, it is the result of a local Electrical Engineering firms attempt to build a viable, battery powered (neat uh?) shunting/trip locomotive. They built some 3 foot gauge locos as a test bed for the usual reasons railways built narrow gauge lines. The particular loco in my possession will have been used to demonstrate its usefulness in the military; therefore it will have a camouflaged livery. (Quite how I am going to paint that I don’t know, but YouTube will be my instructor. Every day is a school day with this hobby.)

If I can get a Pantograph for less than an arm and a leg, I would like to stick one of these on the cab roof. Then, of course I can say it is a “Bimode” locomotive. So on trend! (Anyone have a pan they want rid of?) I suppose I could make some sort of “tram-esque” collector hoop...

Body wise, I did give some thought to “steampunk”, post apocalyptic gibberish, but decided against it. I can’t see the point of sticking gearwheels on the side for no apparent reason. So I looked then at those NER Electrics. A sort of cut down and bodged version of these would suffice, I think. The rounded nose might be a step too far for my dubious plastic bending skills though. Or possibly a double ended loco with Hunslet shaped bonnets. These would be nice and simple to make but the bonnets will have to be full width due to the Aluminium plywood braces. Hey ho, I shall see what happens.

Whatever, there will be rivets to count. Last year, for my Birthday, my partner, (gawd bless ‘er) treated me to a Pdf Models Baldwin loco tractor and a very nice model it is too. However, I chickened out of applying the tiny, tiny rivets supplied with it to decorate the bonnet and cabs as I did not want to ruin it. This cobbled together loco will be a test bed for my riveting skills that I will then apply to the tractor...hopefully. I do have a bag of 1/32” rivets and I am flip flopping between these and the stick on ones. Like I said, every day is a school day with this hobby.


OLD TUB001web.jpg


OLD TUB0002web.jpg
 

Rhinochugger

Retired Oik
27 Oct 2009
36,708
4,240
North West Norfolk
Best answers
0
Country flag
Well, Time flies. I have progressed my little loco on a bit. I have asked around, and IP tin shunter bits seem to be like the proverbial rocking horse poo. I will therefore, have to put a body of my design on it. (Possible disaster alert.) I am now trying not to let it cost me anything but I will probably have to buy some Plastikard, MekPac and (definitely) screws.

So far, I have removed the gearbox as it was not up to the job. The wormwheel is fitted with a 12BA x 1/8” slotted head grubscrew, tightening this with any force at all results in the screw slot splitting and it still not being tight enough to attach the wormwheel to the axle to drive six wheels. I did consider Loctite (the blue stuff), but you risk gluing the lot solid as the wormwheel is captured by the 3D printed gearbox. What I mean to say is that the assembly would have to be glued in situ, therefore there is a (high for me) risk of getting glue on the bearings in the gearbox. I will find a railbus or some light duty vehicle to use it in. I managed to get one of those Indiana Jones Lorries (you know, the German thing with the “canvas” (plastic) cover on the back) before the prices on EBay went potty. It might be a fit in there for its use on rails.

Instead of the proposed gearbox, I have used my usual method of a Slater’s wormwheel assembly, 4mm/2mm coupling and a MFA 15:1 Motor gearbox. (Yes, these were in my bits box, for a long abandoned idea.) I thought I had a sheet of Aluminium to make the footplate, but I couldn’t find it, so I have used some 3mm Plywood, braced with 10mm x 10mm x 1mm Aluminium angle iron (the (6BA) screws are in temporarily until I can get hold of some shorter ones). The angle iron is predrilled to accept the, yet to be made, body on top.

The back story for this loco, it is the result of a local Electrical Engineering firms attempt to build a viable, battery powered (neat uh?) shunting/trip locomotive. They built some 3 foot gauge locos as a test bed for the usual reasons railways built narrow gauge lines. The particular loco in my possession will have been used to demonstrate its usefulness in the military; therefore it will have a camouflaged livery. (Quite how I am going to paint that I don’t know, but YouTube will be my instructor. Every day is a school day with this hobby.)

If I can get a Pantograph for less than an arm and a leg, I would like to stick one of these on the cab roof. Then, of course I can say it is a “Bimode” locomotive. So on trend! (Anyone have a pan they want rid of?) I suppose I could make some sort of “tram-esque” collector hoop...

Body wise, I did give some thought to “steampunk”, post apocalyptic gibberish, but decided against it. I can’t see the point of sticking gearwheels on the side for no apparent reason. So I looked then at those NER Electrics. A sort of cut down and bodged version of these would suffice, I think. The rounded nose might be a step too far for my dubious plastic bending skills though. Or possibly a double ended loco with Hunslet shaped bonnets. These would be nice and simple to make but the bonnets will have to be full width due to the Aluminium plywood braces. Hey ho, I shall see what happens.

Whatever, there will be rivets to count. Last year, for my Birthday, my partner, (gawd bless ‘er) treated me to a Pdf Models Baldwin loco tractor and a very nice model it is too. However, I chickened out of applying the tiny, tiny rivets supplied with it to decorate the bonnet and cabs as I did not want to ruin it. This cobbled together loco will be a test bed for my riveting skills that I will then apply to the tractor...hopefully. I do have a bag of 1/32” rivets and I am flip flopping between these and the stick on ones. Like I said, every day is a school day with this hobby.


View attachment 274517


View attachment 274518
Yes, I think the 6 wheel version was less popular in terms of IP bodies :nod::nod:

I'm also quite an expert in failed gearboxes, having experimented extensively with an identical chassis.

You can file a flat on the axle to prevent having to overtighten the grub screw, but in the end I splashed out large and bought an ECM gearbox and motor.

Ratios were always an issue, and the most successful simple gearbox was one that I scratch built by using a bit of ali bar and bending it into a U shape, the drilling for motor and axle with worm and gear robbed from a Bachmann Bug Mauler. The motor was not quite in perfick alignment, but the gearbox ran smoothly and reliably, but the ratio was too high for anything but a dead flat track.

I also experimented with 0 Gauge sprung axle boxes, dispensed with the whizzy cranks and coupled the axles internally with delrin chain and sprocket.

It now bears the name Yeti - as in yetinother gearbox :emo::emo:
 
Last edited:
  • Like
Reactions: 1 user

Hal Farsed

D.P. Gumby.
7 Apr 2014
2,205
1,451
Staffordshire, England.
Best answers
0
Country flag
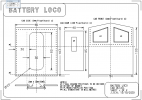
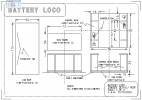
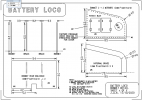
Yes Rhinochugger, I have had great fun in trying to make these IP locos actually work, including the Delrin method. The glue to attach the plastic gears to the steel axle is massively noxious from memory. But I do like my wizzy cranks, so it didnt get too far. There was a chap on 'tube who had mounted a motor in the bonnet, driving a huge gear on the middle axle. I nearly copied him but the bonnet appeared so full of motor, he only had room for a small battery. Which probably leads us on to LiPo or the like. I am a bit apprehensive about these. Anyway, who would have thought my favourite lesson in school was Technical Drawing? It was. So heres three drawings. Bonnets, Cab inside and out. The mists are clearing. I have even sussed out how to make a (non working) pantograph. But thats still in my head.

CAB13102020.PNGCONTROL13102020.PNG
BONNET13102020.PNG
 

Rhinochugger

Retired Oik
27 Oct 2009
36,708
4,240
North West Norfolk
Best answers
0
Country flag
Yes Rhinochugger, I have had great fun in trying to make these IP locos actually work, including the Delrin method. The glue to attach the plastic gears to the steel axle is massively noxious from memory.
Ah, I can explain, I had already changed the axles, the detail disappears in a mist of the myriad changes that I have done, but I started to us Tenmille coach axles and wheels because the resin insert in the wheel had just a little bit more 'give' than the IP solid steel wheel and, if nothing else, at least softened the sound over rough track joints (my loco has a nickel silver soldered body from Worsley Works which acts as a sounding board). The spin-off is that the centre sections of the axles are 1/4" and the Delrin gears are a good solid push-on fit.
 

Hal Farsed

D.P. Gumby.
7 Apr 2014
2,205
1,451
Staffordshire, England.
Best answers
0
Country flag
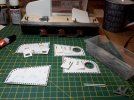
Finally managed to get a couple of hours on the PIG today. Bonnet sides and doors spread liberally about the place.


PIG.jpg
 

Hal Farsed

D.P. Gumby.
7 Apr 2014
2,205
1,451
Staffordshire, England.
Best answers
0
Country flag
As my semi retirement slowly morphs into retirement, I found a little time to continue with this. The bonnets are done apart from one or two little bits, filling my hack marks and painting. The cab is just mocked up with Sellotape to see how it looks, it requires a lot more fettling before its good enough. The Jury is out on the addition of windows in the side of the cab, I am 60/40 yes at the moment. Looking through my drawers (oo er missus) I think I can cobble together enough bits for radio control. ahh well we will see! There is still a lot of work to do, but it keeps my brains working, which is good, in these times. If I am not back before Christmas, I would like to wish you all seasons greetings and a happy new year, I do enjoy reading about all your escapades.


131507733_2955386458111010_7314594068105319984_n.jpg
 

PhilP

G Scale, 7/8th's, Electronics
5 Jun 2013
33,561
3,521
Nottingham
Best answers
0
Country flag
I think a cutout above was-height, so the Driver could reach round, to annoy people with that lamp!
 
  • Haha
Reactions: 1 user

ge_rik

British narrow gauge (esp. Southwold and W&LLR)
24 Oct 2009
10,701
1,244
Cheshire
www.riksrailway.blogspot.com
Best answers
0
Country flag
IPE stuff goes together very well, built an Irish Walker Diesel Loco using IPE parts for the chassis, fell together and worked perfect first time. Outside fly cranks and all.
View attachment 273177View attachment 273178
Only just caught up with this thread - what a marvellous beast, Jon. I've been tempted by one of these for a while - but can't figure out how to justify its existence in 1932 .... :worried: ;)

Rik
 

ge_rik

British narrow gauge (esp. Southwold and W&LLR)
24 Oct 2009
10,701
1,244
Cheshire
www.riksrailway.blogspot.com
Best answers
0
Country flag
As my semi retirement slowly morphs into retirement, I found a little time to continue with this. The bonnets are done apart from one or two little bits, filling my hack marks and painting. The cab is just mocked up with Sellotape to see how it looks, it requires a lot more fettling before its good enough. The Jury is out on the addition of windows in the side of the cab, I am 60/40 yes at the moment. Looking through my drawers (oo er missus) I think I can cobble together enough bits for radio control. ahh well we will see! There is still a lot of work to do, but it keeps my brains working, which is good, in these times. If I am not back before Christmas, I would like to wish you all seasons greetings and a happy new year, I do enjoy reading about all your escapades.


View attachment 277379
Looks great, John. I do like the detailing (rivet heads, handles, vents etc)

Rik
 

Hal Farsed

D.P. Gumby.
7 Apr 2014
2,205
1,451
Staffordshire, England.
Best answers
0
Country flag
Thank you Rik/Philp.
This week, I have been mostly wiring the loco.
I wonder if anyone knows how to resurrect 8 x AA NiMh batteries? They've not been used for a while and appear stone dead. I've put them on charge. even though the indicator lamp on the charger is not on. in the vain hope of a recovery.
 
8 Mar 2014
7,806
972
San Diego
Country
Armenia
www.elmassian.com
Best answers
0
Country flag
Don't do it, in general, once they have an internal defect, you can try zapping them, but they will always be of lesser capacity in the best case, and will always have the predilection to get yet more internal defects.

They are cheap, buy new ones.

Greg
 

Rhinochugger

Retired Oik
27 Oct 2009
36,708
4,240
North West Norfolk
Best answers
0
Country flag
Don't do it, in general, once they have an internal defect, you can try zapping them, but they will always be of lesser capacity in the best case, and will always have the predilection to get yet more internal defects.

They are cheap, buy new ones.

Greg
This side of the pond, Strikealite or Vapextech are good suppliers at decent prices :nod::nod::nod::nod:
 

PhilP

G Scale, 7/8th's, Electronics
5 Jun 2013
33,561
3,521
Nottingham
Best answers
0
Country flag
I wonder if anyone knows how to resurrect 8 x AA NiMh batteries? They've not been used for a while and appear stone dead. I've put them on charge. even though the indicator lamp on the charger is not on. in the vain hope of a recovery.
If the light ain't on... The charger ain't chargin'.... :nerd::shake::shake:

You can hit them with a constant-current charger.. - It will just pump current into the pack. But watch how warm (hot!) they get.. NEVER leave them charging like this!
After a couple of hours. You let them cool, stick a meter on them (to see if there are any electrons at home).. If so, then try a Smart Charger.

Unfortunately, although you might get the pack back, it will never be the same..
Much reduced runtime..
Won't hold charge..

I might give it a go, but feel I would be frustrated by the poor performance afterwards..

PhilP.
 

ge_rik

British narrow gauge (esp. Southwold and W&LLR)
24 Oct 2009
10,701
1,244
Cheshire
www.riksrailway.blogspot.com
Best answers
0
Country flag
I echo the above. Completely discharged cells which don't respond have had it. If you want to use NiMh then I'd go for LSD (Low Self Discharge) as they hold their charge far longer when not in use. The HobbyKing ones are quite good value and are a reliable brand unlike some sold on eBay


Rik