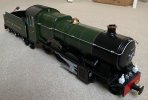
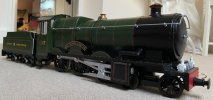
Strange from a certain angle one of the pics in the distance the lining looks orange. You have made a good job of getting the boards together, what sound card did you use?I've been making steady progress - a few hours most evenings.
A couple of weeks ago it made a brief appearance in photographic grey.
View attachment 283958
(ok, primer with a bit of black...!)
Then a week or so of painting with the usual (now rescued) varnish dramas along the way.
Electrics are now in too - I have a new found respect for anyone doing this kind of work in the smaller scales - there are a lot of wires!
View attachment 283959
And most of the lining has been done. I still need to line the boiler, but that was the site of my varnish nightmare so it has got a bit behind - just five bands though, so that should happen in the next few days.
I'm pleased with the name and number plates which are made from plasticard cut on my vinyl cutter, as is the side window surround. The colours of the lining bands aren't reproduced well here - what looks light yellow in the pictures is actually orange.
View attachment 283960
View attachment 283961
View attachment 283962
View attachment 283963
I just had it out on the track to confirm that it 'works'. It's running in the right direction and the sound works (crikey it's loud!). I've got quite a bit of CV programming to do - lights suitably dimmed and mapped, and figuring out the smoke generator which is all new to me. It has directional lights front and back (two colour LEDs), a cab light, firebox light, speaker and pickups in the tender, and a couple of stay alive caps - all of which is a lot of wiring - hidden under the boiler.
Once I've got the boiler lined and painted, I will still need to work on the cab, fix handrails, whistles, maybe some sort of cab floor which bridges the rather large gap between loco and tender (necessary because of my R2 curves) and I'm sure some other things that will come to me, but I'm pleased with the progress and that it will be running in time for the warmer weather!
Hopefully I'll get a chance to put it on the rails again in the daylight tomorrow - I'll post a picture if I do...
You are using an out of date browser. It may not display this or other websites correctly.
You should upgrade or use an alternative browser.
You should upgrade or use an alternative browser.
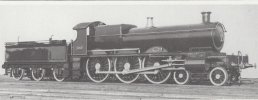
GWR..ish Castle..ish
- Thread starter jimmielx
- Start date
Orange black orange is what the lining is in person - I think the orange has over exposed in these some of these pictures under artificial light - I'll send try some pictures outside later which should show it better.Strange from a certain angle one of the pics in the distance the lining looks orange. You have made a good job of getting the boards together, what sound card did you use?
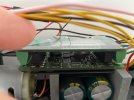
It is just one decoder - a Zimo MX696 LS sound decoder. It has a slightly odd arrangement - the decoder itself has pin connections on it, there is a second board which pushes down on top giving screw terminal for most of the pins (all the commonly used ones). Slight annoyingly there are no fixing points on the secondary board, only on the decoder and you can't access the screws when the boards are pushed together - only a minor niggle. Anyway that is what you are seeing - perhaps the photo attached shows it better.
I usually use ESU decoders - but I wanted to try a fan assisted smoke generator in this loco and the ESU was more expensive and out of stock everywhere, so I went with the Zimo from YouChoos with their Castle sound file.
Thanks for all the comments.I am speechless - I am also starting to build a locomotive... But yours : GENIUS
Andreas definitely no genius here! I've made a few kits and scratch builds, and learn a bit more each time. This forum and YouTube are also really great for ideas and techniques. Looking forward to seeing your build!
Are you have answered my confusion, somewhere along the line I had thought that you were doing it as a Battery Powered job but a re-read of the full thread would have shown that to not be the case. Zimo I think come in sundry types with not all requiring that second board so far as I am aware.
Eeyore.Boater
Registered
That is a lovely looking loco. Just shows that you can find a prototype for anything if you look hard enough!Well that certainly looks like a parallel boiler GWR loco.
View attachment 283985
I procrastinated about the boiler for some time, then applied Rule 8 and carried on!! I could have made it from ply bent round a frame, but it would have left less space inside for the decoder, as well as being a bit tricky to build and taking quite a while I suspect.
I’ve also left out quite a few knobbly bits, lumps and bumps which I didn’t like the look of!
playmofire
Registered
Amazing!
A bit more progress.
The boiler is now lined and varnished. I'm just waiting as long as I can bear to let the varnish cure before I fit it on the loco.
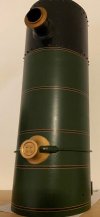
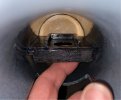
The boiler is screwed to the frame from the underside.- above the front bogie. The smoke generator will sit on a shelf inside the smoke box. As it has a fan on the bottom of it I've cut a hole in the shelf below the fan to give it as much air flow as possible. Not sure how much I will need to access the smoke generator, but it's fairly easy if I do.
In the meantime I had the loco (minus boiler) on the track for some decoder programming. Didn't take any pictures as it was in a state of undress! Took ages because for some reason I couldn't get FO1 to work - probably somewhere in the depths of the CVs there is some setting or other that I missed, but all the others were behaving as expected. Anyway I had one unused, so a quick rewire and all lights and sound were working fine. I've also set up all the CVs in readiness for the smoke generator, but am waiting until the whole loco is together before trying that.
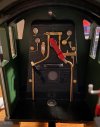
I've done a bit more to the cab. I'll leave the backhead at that but still need a reverser and a couple of tipped up seats. And a crew to face the peril of the chasm between loco and tender!
The boiler is now lined and varnished. I'm just waiting as long as I can bear to let the varnish cure before I fit it on the loco.

The boiler is screwed to the frame from the underside.- above the front bogie. The smoke generator will sit on a shelf inside the smoke box. As it has a fan on the bottom of it I've cut a hole in the shelf below the fan to give it as much air flow as possible. Not sure how much I will need to access the smoke generator, but it's fairly easy if I do.

In the meantime I had the loco (minus boiler) on the track for some decoder programming. Didn't take any pictures as it was in a state of undress! Took ages because for some reason I couldn't get FO1 to work - probably somewhere in the depths of the CVs there is some setting or other that I missed, but all the others were behaving as expected. Anyway I had one unused, so a quick rewire and all lights and sound were working fine. I've also set up all the CVs in readiness for the smoke generator, but am waiting until the whole loco is together before trying that.
I've done a bit more to the cab. I'll leave the backhead at that but still need a reverser and a couple of tipped up seats. And a crew to face the peril of the chasm between loco and tender!

I tend to use black pond liner for that chasm. But if you do Not have any of that a bit of black bin liner works almost as well, but need some matt black paint on it.A bit more progress.
The boiler is now lined and varnished. I'm just waiting as long as I can bear to let the varnish cure before I fit it on the loco.
View attachment 284047
The boiler is screwed to the frame from the underside.- above the front bogie. The smoke generator will sit on a shelf inside the smoke box. As it has a fan on the bottom of it I've cut a hole in the shelf below the fan to give it as much air flow as possible. Not sure how much I will need to access the smoke generator, but it's fairly easy if I do.
View attachment 284049
In the meantime I had the loco (minus boiler) on the track for some decoder programming. Didn't take any pictures as it was in a state of undress! Took ages because for some reason I couldn't get FO1 to work - probably somewhere in the depths of the CVs there is some setting or other that I missed, but all the others were behaving as expected. Anyway I had one unused, so a quick rewire and all lights and sound were working fine. I've also set up all the CVs in readiness for the smoke generator, but am waiting until the whole loco is together before trying that.
I've done a bit more to the cab. I'll leave the backhead at that but still need a reverser and a couple of tipped up seats. And a crew to face the peril of the chasm between loco and tender!
View attachment 284048
Great to see the 'birth' of your loco - it really is a very nice job. How did you create the lining? It is exceedingly neat in all aspects!
The lining is done with waterslide transfers from Fox Transfers, as is the tender logo and buffer number. Basically you are provided with straight sections and corners in two radii - getting them straight and even is a lot of time with the ruler! For the boiler bands I had a scrap piece of thin plastic taped around the boiler to given me a straight edge to line up with. The only preformed bit of lining was for the six splashers- they are provided as a single transfer for each scaled for gauge 1 (don’t recall which gauge 1 scale!). Fortunately my splashers were almost the right size, so I was able to coax them into fitting!
It probably took five or six evenings to get them all applied, but they really lift the loco, so I’m pleased with the results!
I tend to use black pond liner for that chasm. But if you do Not have any of that a bit of black bin liner works almost as well, but need some matt black paint on it.
Thank you, JonD! Just checking, is the pond liner to provide protection from escaping fluid from the smoke generator? The shelf has been black painted, but the back of the smoke box hasn’t. I think I did apply a coat of sanding sealer, but I can’t remember for sure - I’ll check, but in any case I can apply some black. Should I also provide a of a screen between the generator and decoder? I haven’t used a smoke generator before, so not sure what to expect!
Thanks for your reply James - you've really mastered the lining - can't even see the joints!
Thank you, Mick!
RCS-Tony Walsham
Registered
Superb!!!
Time for an update. Good new and bad...
Bad first. At the weekend I got the loco (minus boiler) on the track to get the speeds measured for the automation. All went well until it came off the track lying flat in the flowerbed. I didn't see it come off, but it came off on a long straight section, hmm, the dog (a few days ago that would have been proceeded by several choice adjectives) was walking guiltily away from the crime scene and quite clearly the top of the tender had received some sort of claw shaped passing blow...
My line is a couple of foot from ground level, mostly in raised beds, the dog is seven and barely moves around, my four year old child is very well trained when it comes to the trains, in ten years of G scaling this is only the second thing that has ever come off the line (the last being my then newly completed railcar). Anyway working theory is that the dog jumped onto the flower beds, which she does very occasionally have learned that the tomatoes are grown there, was startled by the oncoming train and caught it jumping down. I have calmed myself down over the intervening days!
Anyway, the damage:
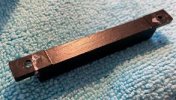
The coupling bar was snapped at one of the screw holes (shown here cemented back together)
The rear buffer beam was damaged
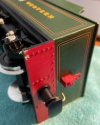
One tender side was cracked
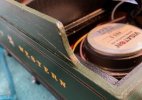
The tender water gauge, one vent and the brake handle all snapped off - all recovered
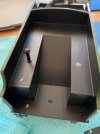
One set of steps damaged and broken off
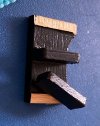
And some scrapes at the top of the inner sides which I don't seem to have pictured...
Fortunately the loco body appears to have escaped unscathed, repairs have been undertaken and I'm now waiting for the touch up paint to cure. The damage which I'll struggle to completely mask is the two scratches on the tender sides. I have put a little filler in the dents, but really I'd need to properly fill and sand the whole side again, followed by painting, transfers and varnish - all over again. For now I will touch it up - I think it will go unnoticed.
Bad first. At the weekend I got the loco (minus boiler) on the track to get the speeds measured for the automation. All went well until it came off the track lying flat in the flowerbed. I didn't see it come off, but it came off on a long straight section, hmm, the dog (a few days ago that would have been proceeded by several choice adjectives) was walking guiltily away from the crime scene and quite clearly the top of the tender had received some sort of claw shaped passing blow...
My line is a couple of foot from ground level, mostly in raised beds, the dog is seven and barely moves around, my four year old child is very well trained when it comes to the trains, in ten years of G scaling this is only the second thing that has ever come off the line (the last being my then newly completed railcar). Anyway working theory is that the dog jumped onto the flower beds, which she does very occasionally have learned that the tomatoes are grown there, was startled by the oncoming train and caught it jumping down. I have calmed myself down over the intervening days!
Anyway, the damage:
The coupling bar was snapped at one of the screw holes (shown here cemented back together)

The rear buffer beam was damaged

One tender side was cracked

The tender water gauge, one vent and the brake handle all snapped off - all recovered

One set of steps damaged and broken off

And some scrapes at the top of the inner sides which I don't seem to have pictured...
Fortunately the loco body appears to have escaped unscathed, repairs have been undertaken and I'm now waiting for the touch up paint to cure. The damage which I'll struggle to completely mask is the two scratches on the tender sides. I have put a little filler in the dents, but really I'd need to properly fill and sand the whole side again, followed by painting, transfers and varnish - all over again. For now I will touch it up - I think it will go unnoticed.
Almost finished!
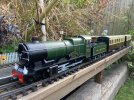
I've just got to add the crew who are currently being painted, but the Castle has seen a few hours running.
Here it is this evening with a pair of Vale Of Rheidol coaches.
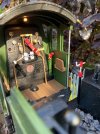
I have now finished the cab with a reverser, floor and hinged fall plate (is that what it's called?!) and some very uncomfortable looking tip up seats.
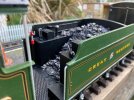
And the tender has had a few more details added inside, as well as a load of coal.
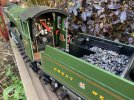
And as it passed through Canoe Bay we briefly had an all Great Western line up
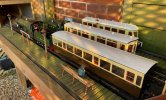
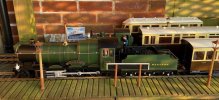
I've spent quite a bit of time working on the smoke. This evening in the low evening sunlight we did catch some glimpses of the smoke which was nice, but as expected the volume is about 1% of what you're really want...
First I was getting hardly any smoke at all. I discovered that the smoke heater voltage settings were wrong - the decoder instructions stated a top voltage of 10v on the heater, but the specs supplied with the generator said 15v - I duly increased the top voltage and got smoke.
Second problem, the fan wasn't working - or maybe occasionally worked. I took it apart a couple of times - poked, prodded and cleaned a bit which improved it and finally deduced that one of the solder joints from motor to PCB was not good - reflowed the solder and now it works reliably.
I don't know why I am surprised, but the fan assisted smoke generator is no more than a heater and a fan - nothing else on the circuit board at all! We probably won't use the smoke much - maybe just when the light is right and there's no wind - but it is nice when you catch it puffing in time with the chuffs.
The YouChoos sound is another story. It's my second sound decoder, the first being in my GWR Railcar - the drone of a diesel I find just disturbs the peace so I don't use it much, but the Castle sounds lovely - it would be a shame to run without it. I don't enjoy the sound of the steam pumps much - particularly not when stationary, so delving into the CV's I discovered I have a great deal of control over the sounds - so I just turned that off.
It runs very nicely overall. I think the Thomas motor block which it is based on is not the best - though it is much improved by removing the waggling eyes mechanism and adding a decent amount of weight. I also have pickups in the tender via LGB ball bearing wheels, so conductivity is no problem at all. The front bogie so far is running very nicely, and the crossheads and slidebars are working fine and don't seem to impede running. I had a little squeak to begin from somewhere, but a drop of oil on all the moving parts has cured that.
I going to try and make a decent video of it once I've got the crew in - so you can hear the sounds and maybe even see the smoke if you're lucky!
Perhaps most importantly this little chap is very pleased with our new engine!

I've just got to add the crew who are currently being painted, but the Castle has seen a few hours running.
Here it is this evening with a pair of Vale Of Rheidol coaches.

I have now finished the cab with a reverser, floor and hinged fall plate (is that what it's called?!) and some very uncomfortable looking tip up seats.

And the tender has had a few more details added inside, as well as a load of coal.


And as it passed through Canoe Bay we briefly had an all Great Western line up


I've spent quite a bit of time working on the smoke. This evening in the low evening sunlight we did catch some glimpses of the smoke which was nice, but as expected the volume is about 1% of what you're really want...
First I was getting hardly any smoke at all. I discovered that the smoke heater voltage settings were wrong - the decoder instructions stated a top voltage of 10v on the heater, but the specs supplied with the generator said 15v - I duly increased the top voltage and got smoke.
Second problem, the fan wasn't working - or maybe occasionally worked. I took it apart a couple of times - poked, prodded and cleaned a bit which improved it and finally deduced that one of the solder joints from motor to PCB was not good - reflowed the solder and now it works reliably.
I don't know why I am surprised, but the fan assisted smoke generator is no more than a heater and a fan - nothing else on the circuit board at all! We probably won't use the smoke much - maybe just when the light is right and there's no wind - but it is nice when you catch it puffing in time with the chuffs.
The YouChoos sound is another story. It's my second sound decoder, the first being in my GWR Railcar - the drone of a diesel I find just disturbs the peace so I don't use it much, but the Castle sounds lovely - it would be a shame to run without it. I don't enjoy the sound of the steam pumps much - particularly not when stationary, so delving into the CV's I discovered I have a great deal of control over the sounds - so I just turned that off.
It runs very nicely overall. I think the Thomas motor block which it is based on is not the best - though it is much improved by removing the waggling eyes mechanism and adding a decent amount of weight. I also have pickups in the tender via LGB ball bearing wheels, so conductivity is no problem at all. The front bogie so far is running very nicely, and the crossheads and slidebars are working fine and don't seem to impede running. I had a little squeak to begin from somewhere, but a drop of oil on all the moving parts has cured that.
I going to try and make a decent video of it once I've got the crew in - so you can hear the sounds and maybe even see the smoke if you're lucky!
Perhaps most importantly this little chap is very pleased with our new engine!


