Re planting, have you thought of some ‘Mind your own Business’ or Soleirolia soleirolii to give it its complex name, great ground cover in a shaded place. Another as you have a Welsh theme going on is ‘Platts black’ or Leptinella squalida which is a rather nice small Fern type plant.
You are using an out of date browser. It may not display this or other websites correctly.
You should upgrade or use an alternative browser.
You should upgrade or use an alternative browser.
Garden railway version 3.0
- Thread starter natdawson
- Start date
natdawson
Registered
I'll have a look at those. There's not much room left for anything at the moment providing the existing plants spread in the way they are supposed to, if they don't behave I'll have to see what else I can use.Re planting, have you thought of some ‘Mind your own Business’ or Soleirolia soleirolii to give it its complex name, great ground cover in a shaded place. Another as you have a Welsh theme going on is ‘Platts black’ or Leptinella squalida which is a rather nice small Fern type plant.
natdawson
Registered
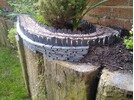
I managed to get a bit more done on the retaining wall during the week which has had the bonus effect of hiding the gap underneath the floating baseboards. A lot more to do but it's definitely getting a more finished look.

I couldn't really find a way in which to build the wall at this location without some form of corbelling of the upper layers of slate. The base layer is pretty much inline with the front of the slate fencing at this point. To make it slightly more complicated there needed to be another opening for a plant to pass through.

The original idea of another archway was quickly dismissed as being far too fiddly especially with the limited room. It became obvious that the sleeper wall of the raised bed is higher at this end and so gives less room for making a curved arch and so instead went for a simple opening instead.

For some reason of which I'm still not sure why, I gradually transitioned the corbelled wall into a normal wall, whereas at the other end there is a clear change. In hindsight I should have mirrored the other end but it's fairly well stuck together now and I really don't want to have to break it all up, remove the dregs of the adhesive and do it all again. If it bugs me too much I will change it but for now it can stay as it is.

Having left the previous slate wall to dry for a couple of days I was able to finish the rest of the wall and take it up to full height. As with the far end of the retaining wall it stops at the beginning of a soil embankment, incidentally this is also where the sleeper wall finishes leaving nothing to build up from so it all works out quite nicely.

Whilst I'm happy with this end of the wall I think I might end up taking the top few layers off of the corbelled section and rebuilding it with thinner slate blocks as I'm still not overly pleased with how it has turned out. I have plenty of slate left over which can be cut down, but I have run out of CT1 adhesive so need to get some more before I can do anything else and besides it sounds very much like a problem for future me.

At the other end of the raised bed the other return loop still has a floating but without the benefit of having a raised bed underneath to help. It is currently supported on a couple of fence posts but it looks far from the finished article it needs to be. This section will end up being some kind of low profile bridge but it still needs to be done in a decent way and in a way that will blend in with the garden as well as possible.
To mark the beginning of the bridge section a slate parapet with capping slab is being built at the edge of the raised bed. At the moment both bits of parapet wall are just above the base board, but again the lack of CT1 adhesive has stopped play, which is probably just as well I need to make some adjustments to both the base board and track alignment. Once the adjustments have been made and parapet walls completed then the slate fencing can be finished off although there wont be much more ballasting done until the bridge detailing has progressed.
So that's it for the moment, some fiddly time consuming work to do on the bridge section and more than likely some retaining wall to re build but it's getting there, even if it is a slow process at times.
I couldn't really find a way in which to build the wall at this location without some form of corbelling of the upper layers of slate. The base layer is pretty much inline with the front of the slate fencing at this point. To make it slightly more complicated there needed to be another opening for a plant to pass through.
The original idea of another archway was quickly dismissed as being far too fiddly especially with the limited room. It became obvious that the sleeper wall of the raised bed is higher at this end and so gives less room for making a curved arch and so instead went for a simple opening instead.
To mark the beginning of the bridge section a slate parapet with capping slab is being built at the edge of the raised bed. At the moment both bits of parapet wall are just above the base board, but again the lack of CT1 adhesive has stopped play, which is probably just as well I need to make some adjustments to both the base board and track alignment. Once the adjustments have been made and parapet walls completed then the slate fencing can be finished off although there wont be much more ballasting done until the bridge detailing has progressed.
So that's it for the moment, some fiddly time consuming work to do on the bridge section and more than likely some retaining wall to re build but it's getting there, even if it is a slow process at times.
Attachments
That is very impressive..
Given a season to mellow, and a few plants to soften the edges, I don't think you will need to do a great deal more?
If the bridge is to be low profile (rather than actually seriously load-bearing) then you could consider scribed foamboard?
See what Mike has Achieved at Lazy Grange Bay..
PhilP
Given a season to mellow, and a few plants to soften the edges, I don't think you will need to do a great deal more?
If the bridge is to be low profile (rather than actually seriously load-bearing) then you could consider scribed foamboard?
See what Mike has Achieved at Lazy Grange Bay..
PhilP
As Philip says Foamboard the Plastic Coated stuff can make super bridges and buildings plus is stable in sunlight. I can see a mini hung on to the wood Whistling Curve like structure working here for you. Just love the Archways and I know you will revisit the one you bottled out of when you reduce the size of slates to loose the corbeling.

See what I did there, just made you a load more work! I’m good at that. Better still at watching said work.
See what I did there, just made you a load more work! I’m good at that. Better still at watching said work.
Jasper
Hey, I'm only being creative here!
Honestly, I don't think that mirroring the other end matters too much here. Such differences are entirely prototypical, they are everywhere. You have achieved a beautifully finished look.I gradually transitioned the corbelled wall into a normal wall, whereas at the other end there is a clear change. In hindsight I should have mirrored the other end
Last edited:
natdawson
Registered
Thanks Phil, for the most part it is now waiting for the planting to do its thing and spread out to cover the bare soil areas which will help a lot.That is very impressive..
Given a season to mellow, and a few plants to soften the edges, I don't think you will need to do a great deal more?
If the bridge is to be low profile (rather than actually seriously load-bearing) then you could consider scribed foamboard?
See what Mike has Achieved at Lazy Grange Bay..
PhilP
I've got some ideas for the bridge and have had a bit of a play with something today which is promising but didn't have much time before light faded, it's going to be a bit fiddly but will hopefully be work it once it's done.
natdawson
Registered
As Philip says Foamboard the Plastic Coated stuff can make super bridges and buildings plus is stable in sunlight. I can see a mini hung on to the wood Whistling Curve like structure working here for you. Just love the Archways and I know you will revisit the one you bottled out of when you reduce the size of slates to loose the corbeling.
View attachment 325464
See what I did there, just made you a load more work! I’m good at that. Better still at watching said work.
I'm leaving the retaining wall for the moment to see if it annoys me enough to make me redo it, if I do then I'll try and have a go at the third arch but it won't be easy due to lack of room.
Having a go at trying some ideas for the bridge first while the weather is good and I have time to think it through.
natdawson
Registered
Thanks Jasper, overall I'm happy with what I've done, but there are a few little bits I'm not so keen on. They might get tackled, on the other hand I might get a bit too lazy to bother about it, for now at least.Honestly, I don't think that mirroring the other end matters too much here. Such differences are entirely prototypical, they are everywhere. You have achieved a beautifully finished look.
ge_rik
British narrow gauge (esp. Southwold and W&LLR)
Is it corbelling or is it cornicing? I had to look it up as I wasn't sure. But having looked it up I'm still not certain.
Sorry, why are there so many pedants on these forums (or should that be fora)?
Anyway, whatever it's called, it looks fantastic. I especially like the archways for the plants. I hope they appreciate it ...")
Rik
Sorry, why are there so many pedants on these forums (or should that be fora)?
Anyway, whatever it's called, it looks fantastic. I especially like the archways for the plants. I hope they appreciate it ...
Rik
Rhinochugger
Retired Oik
A Corbel is structural, while a cornice is decorative .................. according to da interwebby thingIs it corbelling or is it cornicing? I had to look it up as I wasn't sure. But having looked it up I'm still not certain.
Sorry, why are there so many pedants on these forums (or should that be fora)?
Anyway, whatever it's called, it looks fantastic. I especially like the archways for the plants. I hope they appreciate it ...
Rik

In other words, if you remove a cornice nothing falls down.
If you remove a corbel, .................... run like stink

Chris Vernell
Three score and nineteen
If your name is IVLIVS, yes.(or should that be fora)?
natdawson
Registered
It's been a while since I posted an update, unfortunately with the not so favourable weather of late and that pesky thing called work getting in the way progress has been slow. Slow but not none existent.
My focus has mainly on the bridge section as this was the last area which didn't have any scenic detailing at all.
When making the base I had never really thought about doing anything scenic and as a result there were some sections which could be straightened out on the approach to the sharp curved section at the end of the loop, this made the start of the bridge section a lot easier to deal with and makes for a much tidier section overall.

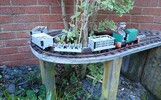
The plan for the scenic section was simply to cover and disguise the base, for the moment as least and as such not be a load bearing item in itself. I quickly settled on going for a metal bridge as anything stone or brick would be too dominate if taken down to ground level and I didn't fancy trying to make a trestle type bridge either.
I started by marking out and drilling screw holes in a strip of aluminium and temporarily fixing it to the side of the ply base. As a top to the metal section a horizontal piece would be added making an upside down L section using smaller brackets pop riveted to the initial aluminium strip and in turn to the horizontal section. Of course with a nice straight bridge a simple length of Z section which could be fixed underneath with countersunk screws would be easy but I do not have the equipment necessary to roll metal to have the correct bend in it.

It was only after drilling all of the main fixing holes that I realised the screw spacing would be too far apart for the pop riveted brackets to suitably hole the top section whilst going round the sharp corners. This resulted in reducing the bracket spacing and leaving differences in the offset between the bracket and screw locations until I got round to correcting it. Thankfully it was only on the first aluminium strip that this was an issue so not a big problem to correct.

Whilst the vertical section is just 2mm aluminium strip the top horizontal section had to be cut specifically for each section out of some larger sheet sections picked up last year when helping clear out someone's garage. To make these pieces a sheet was placed over the vertical strip and a line drawn underneath in pencil. This line was then adjusted to suit the thickness of the metal and cut with a metal cutting blade in a jigsaw to a suitable length. The cut section was checked for fit with the strip before another line was drawn and cut to make the thin sections required.
The brackets were simply cut from an angle section to the right width, drilled for pop rivets and fixed in place at the correct spacing. Where the top sections joined a double width bracket was used.

Once the main bulk of the bridge had been installed it was painted using appropriate primer undercoat for aluminium before being in a couple of coats of a slate grey top coat. The old screw holes still visible in this picture have since been filled and repainted. Ballast has also been added and is now waiting for the slate walls at the end of the bridge to be built up to a higher level.

Only a small section at the back remains to be completed, it is probably the most awkward bit to do due to space constraints and will need to be done in a different way. Having a knackered back also doesn't help as it will involve a lot of not so fun bending just getting access to it.
Still not too sure how the bridge section will get finished off, probably with a timber top sitting on top of the metal and possibly handrails of some kind but that can wait until we get some considerably better weather.
My focus has mainly on the bridge section as this was the last area which didn't have any scenic detailing at all.
When making the base I had never really thought about doing anything scenic and as a result there were some sections which could be straightened out on the approach to the sharp curved section at the end of the loop, this made the start of the bridge section a lot easier to deal with and makes for a much tidier section overall.
The plan for the scenic section was simply to cover and disguise the base, for the moment as least and as such not be a load bearing item in itself. I quickly settled on going for a metal bridge as anything stone or brick would be too dominate if taken down to ground level and I didn't fancy trying to make a trestle type bridge either.
I started by marking out and drilling screw holes in a strip of aluminium and temporarily fixing it to the side of the ply base. As a top to the metal section a horizontal piece would be added making an upside down L section using smaller brackets pop riveted to the initial aluminium strip and in turn to the horizontal section. Of course with a nice straight bridge a simple length of Z section which could be fixed underneath with countersunk screws would be easy but I do not have the equipment necessary to roll metal to have the correct bend in it.
It was only after drilling all of the main fixing holes that I realised the screw spacing would be too far apart for the pop riveted brackets to suitably hole the top section whilst going round the sharp corners. This resulted in reducing the bracket spacing and leaving differences in the offset between the bracket and screw locations until I got round to correcting it. Thankfully it was only on the first aluminium strip that this was an issue so not a big problem to correct.
The brackets were simply cut from an angle section to the right width, drilled for pop rivets and fixed in place at the correct spacing. Where the top sections joined a double width bracket was used.
Only a small section at the back remains to be completed, it is probably the most awkward bit to do due to space constraints and will need to be done in a different way. Having a knackered back also doesn't help as it will involve a lot of not so fun bending just getting access to it.
Still not too sure how the bridge section will get finished off, probably with a timber top sitting on top of the metal and possibly handrails of some kind but that can wait until we get some considerably better weather.
Attachments
natdawson
Registered
Thanks Rik.It may be small but you've packed in so many clever ideas. A mini masterpiece.
Rik
Not so sure about any masterpiece but it is mini.
A small space on an even smaller budget but it needed to fit in if it was going to work which it now does for the most part.
It even has wife approval so I must be doing something right.
natdawson
Registered
Thanks Paul.Very well done.
Similar threads
- Replies
- 5
- Views
- 305
- Replies
- 6
- Views
- 258