EPL Turnout Drive Terminal Blocks & Some Other Useful Items

phils2um

Phil S
11 Sep 2015
1,522
423
Ann Arbor, Michigan
Country
United-States
Best answers
0
Country flag
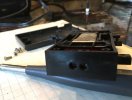
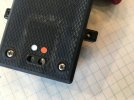
In another thread the propensity of the terminal block screws to rust in some production lots of EPL drives came up. That prompted me to order what I hoped would be suitable replacements from one of my favorite electronics parts suppliers. Indeed the parts ordered were just what was needed. The 2 position terminal blocks are manufactured by TE Connectivity. The mfg. part no. is 1776118-2. The following pics show the part and installation. Everything lines up perfectly. The screws and wire clamps are nickel and tin plated brass and should have no problem surviving outdoors.
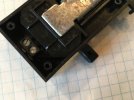
EPL terminal block - 1.jpeg EPL terminal block - 1 (1).jpeg EPL terminal block - 1 (2).jpegEPL terminal block - 1 (3).jpeg

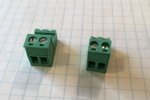
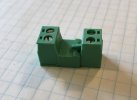
As long as I was ordering parts I got a few more of these very useful "Classic Combicon" terminals manufactured by Phoenix Contacts. These are used by many OEMs in place of "choc block" screw terminals. They take wire sizes from 12 to 24 awg. I have put them on the power in and track out of my Massoth and ESU decoder programmers (another story!o_O) and related power supply. They are also used for the track power connections on my Märklin CS3 and boosters. Here are pics.
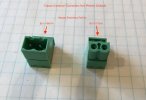
EPL terminal block - 1 (5).jpeg EPL terminal block - 1 (6).jpeg EPL terminal block - 1 (7).jpeg

Finally, this is a tool I have found indispensable since discovering it. It is called a "spudger". It is a strong nylon tool made for poking around on circuit boards and IC chips. Its about 6 inches (15 cm) long with a point on one end and a flat on the other. It is very useful for prying parts off plastic locos and wagons without causing scratchs or other marring that a screwdriver can do. If you don't have one add it to you next electronics order. They're only a buck or two.
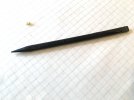
EPL terminal block - 1 (4).jpeg
 
Last edited:

OBBherr

Registered
17 Aug 2016
197
8
70
Hampshire, UK
Best answers
0
Country flag
Phil, thanks for this. I am one of those who has suffered badly corroded contacts. I've actually had to drill some out the afternoon (points purchased 2nd hand and used outside). Motor is fine, wire end have been allowed to rot inside.

One question. How was it unsoldering the original terminal block and resoldering the new one? Is there any danger of damaging the very fine copper winding wire? I do have a low wattage iron but my soldering skills are a bit untutored.

I also sourced extra PCB terminal blocks; in the UK RS Components do them as part number 8971070. I also have a Massoth system and they use a larger 5.08 mm version part no 8971219. Less than £5 for 10; Massoth want over £5 for 1!
 

phils2um

Phil S
11 Sep 2015
1,522
423
Ann Arbor, Michigan
Country
United-States
Best answers
0
Country flag
How was it unsoldering the original terminal block and resoldering the new one?
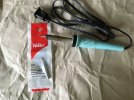
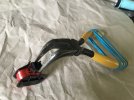
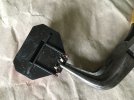
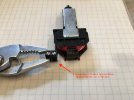
I did not have any trouble desoldering the wires. I use a 25w iron with a very narrow pointed tip for work like this. I've got a couple of other broader tips for the iron too. Once the solder was molten I was able to use the iron tip to poke the coil wires free from the terminal posts. The biggest issue I had was not having a solder sucker to remove the solder from the terminal block posts. (An inexpensive manual plunger type desoldering tool is now on the list for my next electronic parts order!) I almost melted the plastic tang coming off the coil spool as I was knocking the solder off the old terminal block posts. Too much heat for too long! As it was, the tang did get deformed a little bit where the block mounts. I had to clamp the new terminal flat to the tang for installation. I used bent nose pliers and a rubber band. I put a dab of paste flux on the terminal post sticking through the spool's tang before soldering. Then I bent/pushed the coil wire into contact the post using tweezers. A small blob of solder both connected the wire and secured the terminal block to the spool tang. In the end, it all worked out fine. (And the EPL drive does work!) Here are a couple of pics of the iron I use and how I clamped the new block for soldering.

Weller - 1.jpeg Weller - 1 (1).jpeg Weller - 1 (2).jpeg
 
Last edited:

OBBherr

Registered
17 Aug 2016
197
8
70
Hampshire, UK
Best answers
0
Country flag
Phil, many thanks. I've got a dead point motor that I can practice on so I'll give it a go.

Re de-soldering, have you tried copper braid, which has worked fairly well for me in the past? I couldn't say it's better than a sucker because I've not tried the latter.
 

Gizzy

A gentleman, a scholar, and a railway modeller....
26 Oct 2009
36,139
2,273
63
Cambridgeshire
www.gscalecentral.net
Best answers
0
Country flag
Rather than replace the screw terminal block, I simply removed the corroded ones from a couple of motors, and I soldered in a flying lead instead.

I've used these on crossovers paired with another motor that has a serviceable screw terminals....
 

phils2um

Phil S
11 Sep 2015
1,522
423
Ann Arbor, Michigan
Country
United-States
Best answers
0
Country flag
Re de-soldering, have you tried copper braid
Yes, I've used that in the past at work. Kind of forgot about it. I'll put that on the list too. It's always good to have multiple options!
 

phils2um

Phil S
11 Sep 2015
1,522
423
Ann Arbor, Michigan
Country
United-States
Best answers
0
Country flag
Rather than replace the screw terminal block, I simply removed the corroded ones from a couple of motors, and I soldered in a flying lead instead.
Hi Gizzy - If flying leads work for you great. I'd be too clumsy and wind up ripping them from the fine coil wires myself!:(