Custom Milk Wagons - Bashing Newqida Tank Wagens

curtis

Registered
27 Nov 2018
438
115
34
Jersey
Country
Jersey
hsbagardenrailway.com
Best answers
0
Country flag
EDIT | 2020-01-04: For future readers of this thread, you can find a complete summary of the steps, my learnings and advice from this thread on our website: Custom G-Gauge Rolling Stock – A Guide to Modifying Milk Tankers – HSBA Garden Railway

With the run-up to Christmas, I'm going to have some time off work. I decided I'd like to spend some time bashing some Newqida Tank Wagons after being inspired by the incredible creations of other members of this forum. Full disclosure, this is my first attempt at a bash

Sourcing
I found a seller on eBay here in Germany that seems to have a good supply of Newqida stock. I was able to buy x3 tankers for around €75 (~£68). [Here is his page if anyone is interested. Not sure about international shipping charges].

Plan
My fiancé and I are keen to make it our railway. Currently, it's mostly continental steam themed without being much more perspective than that. The plan is to convert the 3 fuel tankers into milk wagons (or at least, my interpretation of them). They will each be liveried slightly differently based on things important to us:

  • Home Farm Dairy - this is my my Step-Dad and Mum's dairy farm
  • Goose Rocks Dairy - this is an Ice Cream parlour in Kennebunkport, Maine, USA that my fiancé visited a lot of a kid
  • Starbucks - Because my fiancé loves it and it's part of our Sunday morning dog-walk tradition
For the first two, I've mocked up some logos/text as they didn't have any quality ones to hand and will print them on waterslide paper using a laser printer. I've tried this once before and it worked out well but I didn't seal it resulting in them silvering (going white-ish).

Decals.png

For the liveries, I am thinking:
  • Home Farm Dairy - matt cream (slightly lighter than the the LGB Leuna tank wagon)
  • Goose Rocks Dairy - gloss white
  • Starbucks - gloss white dividing stripe with the dark green for the rest of the wagon. I need the white backing for the decals as I can't print white (which was one of those things that was obvious after I read it!
Progress
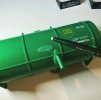
So far the wagons have arrived and I've used a fibreglass pen to scratch off the existing markings on the tank itself. I've not tackled the actual markings on the chassis (e.g. the fire warnings and the running reference etc). That I think I'll simply respray with matt black and deal with in the future).
E6C200C2-84BA-49E7-BC66-4EB14F56729E.JPG

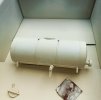
After removing the markings, I sprayed the tanks with plastic primer and began applying the paint in layers. This is probably only my second time using spray paint so I watched a few YouTube videos before hand. A couple of things I don't think I took into consideration - the temperature outside (-1oC) and the cylindrical shape of the tank seemed to give odd results - in some areas the paint grouped and in other places it ran (this is probably my excuse for my poor technique of trying to apply thin coats).

A quick search suggested using some fine grit sandpaper to smooth down the uneven areas, washing it to remove any debris and reapplying. This seemed to work reasonably well
A01C1833-73E8-4815-8CE3-47D08781424F.JPG

I've now applied a glass varnish to the cream wagon and I'm rather impressed with myself. I'll print the decals this week at my office.

Currently working through the second two. The white gloss spray is going better but have still got some drips (again, putting down to my technique and I'm a little more cautious about sanding this one for fear of causing unevenness in the final product). I've started dismantling the final wagon ready to start priming and spraying this afternoon.
 
Last edited:

Madman

Registered
25 Oct 2009
17,132
2,949
Pennsylvania, USA
Best answers
0
Country flag
I presume you are using spray paints in cans. Yes, the temperature has alot to do with how spray paints perform. Optimal temps would be over sixty degrees. Also, hold the spray can at least 10-12 inches away from the item to be painted. I found through experience that the paint has a chance to mist into finer droplets, at that distance, thereby coating more evenly.
 

playmofire

Registered
23 Oct 2010
8,262
853
80
North Yorks
Best answers
0
Country flag
I presume you are using spray paints in cans. Yes, the temperature has alot to do with how spray paints perform. Optimal temps would be over sixty degrees. Also, hold the spray can at least 10-12 inches away from the item to be painted. I found through experience that the paint has a chance to mist into finer droplets, at that distance, thereby coating more evenly.
That's 60F of course and not 60C which the -1 is in.
 

dunnyrail

DOGS, Garden Railways, Steam Trains, Jive Dancing,
Staff member
GSC Moderator
25 Oct 2009
26,160
4,986
75
St.Neots Cambridgeshire UK
Best answers
0
Country flag
You will find that the lettering on the chassis will show through if you do not remove it as you have with the Tanks.
 

playmofire

Registered
23 Oct 2010
8,262
853
80
North Yorks
Best answers
0
Country flag
A good order for spray painting with aerosols is plastic primer which provides a slightly rough surface and which helps adhesion, then one or two coats of top coat leaving plenty of time between each. In cold weather, use a hairdryer to heat the object to be painted just before spraying it.

Always try to spray indoors and avoid doing so if the atmosphere is damp as this can cause a "bloom" on the surface as the paint dries.
 

LGB-Sid

Registered
19 Sep 2016
2,036
1,130
65
UK
Best answers
0
Country flag
If using a hair dryer remember they can get a lot hotter than you think, and can do some weird things to plastic been there :) Same problems here at the moment it's too cold and wet outside for me to paint, so I usually pick the days when it's just warm enough in the sunshine, I warm what ever I want to paint up inside along with the spray can , not with a hair dryer though, spray in the sunshine then move the item back into the warm to dry.
 

Northsider

Modelling the Northern half of the Isle of Man
3 May 2012
2,362
568
Hertfordshire
Best answers
0
Country flag
Well done for taking the leap -you won't regret it! There are plenty of new skills to learn and develop as you go. Trial and error works well, but, as you've already discovered, there are plenty of experienced modellers on here to call on when you need to.
 

curtis

Registered
27 Nov 2018
438
115
34
Jersey
Country
Jersey
hsbagardenrailway.com
Best answers
0
Country flag
All, thank you for the helpful and wise responses - one of the many reasons I really appreciate the community.

I appreciate you calling out the temperature and not focusing on the (probable) lack of skill on my part! I have been getting closer to the plastic when spraying - a result of trying not to get paint on decking so I'll need to catch myself on that.

Spraying inside is, unfortunately, not an option for me as we're in an apartment without the right space to do that. I do, however, have a specious balcony I can use after a casual warming of the plastic with the hairdryer.

Well done for taking the leap -you won't regret it! There are plenty of new skills to learn and develop as you go. Trial and error works well, but, as you've already discovered, there are plenty of experienced modellers on here to call on when you need to.
Remember, the person who makes no mistakes, never made anything
Absolutely! Excited to see how it turns out. Hopefully one day I can achieve the level of some of the fine medallists on this site. We learn by doing and making mistakes, right!

Currently, my plan is:
  • Primer ✅Done
  • Paint ✅ In Progress
Question for what comes next. I was planning to apply gloss varnish and then add the waterslide decals (with some decal fix). I was worried about putting gloss varnish on top of the decals incase it reacted poorly. Any thoughts?
 

JimmyB

Now retired - trains and fishing
23 Feb 2018
6,944
921
69
Weston-super-Mare
www.tumble-down-falls.co.uk
Best answers
0
Country flag
Primer, gloss paint, decals and then varnish to suit you finish, e.g. gloss or satin varnish (or clear lacquer).
 

korm kormsen

Registered
24 Oct 2009
2,765
296
Country
Paraguay
Best answers
0
Country flag
... - a result of trying not to get paint on decking so I'll need to catch myself on that.
get hold of an old cardboard box. about 2' by 2' by 2' 60 x 60cm or larger would be fine.
put it with the opening to one side on a table or stool - and ready is your spray studio!
your decking should be safe(r).
 

dunnyrail

DOGS, Garden Railways, Steam Trains, Jive Dancing,
Staff member
GSC Moderator
25 Oct 2009
26,160
4,986
75
St.Neots Cambridgeshire UK
Best answers
0
Country flag
get hold of an old cardboard box. about 2' by 2' by 2' 60 x 60cm or larger would be fine.
put it with the opening to one side on a table or stool - and ready is your spray studio!
your decking should be safe(r).
That is what I was going to say but also add a few newspapers around it to catch any overspray. I use Cardboard Box on my workshop floor like that.
 

Paul M

Registered
25 Oct 2016
11,875
1,696
60
Royston
Best answers
0
Country flag
Quick tip, don't leave it outside to dry, flies and creepy-crawleys absolutely love getting stuck in wet paint! Either bring it in and leave in a room with an extractor fan, (bathroom or loo) or if you're really stuck drape something over the open end of the box. I personally seal up the opening top and bottom of the box, and cut a flap in one of the sides. That way you've some extra surface protection at the front of the box, and it can be lifted up after spraying to stop the bugs
 

dutchelm

Registered
24 Oct 2009
3,026
176
N Somerset
Best answers
0
Country flag
I always keep the can I am using in my pocket, with the lid on . It keeps it nice and warm & better for spraying.
 

dunnyrail

DOGS, Garden Railways, Steam Trains, Jive Dancing,
Staff member
GSC Moderator
25 Oct 2009
26,160
4,986
75
St.Neots Cambridgeshire UK
Best answers
0
Country flag
There's always one
If you ask me none of us are getting out enough, lack of Model Railway Shows, visits to Model Railway Shops and others Gardens oh and pubs beginning to show.
 

curtis

Registered
27 Nov 2018
438
115
34
Jersey
Country
Jersey
hsbagardenrailway.com
Best answers
0
Country flag
I've got 2 more to go and managed to save a larger box from a recently delivery. I'll adopt the advice above for the next steps (including keep the paint warm in my pocket...). I have been drying them inside but, spraying is still going to happen outside due to the fumes and our pets/my fiancé.

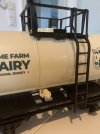
Last night I applied the decals for the Home Farm wagon. I'm actually really happy with the outcome as a first attempt.
  • Decals were printed from a laser printer. Some were blotchy but actually worked for this style
  • I used a decal fix before applying to clean the area and help the decal fix
  • I used a brush to help position and revisited every 5mins to brush out any lumps/bubbles
  • On one of the other tankers, I applied a spare decal underneath - I'll test the gloss varnish I have on his to ensure it doesn't affect the ink.
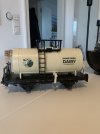
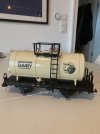
Anyway - pictures below! Last one shows some of my poor paintwork but isn't really noticeable unless you get unclose. The backstory will simply be some damage from the farm's tractor as a cover for my developing skillset. Thanks for all the advice/help so far!

IMG_5701.jpeg
IMG_5698.jpeg
IMG_5700.jpeg
 
  • Like
Reactions: 5 users

playmofire

Registered
23 Oct 2010
8,262
853
80
North Yorks
Best answers
0
Country flag
Looks just the job. I will be undertaking a similar exercise come the warm weather with an LGB ToyTrain tanker and some repro Hornby United Dairies decals and if it comes out as good as yours I will be very happy.