curtis
Registered
EDIT | 2020-01-04: For future readers of this thread, you can find a complete summary of the steps, my learnings and advice from this thread on our website: Custom G-Gauge Rolling Stock – A Guide to Modifying Milk Tankers – HSBA Garden Railway
With the run-up to Christmas, I'm going to have some time off work. I decided I'd like to spend some time bashing some Newqida Tank Wagons after being inspired by the incredible creations of other members of this forum. Full disclosure, this is my first attempt at a bash
Sourcing
I found a seller on eBay here in Germany that seems to have a good supply of Newqida stock. I was able to buy x3 tankers for around €75 (~£68). [Here is his page if anyone is interested. Not sure about international shipping charges].
Plan
My fiancé and I are keen to make it our railway. Currently, it's mostly continental steam themed without being much more perspective than that. The plan is to convert the 3 fuel tankers into milk wagons (or at least, my interpretation of them). They will each be liveried slightly differently based on things important to us:
For the liveries, I am thinking:
So far the wagons have arrived and I've used a fibreglass pen to scratch off the existing markings on the tank itself. I've not tackled the actual markings on the chassis (e.g. the fire warnings and the running reference etc). That I think I'll simply respray with matt black and deal with in the future).
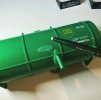
After removing the markings, I sprayed the tanks with plastic primer and began applying the paint in layers. This is probably only my second time using spray paint so I watched a few YouTube videos before hand. A couple of things I don't think I took into consideration - the temperature outside (-1oC) and the cylindrical shape of the tank seemed to give odd results - in some areas the paint grouped and in other places it ran (this is probably my excuse for my poor technique of trying to apply thin coats).
A quick search suggested using some fine grit sandpaper to smooth down the uneven areas, washing it to remove any debris and reapplying. This seemed to work reasonably well
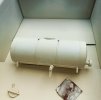
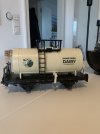
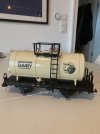
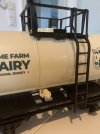
I've now applied a glass varnish to the cream wagon and I'm rather impressed with myself. I'll print the decals this week at my office.
Currently working through the second two. The white gloss spray is going better but have still got some drips (again, putting down to my technique and I'm a little more cautious about sanding this one for fear of causing unevenness in the final product). I've started dismantling the final wagon ready to start priming and spraying this afternoon.
With the run-up to Christmas, I'm going to have some time off work. I decided I'd like to spend some time bashing some Newqida Tank Wagons after being inspired by the incredible creations of other members of this forum. Full disclosure, this is my first attempt at a bash
Sourcing
I found a seller on eBay here in Germany that seems to have a good supply of Newqida stock. I was able to buy x3 tankers for around €75 (~£68). [Here is his page if anyone is interested. Not sure about international shipping charges].
Plan
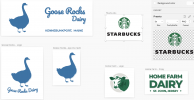
My fiancé and I are keen to make it our railway. Currently, it's mostly continental steam themed without being much more perspective than that. The plan is to convert the 3 fuel tankers into milk wagons (or at least, my interpretation of them). They will each be liveried slightly differently based on things important to us:
- Home Farm Dairy - this is my my Step-Dad and Mum's dairy farm
- Goose Rocks Dairy - this is an Ice Cream parlour in Kennebunkport, Maine, USA that my fiancé visited a lot of a kid
- Starbucks - Because my fiancé loves it and it's part of our Sunday morning dog-walk tradition

For the liveries, I am thinking:
- Home Farm Dairy - matt cream (slightly lighter than the the LGB Leuna tank wagon)
- Goose Rocks Dairy - gloss white
- Starbucks - gloss white dividing stripe with the dark green for the rest of the wagon. I need the white backing for the decals as I can't print white (which was one of those things that was obvious after I read it!
So far the wagons have arrived and I've used a fibreglass pen to scratch off the existing markings on the tank itself. I've not tackled the actual markings on the chassis (e.g. the fire warnings and the running reference etc). That I think I'll simply respray with matt black and deal with in the future).

After removing the markings, I sprayed the tanks with plastic primer and began applying the paint in layers. This is probably only my second time using spray paint so I watched a few YouTube videos before hand. A couple of things I don't think I took into consideration - the temperature outside (-1oC) and the cylindrical shape of the tank seemed to give odd results - in some areas the paint grouped and in other places it ran (this is probably my excuse for my poor technique of trying to apply thin coats).
A quick search suggested using some fine grit sandpaper to smooth down the uneven areas, washing it to remove any debris and reapplying. This seemed to work reasonably well

I've now applied a glass varnish to the cream wagon and I'm rather impressed with myself. I'll print the decals this week at my office.
Currently working through the second two. The white gloss spray is going better but have still got some drips (again, putting down to my technique and I'm a little more cautious about sanding this one for fear of causing unevenness in the final product). I've started dismantling the final wagon ready to start priming and spraying this afternoon.
Last edited:

