Converting Bachmann Closed Streetcar to USA Trains Motor Block

KylePearce

Registered
Country flag
As many of us know, the Bachmann trolleys are very detailed but mechanically frustrating. After dealing with cracked gears, feeble motors and overall roughness I made the switch to the USA NW-2 motor block as many suggested. This will document how that conversion went.

What I used:
-USA Trains motor truck, Part # R22-12
-3D printed mounting bracket x 2
(Or you can make one from plastic angle)
-Side-frame from original gearbox
-rubber toughened CA glue

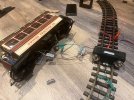
First I started with removing the metal contacts for the old gearbox. Using a dremel I carefully cut the plastic posts that held them. I sanded those spots flush with the surface. Don't mind the R/C equipment , that's a whole other story!
tempImageg6k0Z9.jpg

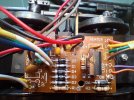
I unsoldered the old contacts from the wiring, and wired in two leads which will be connected to the motor later. They start at the negative side of the diodes. It was important that no wires got in the way between floor and gearbox, as there is no room. On the block itself, the axles had to be trimmed down to the wheel so that the side frame would fit.
bracket.jpg
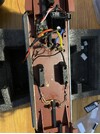
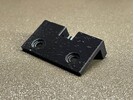
The next step used the 3D printed brackets. If you don’t print, I’m sure this could be easily made from plastic angle. It’s just an L bracket with the correct holes. Note the indent around the holes, which the old gearbox's posts fit into. I screwed one down at one end and put glue on it. I aligned the box and placed it against that bracket. I then put glue on the other one and screwed it into the other side. After the glue dried, the box could be removed easily with 4 screws. The original Bachmann side frame has 2 small posts on each side, pointing inwards. After drilling 4 small (1.5mm) holes in the USA block, the side frame fit was it was. Be careful not to go too deep, as the can of the motor is not far from the wall. Here is the result:
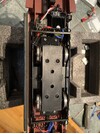
tempImageE45Ize.jpg

After this, the final step was tidying up all the wiring. There is *just* enough room between the side frame and the weight for the wires to pass. I secured them to the floor so they would not hang down and touch the wheels. The two leads coming off of the lighting circuit got wired into the motor leads, so that the directional headlights worked. If running track power, I'd imagine one would just wire the track pickups right to the motor leads as well. For me, the pickups are removed and the motor and lights are powered off of a 12v electronic speed control.
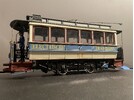
tempImage8SI9PI.jpg

The height did not change at all from the bachmann block. The only change is that the wheelbase is ever so slightly shorter. I can say that the USA mechanisms are 100x better than what this trolley came with. The performance is incredibly reliable, quiet and smooth. I can definitely see why people swear by the USA mechanisms now. I hope this was useful to anyone making their Bachmann trolley run as good as it looks.
 
Last edited:
3D printed brackets are a bit over the top, especially if you cannot do 3D printing. A good blob of Evilstick will secure the motor block.
 
I converted two of my Bachmann streetcars to USA Trains NW2 motor blocks a few years ago. Both have onboard battery and R/C . Both run beautifully.
 
LOL, I was just about to order one for my Traction! I was going to get a new Bachmann chassis but then I saw a video of a new one running and it sounded like a meat grinder. Now I know they fit well. Thank you. This is my next project after my big hauler porter LGB block conversion! Already got the interior leds and pantagraph flicker waiting!!!
 
As many of us know, the Bachmann trolleys are very detailed but mechanically frustrating. After dealing with cracked gears, feeble motors and overall roughness I made the switch to the USA NW-2 motor block as many suggested. This will document how that conversion went.

What I used:
-USA Trains motor truck, Part # R22-12
-3D printed mounting bracket x 2
(Or you can make one from plastic angle)
-Side-frame from original gearbox
-rubber toughened CA glue

First I started with removing the metal contacts for the old gearbox. Using a dremel I carefully cut the plastic posts that held them. I sanded those spots flush with the surface. Don't mind the R/C equipment , that's a whole other story!

View attachment 334164

I unsoldered the old contacts from the wiring, and wired in two leads which will be connected to the motor later. They start at the negative side of the diodes. It was important that no wires got in the way between floor and gearbox, as there is no room. On the block itself, the axles had to be trimmed down to the wheel so that the side frame would fit.
View attachment 334167
The next step used the 3D printed brackets. If you don’t print, I’m sure this could be easily made from plastic angle. It’s just an L bracket with the correct holes. Note the indent around the holes, which the old gearbox's posts fit into. I screwed one down at one end and put glue on it. I aligned the box and placed it against that bracket. I then put glue on the other one and screwed it into the other side. After the glue dried, the box could be removed easily with 4 screws. The original Bachmann side frame has 2 small posts on each side, pointing inwards. After drilling 4 small (1.5mm) holes in the USA block, the side frame fit was it was. Be careful not to go too deep, as the can of the motor is not far from the wall. Here is the result:

View attachment 334165

After this, the final step was tidying up all the wiring. There is *just* enough room between the side frame and the weight for the wires to pass. I secured them to the floor so they would not hang down and touch the wheels. The two leads coming off of the lighting circuit got wired into the motor leads, so that the directional headlights worked. If running track power, I'd imagine one would just wire the track pickups right to the motor leads as well. For me, the pickups are removed and the motor and lights are powered off of a 12v electronic speed control.

View attachment 334166

The height did not change at all from the bachmann block. The only change is that the wheelbase is ever so slightly shorter. I can say that the USA mechanisms are 100x better than what this trolley came with. The performance is incredibly reliable, quiet and smooth. I can definitely see why people swear by the USA mechanisms now. I hope this was useful to anyone making their Bachmann trolley run as good as it looks.
I just picked up one and of course the motor block is fried. I have the USAT block on order and will be printing that bracket shortly. This is such a great resource! Thanks for posting
 
Interesting Kyle. I am planning to do an rc/battery install in an OcCre tram I built about 10 yers ago, although I bought the bits 20 years ago ! I used a USAT block too. I'm interested to see how you approach the rc/battery installation. I'll start a separate thread to motivate me to get on with it :D Max
 
Interesting Kyle. I am planning to do an rc/battery install in an OcCre tram I built about 10 yers ago, although I bought the bits 20 years ago ! I used a USAT block too. I'm interested to see how you approach the rc/battery installation. I'll start a separate thread to motivate me to get on with it :D Max
I would think for space you would need small Lipo/Lion batteries and a deltang based small RX. @PhilP of this parish I am sure could help with the bits.
 
Thanks! Very happy with the USA Trains motor block. For some reason, whenever I change motor blocks I seem to have a 50/50 chance of getting the motor block orientation correct - so the correct headlight comes on! I'd be interested in where you put a battery. Also anyone know if there are 3D designs for the trolley pole?
 
If you are ordering from the States, why not go directly to the source?
Charles Roo..


PhilP.
 
tempImageIfnyTR.jpg
ok I give up... how do I wire this mod up to power the lights? I have the USAT motor block wires up correctly so the power and motor pegs are aligned, the block works with my trolley shuttle, but now I can't get these stinking lights to work. I don't even care if they are on/off in sync with the direction I just want the interior and front/rear headlights always on and I can't figure it out. any help would be appreciated! thank you
 
All things being equal what you have done looks ok. But have you tried them with a battery first? That way you should understand a little more how the wiring works in the Tram. Was there a circuit board in there? A 9v battery should work for you
 
Just a thought. Are the lights on your tram of the LED type ? When you did the switch to the USAT block did you gut the Bachmann wiring and a power distribution PCB. Bachmann usually place any LED's resistors on that board, not at the LED's wiring tags. But check if they are in those grey plastic housings anyway. Have you burned out the LED's by connecting without the correct resistors in place ? Without seeing the original unmodified set up I cannot tell. Picture below is of a Bachmann power distribution PCB I have just taken out of one of their "Mining Moguls" when doing a battery/rc convertion. The 2 resistors marked R1 & R2 at the bottom are the ones that protect loco's directional front and rear LED's. I have had to take care to replace those resistors in the rc/battery conversion I am doing on that loco.

20260912_163634.jpg
 
All things being equal what you have done looks ok. But have you tried them with a battery first? That way you should understand a little more how the wiring works in the Tram. Was there a circuit board in there? A 9v battery should work for you
Thank you for the reply! I was able to get the lights to work when powered directly from the rails, just connecting the alligator clips to the metal pickups. However I can't seem to get the power to flow from the USAT block correctly. I'll try just throwing a 9v battery in there and seeing what happens. This model does not use LEDs though, so its power input is directly correlated with the brightness of the lights. Ill see how 9v looks and go from there
 
Just a thought. Are the lights on your tram of the LED type ? When you did the switch to the USAT block did you gut the Bachmann wiring and a power distribution PCB. Bachmann usually place any LED's resistors on that board, not at the LED's wiring tags. But check if they are in those grey plastic housings anyway. Have you burned out the LED's by connecting without the correct resistors in place ? Without seeing the original unmodified set up I cannot tell. Picture below is of a Bachmann power distribution PCB I have just taken out of one of their "Mining Moguls" when doing a battery/rc convertion. The 2 resistors marked R1 & R2 at the bottom are the ones that protect loco's directional front and rear LED's. I have had to take care to replace those resistors in the rc/battery conversion I am doing on that loco.

View attachment 361113
Hello and thanks for the reply! I did not remove any circuit boards, I did take off one black and silver things (pretty sure its a flyback transformer?) just for a few tests but overall no I didn't remove any full panels or anything, just taking the wiring as it was and attempting to re-power it. And I did get the lights on wiring alligator clips to the pickups from the track directly so I think my issue is in how the power is being sent (or not sent) from the motor blocks.
 
Back
Top Bottom