Claptowte Railway - Gernise End Platform Signs

David1226

Registered
Country flag
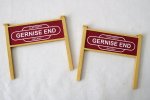
Having drawn an entrance sign for Gernise End Station, I decided to use the corporate logo that I had created to make a couple of platform signs for the yet to be built platform. I created the sign boards/posts from plasticard sheet/strip. I grained to 'woodwork' by drawing a razor saw sideways along it. I have drilled holes in the bases of the posts in anticipation of inserting wire pegs with which to plant them into the platform surface.
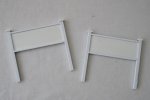
dig 210311001.JPG

The signs were created using Microsoft paint and printed on white card. As the signs are intended for indoor use only I did not worry about sealing them. I stuck the card on using silicone glue, so in theory it should be possible to peel off a damaged/faded sign and replace it with a fresh one if required.
dig 210312001.JPG

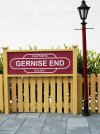
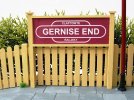
I have mocked up a picture of what they should look like in situ, once the platform has been built, by leaning one against the fence on the goods loading dock and placing a strip of hedge behind.
dig 210312002.JPG

dig 210312003.JPG
 
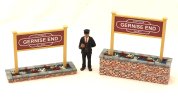
The station signs were made over five years ago now. It is only now, with the track plan having been finalised, for Gernise End Station, and the track actually laid on the baseboards, that I can finalise some of the smaller details, including the final placement of the station signs. Having built platform lamps, with battery packs concealed in raised brick built flowerbeds, I thought it would add an additional splash of colour if I was to 'plant' the station signs into similar flower beds. Being a terminus, there is really only need for a single sign on the end of the platform. For this sign, it was only necessary to build a low level flowerbed. I decided to place the second sign, adjacent to this, between the tracks, between the platform run around loop and the goods loop. This sign, being at ground level, as opposed to being at platform height, would need to be raised higher, to be on the same level as the platform, so the second flowerbed was accordingly, built taller.

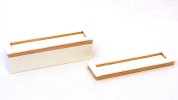
Like many of my scratch builds, I designed the models as I went along. I had intended using 3mm plasicard for most of the build, but it's in not easy to cut it into the narrow strips that I was intending to build the low walls with. I changed my mind, I used 3mm plasticard for the flower beds, and made the walls from 1/4" square wood strip, glued around the bed, giving a wall height of about 3mm. The capping stones surrounding the flowerbed, were 8mm wide strips of 3mm plasticard, scribed and hacked about slightly, to represent individual capping stones, the same technique that I used on the station lamp flowerbeds. To raise the second flowerbed, I glued together an open box of single thickness 3mm plasticard, which I glued underneath, with a bit of 1/4" wood strip as reinforcement. After painting the soil bed, inside of the walls and the capping stones, I glued the same textured, embossed, colour printed paper to the exterior of the walls, as used on the lamp post flowerbeds.

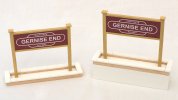
When I first made the station signboards, I had already drilled vertical holes in each support leg, for the purpose of inserting a length of brass wire, to use as a locating peg. I glued in the pegs, and, having drilled holes in the soil bed, I glued the signs to the bases. All that remained was to plant up the flower beds, using the same self adhesive flower clumps that I used to plants the station lamp flowerbeds.

The flower beds, in the raw, before painting.

dig 260806001.JPG

The flowerbeds with the signs in place but not yet glued.

dig 260806002.JPG

The finished signs, in their flowerbeds, panted and planted up.

dig 260807001.JPG

David
 
Back
Top Bottom