trammayo
Interested in vintage commercial vehicle, trams, t
It'll send you dotty
- - - Dash it all, I'll Endeavour to keep sane - or "I'm as sane as the next man". "I'm Eccles".
It'll send you dotty
Try this free download for pic resizing
www.softorbits.com/batch_picture_resize/articles/pic-resize.html

.JPG")
.JPG")
.JPG")
.JPG")
.JPG")

No, the blur is Mick's speed of constructionThe problem is that either you're too close to what you're photographing for the camera to focus properly or (as in the case of the wheel units on the platform) the camera has focussed on the background.
")
The problem is that either you're too close to what you're photographing for the camera to focus properly or (as in the case of the wheel units on the platform) the camera has focussed on the background.
No, the blur is Mick's speed of construction
<observation>
Those spacers seem a bit, well, 'chunky'..
Still, I suppose you won't see them on the running engine??
With re-gauging.. Will the wheels still end up inside the frames? - For want of a better term..
Have you got a "macro" setting on the camera?
My Fuji Finepix has, and it improves the quality when you take close up shots of things. Been photographing some of the N buildings I have constructed to post on another site and it certainly improves the quality of the images.
.JPG")
.JPG")
.JPG")
Have you got a "macro" setting on the camera?
My Fuji Finepix has, and it improves the quality when you take close up shots of things. Been photographing some of the N buildings I have constructed to post on another site and it certainly improves the quality of the images.
Yes, the Finepix S5000 has a close-up/macro setting, and a warning sound/icon if you're too close to the subject to focus properly.
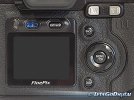
Mick, on the photo I've attached from letsgodigital.org, there is a little flower icon on the left hand side of the ring round the button marked Menu/OK.
With the camera turned on, press the that side of the button once, a "bar" will appear in the viewing screen showing Off, a silhouette of a flower and a silhouette of a magnifying glass and a flower. Press the right hand side of the ring and then OK and a small flower image in yellow) will appear in the top left corner of the viewing screen. That shows you've get close focus on and can photograph closer. Press the right hand side of the ring twice, and a yellow magnifying glass and flower will appear; press OK and can then go very close.
To get rid of the either setting, press the left hand of the ring and then the right hand side until Off is highlighted and then press OK.
In any focus mode, normal, close-up or macro, if you are too close when you first press the shutter button, there should be a beep and the letters AF flash in red to the right of the focus screen.
All this assumes the camera is set on auto focus.
.JPG")
.JPG")
.JPG")
.JPG")
So, having been inspired to use the camera again (and to operate a daily train), I took Dotti's superstructure out to temporay mate with it's underframe!
View attachment 220145
I blame the white for reflecting the light! I did use a filter but you can make out the panels on the bonnet.
View attachment 220146
View attachment 220147
Now it's down to detailing, glueing in the screws that retain the chassis (and allow detachment to reach the battery box - need a 3mm nut spinner I think!), mesh for the radiator, switch mounting and all wiring up, rivetting detail (no, that's not an observation), exhaust mods, air intake mods, painting, handbrake, make a gear changer, fit the axleboxes and couplers, find an out of work driver and bash him into shape, etc.
I'll be back!
Houston Gate Locomotive Works are a bit cheaperMust go back through this thread when more time...
Interested in the drive-train (no pun)..
Am thinking of a small diesel scratch-build.. Tentative, and freelance, just to ease myself into things..
The commercial chassis, seem quite expensive, for what they are??

Must go back through this thread when more time...
Interested in the drive-train (no pun)..
Am thinking of a small diesel scratch-build.. Tentative, and freelance, just to ease myself into things..
The commercial chassis, seem quite expensive, for what they are??