Another Playmobil Diesel Transformation. This time a Baby Kamel.

dunnyrail

DOGS, Garden Railways, Steam Trains, Jive Dancing,
Staff member
GSC Moderator
25 Oct 2009
26,166
4,990
75
St.Neots Cambridgeshire UK
Best answers
0
Country flag
As has been recounted elsewhere, these little Locomotives are super runners and great value. I paid £90 for my set from Amazon including the postage and was miffed that the next day that they were £69 post paid. Never mind, I guess the extra cost has made me decide that this little beauty was worth more than just slopping some weathering on it to hide its toylike looks.


But first I must thank PaulRHB for his pathfinding research on slowing the beast down somewhat. I have copied his findings and thought that I would give some information here on my Tests as part of my makeover thread. I decided that I would follow Paul`s suggestion and install 6 Diodes and the Switch. My reasoning being that the Switch would give me slower speeds for shunting. These are my findings, note that the speeds are calculated using an iPhone App called " Model Speed" and I use a setting of 2 Yards to give me Scale Speeds in KPH. I did 2 runs at each setting to give me some kind of appreciation that I was getting my timing right. The 3 settings for each choice of Diodes represents the 3 Speed Settings that happen as you move the Control Knob.


Slow Speed Switch set for 3 Diodes, 28 and 26
Intermediate Speed 3 Diodes 14 and 13
Highest Speed 3 Diodes 7.7 and 7


Fast Speed Switch set for 2 Diodes, 33 and 28
Intermediate Speed 2 Diodes 18 and 15
Highest Speed 2 Diodes 11 and 9.6


Not a massive difference with the Diodes, but certainly better than without. Note that the Slow Speed gives nice shunting speeds in the 7kph range and Fast Speed gives a Top Speed of around 30kph.


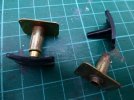
Before all this of course I had to dismantle the Beast. This is easier said than done and has again been recounted before, just remember if you use the option of Cocktail Sticks that they can jab you a nasty jab, don`t ask how I know this! Having got it apart I decided to cut all the Tabs off. This gives me the problem of holding the body on but more of this later.


My next task was to spray the dismantled Loco with rattle Halford Matt Grey. This acted as the base for my livery that is to reflect the Harz Diesel that I wanted to replicate, hence my Title of Baby Kamel.


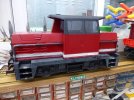
After an overnight in the Airing Cupboard I sprayed the bottom part of the Body with Halfords Rattle White undercoat. Then after another night to dry off masked my line off with Tamiya 6mm Lining Tape and another attack with the Halfords Rattle Can, this time `BMW Imola Red 11`. I reasoned this to be a close approximation to the DR/HSB Maroon and hey I am representing a German Locomotive so what better colour than a BMW one? After yet another night in the Airing Cupboard the lining tape was removed, this gave the effect that I was looking for with a little spray over of the Maroon which was touched up with some Tamiya Matt White Brushing Acrylic.


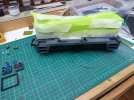
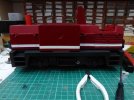
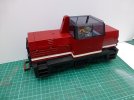
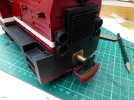
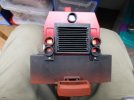
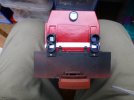
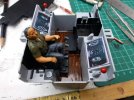
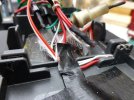
The first two pictures show the Loco on the Test 2 Yards whilst on Timing Runs. Inevitably the wiring was all over the place till this testing was completed. It has now all been tidied up prior to stuffing into the compartment just behind the Battery Box, which thankfully appears to be full of empty air prior to the mods. The final shot shows the Masking carried out prior to Rattle Canning the Chassis in Matt Black with a little `Bounce Weathering` undertaken using Halfords Red Primer. Actually a superb colour for Bauxite Colour of Wagons and subtle Brake Dust.

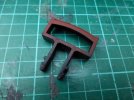
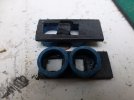
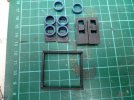
Just seen in the final picture are the initial Plasticard Botch ups for New Lights and a Radiator Cover. Oh I forgot to mention that I have also done some covering of the body to make it look like there is only  a Motor at one end and just one Radiator.
JonD


Attachments

  • image.jpg
    image.jpg
    136.5 KB · Views: 125
  • image.jpg
    image.jpg
    111.4 KB · Views: 152
  • image.jpg
    image.jpg
    110.8 KB · Views: 165

dunnyrail

DOGS, Garden Railways, Steam Trains, Jive Dancing,
Staff member
GSC Moderator
25 Oct 2009
26,166
4,990
75
St.Neots Cambridgeshire UK
Best answers
0
Country flag
Whilst getting on with the painting, some other matters were attended to. Not least deciding how I would hold the Body onto the Chassis. This was to be by my ever favorite method of using Small BA Screws. It was decoded to use a Lamp Cluster to hold the Front and Rear Bonnets. This would mean that a new cover would be made to extend over the Chassis to allow the screws to  both assist in holding it to the body and to secure the Bonnets. There is a small glance of these on the previous post,
Here is a better brutal close up of them. They are basically a Plasticard Mash up with some small Plastic Tube for the circle parts. I made 4 of the clusters and another 2 Circles for the Top Lights. The Clear Glazing used for the Lights has been reused but cut into 10 parts to be used behind each opening. Small bits of Plasticard have been bodged in between the Lamps on the Clusters in an attempt to stop bleed through on the Red and White Lights. The two pictures show all 4 with the Start of the New Rad and another brutal close up to show the Top and Underbelly of the new clusters.


Somewhere on one of the threads there was a suggestion that the Coupling would loose stock by decoupling. I resolved this by turning the coupling upside down. To enable it to be refitted I cut out the Webb and one of the pictures shows this Mod. It may be the I will have to reduce the lip now underneath somewhat, but that will be attended to when coupling trials are carried out. Certainly unwanted uncoupling should never be an issue with this mod. But possibly pulling out may be with large loads.


There were a few Paint tidying issues to be looked at around the Light Clusters as they were fitted after the Spraying. But this was just a little splodge of Matt Black here and there. The picture of the Loco Side shows where I have covered ip the original Moulding with Fake Doors on both ends of the Bonnet. Also the location of the Diode Switch can be seen. This will be lost with a bit of Matt Black, though I may paint this onto a small Switch Cover.
JonD
 

Attachments

  • image.jpg
    image.jpg
    90.2 KB · Views: 159
  • image.jpg
    image.jpg
    107.9 KB · Views: 102
  • image.jpg
    image.jpg
    87 KB · Views: 97
  • image.jpg
    image.jpg
    71.8 KB · Views: 91

Gizzy

A gentleman, a scholar, and a railway modeller....
26 Oct 2009
36,138
2,273
63
Cambridgeshire
www.gscalecentral.net
Best answers
0
Country flag
A baby Kamel?

Clever bit of lateral thinking and certainly the paint job looks the part....
 

dunnyrail

DOGS, Garden Railways, Steam Trains, Jive Dancing,
Staff member
GSC Moderator
25 Oct 2009
26,166
4,990
75
St.Neots Cambridgeshire UK
Best answers
0
Country flag
Thanks for your comments, latest round of work yesterday included some more Rattle Canning to the Roof and Playmobil Handrails. Not sure if I will use these or go for something more to scale.  A bit of touch up, specially where I drilled a hole in the exhaust. Wiring has been tidied up prior to being able to stuff it all in the spare bit of Air behind the Battery Compartment.  In this I used some GPO single strand wire , not much use for wiring but very good for wrapping round bunches of wire to tidy them up. Lots of Heat Shrink was used In the tidy up process as well. Also some metal bashing was done to create a couple of Centre Couplings. This just used some flat plate attacked with the Rivet Punch, some KS Tube and a couple of LGB Buffer Ends that were kicking about in the bits box. The cab inside has been worked up to include a Control Panel from a picture x the Webb. Some odd levers, buttons, foot controls and a small cooking Hob. The Driver Herman Schlitz had a hole drilled in his Arxx so that he could be screwed to the seat (painful but it stops him going down the pub).  That is about all that was done yesterday, but it took most of the day. I think that the pictures will tell the story better now. Oh The Rad was worked up the day before yesterday, after the square had dried up I just cut lengths of 20 thou Plasticard to represent the Grills spaced with small offcuts to give separation. A bit of Metal Grill that was around was cut to go inside and the whole lot superglued to the front after I had Matt Blacked the front where the Rad inside would be.


Having got thus far I thought that I deserved a little play with her in the Garden. Yesterday (Thursday) was much milder that foggy Wednesday. I have to say that the haulage powers are not great, perhaps that is why they only include 1 Wagon in the Train Set. Certainly the Long Wheel Base knocks hell out of the forward progress, even on 4ft Radius Curves. But then perhaps my Batteries are a bit worn after much testing during the build. It may be that I will play with the Diode Set Up, now that the type spec`d by PaulRHB have arrived from Maplin. The Switch may even be adapted so that there is a No Diode for Main Line runs and the 3 set up option for shunting. We shall see, at least with my all screw pull apart I can dismantle it easily now to undertake changes.
JonD
 

Attachments

  • image.jpg
    image.jpg
    53.3 KB · Views: 108
  • image.jpg
    image.jpg
    87.5 KB · Views: 188
  • image.jpg
    image.jpg
    89.6 KB · Views: 95
  • image.jpg
    image.jpg
    90.8 KB · Views: 99
  • image.jpg
    image.jpg
    76.2 KB · Views: 92
  • image.jpg
    image.jpg
    80.7 KB · Views: 99
  • image.jpg
    image.jpg
    80.7 KB · Views: 102
  • image.jpg
    image.jpg
    97.4 KB · Views: 100
  • image.jpg
    image.jpg
    93.3 KB · Views: 99

peterexmouth

Registered
24 Oct 2009
63
1
Devon
Best answers
0
Country flag
The motors in this loco are fairly small, and there are several plastic gears in the drive train. I think the loco is well engineered for its intended use, but I would be very wary of loading it with more than a couple of trucks on an incline. I think the gears could strip quite easily. However it's a great way to get the grandchildren in charge and fascinated, and I'm really happy to run it when I can't be bothered to clean the track.

Peter
 

playmofire

Registered
23 Oct 2010
8,266
853
80
North Yorks
Best answers
0
Country flag
The previous Playmobil locos, track and battery powered, were designed to pull up to four items of rolling stock, although I've had my r/c ones pulling appreciably more at times.
 

dunnyrail

DOGS, Garden Railways, Steam Trains, Jive Dancing,
Staff member
GSC Moderator
25 Oct 2009
26,166
4,990
75
St.Neots Cambridgeshire UK
Best answers
0
Country flag
Been away for the weekend hence no further time to report progress. I think that when I am in Battery Mode she will be used as a Station Pilot attaching and detaching the odd van or two. Paul yes I am sure that the batteries were well and truly K'd so will test out using better ones. Just a bit dismayed by the reduction of speed on Curves. Still again maybe a new set of Batts will solve that. If weather is kind later today will try some more Tests. I had hoped that it would manage a Selktalbahn Train of 2 Bogies and a Van, but clearly that is not going to happen in light of the Gear Train Warnings. Still I think it is a very attractive little beast and am very pleased that I have taken the time to revise its look.


Still not quite finished yet so a but more of an update soon.
JonD
 

PaulRhB

This Way Up
24 Oct 2009
8,855
408
Wilts Drifting toward the RhB,plate tectonics rock
Best answers
0
Country flag
There wasn't any appreciable slowing on corners either and as the gear train appears to be spur gears, they rotate easily when turned, I doubt the gear train is under too much strain but the limit will be the motors power instead. I haven't looked at the width of the gears to see how robust they seem but that or any issues with tight inteference fit causing cracking, like Bachmann, would seem the main mecanical risk. I'm considering a repaint on my modified version to the orange found on the smaller diesels like the Kof although you paint job seriously tempts me to turn it into a mini camel!
 

playmofire

Registered
23 Oct 2010
8,266
853
80
North Yorks
Best answers
0
Country flag
Could the electrical changes made account for the lack of pulling power? Or during reassembly has something become misaligned which is reducing pulling power?
 

PaulRhB

This Way Up
24 Oct 2009
8,855
408
Wilts Drifting toward the RhB,plate tectonics rock
Best answers
0
Country flag
The diodes reduce voltage without affecting the current ;) That's why we use them as opposed to resistors to reduce the voltage.
My two locos and Ashleys all run fine with several wagons on typical garden gradients but there is a significant drop off as the batteries get nearly empty. The quality of the batteries also has a major effect as my other friend Jon found out with his accucraft diesel converted to battery power.
 

dunnyrail

DOGS, Garden Railways, Steam Trains, Jive Dancing,
Staff member
GSC Moderator
25 Oct 2009
26,166
4,990
75
St.Neots Cambridgeshire UK
Best answers
0
Country flag
Paul, many thanks for the complement that my conversion has made you think of a replication of my efforts. Good luck, I am sure that you will do a better job than I have.


Re the pulling power I am pretty sure that nothing is misaligned but will investigate to see.


Rain stopped the thought of testing though I did get some work done on the Layout and am on with a Building.


However I refitted the Handrails and carried out a little bit of weathering. The Handrails are showing in the picture much more than they do in the eye, in fact the little bit of Silver that I used to simulate wear looked horrible in the pictures so it was gently Emeried off.


Jobs still to do, Handrails for the Cab. Lettering, I shall use a set of Troger Kamel ones but ask him if he can give me a different number. Latest Pictures below. Not both the same but one of each side.

image.jpg


After some faffing about I think that I have got the images correct now!
JonD


Attachments

  • image.jpg
    image.jpg
    116.3 KB · Views: 97

garrymartin

My Family,Railways, Beer and the Seaside
30 Oct 2009
10,036
5
Now Derbyshire !
Best answers
0
Country flag
That's an odd name for a locomotive ??? :eek:
 

dunnyrail

DOGS, Garden Railways, Steam Trains, Jive Dancing,
Staff member
GSC Moderator
25 Oct 2009
26,166
4,990
75
St.Neots Cambridgeshire UK
Best answers
0
Country flag
Many thanks for the complement Paul.


Gary, the Harz Line back in the 80's got some Standard Gauge Diesel BoBo's that were converted to Narrow Gauge by the expedient of putting a pair of 6 wheel Metre Gauge Bogies on them. They were nicknamed by someone as Kamels. Being centre Cabs I suppose to someones idea they looked like a Camel. Presumably the Germans spell Camel with a K. Hence the name for my Kamel as it is in effect a Baby Version. I must pose the two together in a pic on here to show the similarity for you all. In the next day or three this will be done.
JonD
 

Dtsteam

G Scale, Travel, Steam Boats, Mechanical Music
24 Oct 2009
5,401
15
Preston
Best answers
0
Country flag
I can't wait for the name plates :)
 

garrymartin

My Family,Railways, Beer and the Seaside
30 Oct 2009
10,036
5
Now Derbyshire !
Best answers
0
Country flag
I was referring to the word underneath the loco in your pictures :eek:
 

trammayo

Interested in vintage commercial vehicle, trams, t
24 Oct 2009
22,670
4,680
75
Co. Mayo
Country
Ireland
Best answers
0
Country flag
garrymartin said:
I was referring to the word underneath the loco in your pictures :eek:

You mean the one with the wrong spelling?

But, seriously, I have followed this thread from the beginning and can say that, whilst in it's original state it might not be really a Pig's Ear, you have made a Silk Purse out of it!