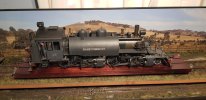
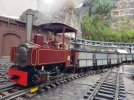
7/8" Decauville sorted with Radio Control

David Price

Registered
Country flag
I thought I would start this thread to the existing Decauville Q&A on the 7/8" forum in the SE Lounge as that site appears to have some difficulty in accepting files and images, despite the thread being extremely helpful to anyone who has one of these engines.

If members on this forum are interested I will detail some of the additional issues I encountered with this locomotive before converting it to full radio control. Most of my comments will be in addition to the now 37 pages of information regarding this engine in the Decauville Q&A thread on the 7/8" forum.

If there is interest I will document some of the issues that were not covered in the Q&A thread that I had to sort just to get it to run well under manual control and then detail the conversion to a Fosworks system with both regulator and reverser servos.

Before I go into detail I'd appreciate any comments whether posting this info is worthwhile.
 
I would say 'yes'. Especially if there are 'problems' with the 7/8th's Forum. - It means there is another copy of the information 'out there', making it more resilient and perhaps easier for others to find in the future?

PhilP.
 
Anything 7/8s scale seems to be my interest at the moment.
 
I thought I would start this thread to the existing Decauville Q&A on the 7/8" forum in the SE Lounge as that site appears to have some difficulty in accepting files and images, despite the thread being extremely helpful to anyone who has one of these engines.

If members on this forum are interested I will detail some of the additional issues I encountered with this locomotive before converting it to full radio control. Most of my comments will be in addition to the now 37 pages of information regarding this engine in the Decauville Q&A thread on the 7/8" forum.

If there is interest I will document some of the issues that were not covered in the Q&A thread that I had to sort just to get it to run well under manual control and then detail the conversion to a Fosworks system with both regulator and reverser servos.

Before I go into detail I'd appreciate any comments whether posting this info is worthwhile.
We tend to be a pretty road group with many diverging interests. Any information about build and Rc fitting to live steam tends to be well liked. My 3 live steam locomotives are all fitted with Spoorer or Fosworks equipment, Spoorer being taken over by Fosworks for any that may not know.
 
I started a separate thread to the existing Decauville Q&A on the 7/8"forum to detail some of the additional issues I encountered with this locomotive before converting it to full radio control.

My posts here will document some of the issues that were not covered in the Q&A thread that I had to sort just to get it to run well under manual control and then detail the conversion to a Fosworks system with both regulator and reverser servos.

As PhilP indicated information in more than one location is not a bad idea - and posting on the 7/8" Forum has been at times extremely frustrating when a carefully written post just gets lost in the system with this sort of response:

7-8 Post-1.JPG

This is not a criticism of the site or those that run it as I am extremely grateful for anyone that puts time and effort into these sorts of forums for no profit!.

Just given up attempting to for now on the SE Lounge in frustration.......
 
My Decauville was purchased via eBay from the US and sold as as a "test run only" unit with the underfloor gas tank supplied as a separate item.

Unfortunately the Accucraft packing is not suitable for international shipping and it arrived with a number of bent cosmetic bits and a pressure gauge stuck on 100 psi.

The seller did have the grace to do a partial refund to cover the pressure gauge replacement and some of the damage - it was also missing the coal bunker that covers the lubricator.

After straightening bits and fixing the pressure gauge problem the next issue discovered was oil in the boiler - either it had been left with the regulator open after a run or the regulator was open and the pressure changes during air freight caused the contamination.

Photo shows the first, second & third flush with general purpose thinners - followed by another flush with fresh water, a boiler fill and the burner lit with the filler plug off to evaporate any remaining thinners.

20250104_182415.jpg


It was now ready for steaming on the rolling road.............
 
Whilst the engine had insulation fitted either side of the small gas tank and in the smokebox it would not steam with the smokebox door shut, despite boring out the diameter of the funnel (using parallel reamers of increasing size) as suggested in one of the 37 pages of posts in the Decauville Q&A:

20250106_164235.jpg

Fitting a #3 jet has subsequently allowed it to steam well with the smokebox door shut and to be lit down the stack - the procedure that works is once the gas is lit a small flame will be visible down the stack in the smokebox - then back the gas off until the burner starts to "sing".

(Jason Kovak at The Train Department kindly suggested I use the Accucraft #3 (0.18mm) jet).

The engine then steamed reasonably well on the rolling road but would sometimes "lock up" the motion in forward gear.

20250106_153451.jpg

(The cab, cab steps and all the detail parts have been removed until all of the issues are sorted out.)

I'll detail what the problem with the motion was in the next post.
 
Last edited:
The issue with the motion and jerky running was as a result of the left hand piston rod not being threaded properly into the cross head - this was established by comparing the number of visual threads on each side.

Left-hand side:

20250110_170941.jpg

Right-hand side:

20250110_171012.jpg

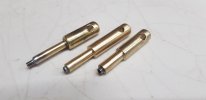
To fix the problem properly I decided to remove the cylinder covers - the bolt heads used here were smaller than my Accucraft 1.4 socket driver so I made up an appropriate size (and several other small sizes) using a hex grub screw threaded and silver soldered into a brass mandrill:

20250209_212043.jpg

The size for the cylinder head bolts also fits the heads of the bolts holding the cab in place so is a handy tool to have.
 
Last edited:
Once the cylinder covers were removed the problem became obvious - left-hand side was 2.4mm advanced over the right:

LH piston at full forward stroke - notice position in relation to the inlet port:

20250209_150729.jpg

RH piston at full forward stroke - the weird shape in the centre is the way the piston rod is peened over to hold the piston on the piston rod:

20250209_150917.jpg

The peened end precludes using a tool to screw the piston rod into its correct position.

I carefully screwed it fully out, cleaned the thread with thinner, added a drop of Loctite and screwed it into a position matching the RHS using a caliper to measure the depth in the cylinder against the RHS. Flat needle nose pliers without serrations were used to do this job - gripping right at the end of the thread as this will not travel into the cylinder gland.

Cylinder covers were then reattached using a Loctite 34248 High Temperature sealant as a gasket (the pin is just to locate the cover in the correct position relative to the steam admission port).

20250209_163127.jpg

This rectified the issue with the motion and the engine now appeared to steam freely and run properly in both forward and reverse gear.

However I soon found even running it at the AMRA Glen Iris track (which has effectively no grades but tight LGB curves) with a light load and no radio control proved to be either too lively on the straight if set for the curves or a stall on the curves:

20250216_132933.jpg

Radio control (of at least) the regulator was the next step.
 
Last edited:
My first 45mm gauge live steam locomotive was a Roundhouse Davenport fitted with Fosworks Radio Control system and I decided to stick with that system for future live steamers. (I use CVP Airwire for RC control of battery powered Fn3 locomotives with ESU 5XL decoders and LiIon batteries as detailed elsewhere in this forum).

After taking delivery of a set of servos and a receiver from Steve at Fosworks I looked at how this could be fitted to the Decauville and decided I could fit the necessary components into the RH side tank.

This meant installing the larger gas tank under the floor which is well covered in the Q&A thread and in the instructions that come with the tank so I will avoid duplicating that info. It also meant I couldn't use the under cab floor space as originally conceived and done by Gerd on the 7/8"forum.

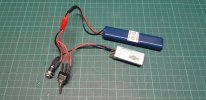
The key to the install in the side tank is to use a battery pack with two parallel rows of 2 x AAA batteries - I'm using a NiMH pack supplied by Fosworks after a LiIon saga with a local supplier that I won't go into detail here.

(The LiIon pack is seen here in the image but cannot used as the supplier used XTar LiIon batteries each with an internal BMS systems which will not allow two wire charging when assembled as a pack.):

20250603_171133.jpg

In the final installation some wires were shortened but there is sufficient room in the side tank for it all to fit with the insulation in place.

20250612_143627.jpg

Switch and charging socket in the end wall of the tank works - with the switch just clearing the Johnson bar if manual reversing is to be kept.
 
Last edited:
I thought I would start this thread to the existing Decauville Q&A on the 7/8" forum in the SE Lounge as that site appears to have some difficulty in accepting files and images, despite the thread being extremely helpful to anyone who has one of these engines.

If members on this forum are interested I will detail some of the additional issues I encountered with this locomotive before converting it to full radio control. Most of my comments will be in addition to the now 37 pages of information regarding this engine in the Decauville Q&A thread on the 7/8" forum.

If there is interest I will document some of the issues that were not covered in the Q&A thread that I had to sort just to get it to run well under manual control and then detail the conversion to a Fosworks system with both regulator and reverser servos.

Before I go into detail I'd appreciate any comments whether posting this info is worthwhile.
Post away David. I am always eager to learn.
 
Yes, carry on! Even if you aren't in possession of a Decauville, the principals are pretty much the same for all RC steamers. TBH, I find it frightening taking my engines apart, let alone drilling holes and things in them
 
Agreed, reading all this is very useful in getting a feel for what we sometimes have to do to "make it run".

Subscribed.
 
I should have mentioned earlier that the initial radio control test setup was the fitting of a Hi-Tech servo to the regulator with the original kit received from Fosworks - a battery pack (4 x AAA NiMH sitting side by side), receiver and wiring with charging socket and on/off switch from the loom below all sitting temporarily in the side tank.

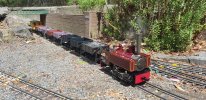
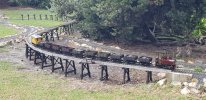
I had also fitted a fine control needle as supplied by Jason Kovak to the regulator but testing at the club track demonstrated insufficient steam throughput with the travel available from the servo - reverting back to the original regulator needle solved that problem and it subsequently has proven to be a good runner, as seen here at my colleague's "Copperhead Garden Railway" at Venus Bay, Victoria:

Decauville-3.jpg

This line has a number of grades, particularly up past the driveway and the control of the regulator proved the merit of the installation - free running with the regulator set for the curves and uphill grades with this load would have meant excessive speed on the downgrades and a major derailment.

Next stage saw me fit all of the electronics into the side bunker with the slim line battery pack, and with the switch & charging socket at the end of the bunker inside the cab as seen in the earlier post.

Running with radio control of the regulator proved the exercise was worthwhile but I decided that I needed reverser control as well - I will detail that in the next post.
 
Last edited:
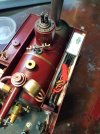
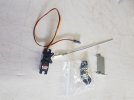
Regulator control was established using a HiTECH HS-82MG (metal gears) servo and bracket supplied by Fosworks along with the link in the image.

20250621_113130.jpg
As I had decided to use the underfloor gas tank the servo had to be mounted inside the cab - the bracket was positioned so the screw holes were just outside the frame of the engine - once fitted the engine was tested on the rolling road, at the club tack firstly with the fine regulator needle fitted then with the standard needle which provided more steam flow to the cylinders.

It was run in this configuration with the temporary electrical lash-up at Venus Bay and proved to be very controllable.

However having to use the Johnson bar inside the cab for forward and reverse when clearing the cylinders or backing into a siding at the club track proved to be a bit of a fiddle so I went the extra step of fitting a servo to the reverser.

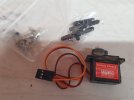
As this servo does less work than that on the regulator I chose to use a Lonely Planet MG 90S (metal geared) servo due to both the size and the cost (only AUD$29 for 4). The packet on the left in the shot below are radio control link connectors - one of which I milled to a two sided flat unit to mount to the end of the reversing rod.

20250621_113318.jpg

The servo was mounted on 2 x 4mm brass pillars using M2.5 Pan Head screws - length is currently 27mm but they need to be taken down to 25mm to give a little more clearance to the switch.

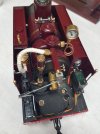
With all of the electronics tucked away in the side tank the footplate ended up looking like this:

Decauville-7.jpg

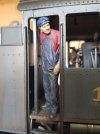
Cables, gas pipe and brackets will be painted black to make them less obvious but when the cab is back on they are not as visible. Having said that gas burners and non-scale gauge glasses take away from inside the cabs of live steamers in this scale and a 7/8" figure from Andian Models in NSW will be added at a later stage - probably this guy as seen on the footplate of my Fn3 Mallet:

20250621_124216.jpg

Think he needs to wash his face......... - looks OK though at this distance:

20241219_113156.jpg

That just about sums up the installation to date.
 
Last edited:
After successfully running on the rolling road with both regulator and reverser control all of the detail bits including the cab steps, pipework and etched builder's plates (with Decauville spelt correctly) were fitted.

Running at the AMRA Glen Iris track a fortnight ago proved most enjoyable with an engine that can now be driven with a load at more sedate speeds - it has also become a better steamer with a Summerlands Chuffer fitted - most likely due to increased back pressure on the exhaust.

It certainly sounds nice!

20250615_140612.jpg

(Coupler pockets are Ozark Miniatures modified to fit the Accucraft pockets with a shaft and original Accucraft spring fitted)

Coal loads in the LGB hoppers are a story for another day - now I just have to decide whether I will weather the engine.......................
 
Last edited:
Thanks. Great to see 7/8ths on this site. Glad you were able to sort it out. It is a lovely looking engine but they rarely if ever appear for sale.
Best wishes.
 
After successfully running on the rolling road with both regulator and reverser control all of the detail bits including the cab steps, pipework and etched builder's plates (with Decauville spelt correctly) were fitted.

Running at the AMRA Glen Iris track a fortnight ago proved most enjoyable with an engine that can now be driven with a load at more sedate speeds - it has also become a better steamer with a Summerlands Chuffer fitted - most likely due to increased back pressure on the exhaust.

It certainly sounds nice!

View attachment 344249

(Coupler pockets are Ozark Miniatures modified to fit the Accucraft pockets with a shaft and original Accucraft spring fitted)

Coal loads in the LGB hoppers are a story for another day - now I just have to decide whether I will weather the engine.......................
I must admit that I marvel at the true, old fashioned engineering that is involved in building and operating scale live steam, especially when it doesn't work properly. I must also admit that I don't have the temperament do something like this myself. So, I'll just marvel on the sidelines.
 
Back
Top Bottom