7/8" Decauville sorted with Radio Control

Thanks. Great to see 7/8ths on this site. Glad you were able to sort it out. It is a lovely looking engine but they rarely if ever appear for sale.
Best wishes.
Interestingly the seller in the US had two for sale - both "test run" only - the one I did not purchase had the larger gas tank installed under the cab floor.

General consensus on this loco is that Accucraft ignored some of the design advice they were given (like - don't put the gas tank next to the boiler) - and mine may have been "a Monday or Friday job" as we used to say about certain manufacturer's cars..... And they didn't even spell Decauville correctly on the builder's plates!

Also I didn't point out earlier that half a glass of water in the gauge glass means you are about to expose the burner tube - if this were a real locomotive you would be about to expose the crown sheet with likely catastrophic results. Whilst I realise this will not cause major damage in this scale it is still not good practice (I've also put a copper wire in the gauge glass to keep the water level at a more reliable sighting and have yet to put a zebra pattern sheet behind).

Despite the nice blow-through cock on the glass it needed the internal wire for better readings to sometimes break the meniscus of the water.
 
This thread is extremely helpful, thank you.
I bought one of these Decauvilles about a month ago, it has never been steamed, has had the lagging modifications, but came with a new spare gas tank, without fitting instructions, which I now realise is designed to mount under the cab floor. I was aware of some of the issues with this loco, but it looks beautiful and was a good price. So I hope it’s going to be worth the effort……

EDIT. Reading this thread again and looking at my spare gas tank, I think I just have the revised slim tank and two sheets of insulation. So I'm guessingp that is designed to still go in the same side tank as the factory fitted tank?
So the underfloor gas tank modification uses the original larger tank, or a different type altogether?
 
Last edited:
Hi Ashley,

I've just come home from my Heritage Railway (About Us | The Bellarine Railway:) - I'll dig out the installation instructions for the under floor tank and copy them for you.

Last time I looked there were 37 pages on the SE Lounge on this locomotive and its issues: Login

I'm very happy with it now even if it cannot pull as much as my Roundhouse Davenport - final job was to turn down the pillars I mounted the servo for the reverser to allow clearance for the switch and bring the reversing rod down a little (after getting my lathe fixed which cooked its starter windings during the process).

The final step I have taken is to make up a patterned back plate for the gauge glass:

20250717_182525[1].jpg

I'll see how this works when I run it next - I may need to revise it with smaller width stripes. The black marker on the glass is where the level sits at the top of the burner tube - allowing the water below this is equivalent to exposing the crown sheet on a real locomotive.....

I've made my comments about all this on another thread on this forum so I won't repeat myself here.

NB: if you look at the pages on my railway's restoration projects I'm the driver of the Malcolm Moore pulling the "brown bomber" PB15 during a shunt at Queenscliff.

Cheers,
 
Instructions for installing the gas tank under the floor of the 7/8" Decauville as promised - please note that this gives a gas capacity that is greater than the water capacity in the boiler (which is quite limited).

I run with a Goodall valve and always try to avoid running the water level below the burner tube (despite comments by others that these boilers are built well enough to run dry).

Accucraft Decauville Gas Tank Install.jpg
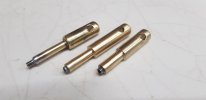
NB: I made up a socket driver to remove the cab nuts by drilling and tapping a brass mandrill, inserting a hex head grub screw that fitted the heads of the M1.4 nuts and silver soldering it in place. This was also handy for removing the cylinder end cover bolts. (I made up several sizes while I was at it):

20250209_212043.jpg

Cheers,
 

Attachments

Last edited:
Instructions for installing the gas tank under the floor of the 7/8" Decauville as promised - please note that this gives a gas capacity that is greater than the water capacity in the boiler (which is quite limited).

I run with a Goodall valve and always try to avoid running the water level below the burner tube (despite comments by others that these boilers are built well enough to run dry).

View attachment 345534
NB: I made up a socket driver to remove the cab nuts by drilling and tapping a brass mandrill, inserting a hex head grub screw that fitted the heads of the M1.4 nuts and silver soldering it in place. This was also handy for removing the cylinder end cover bolts. (I made up several sizes while I was at it):

View attachment 345535

Cheers,
I like the idea of using grub screws as nut runners! Brilliant!
On the subject of water below the boiler tube, my Accucraft locos all seem to have plenty of water left after the gas runs out, but my Roundhouse Billy was almost dry. I spoke to Roundhouse about it, and was told not to worry, as long as there was some water left. I'm always careful not to draw the amount of water out that Roundhouse suggest though
Hi Paul,

cannot lay claim to the grub screw/socket idea - it was suggested to me some time back by a colleague one running day at the AMRA Garden Railway Group track at Glen Iris (same track location that the Roundhouse Gallery shot of my Davenport was taken).

And as for water levels - I'm afraid over forty five years of driving and firing full size steam (locomotives, traction engines & steam rollers) just means I can never ignore it as a concern...........

Good luck with the conversion.
I was recently razoring some old G1 journals and the grub screw thing was one of the articles that I saved, currently sitting on my workbench waiting for my ‘round to it’ moment.
 
And as for water levels - I'm afraid over forty five years of driving and firing full size steam (locomotives, traction engines & steam rollers) just means I can never ignore it as a concern...........
I totally agree with you, that's why i took my concerns to Roundhouse. In practice, all I do is ignore their advice to remove 30ml of water after filling the boiler to the top, and only remove 20. It seems to work.
 
Roughly what i said previously, which wasn't too reassuring. But the did also remark it was how the engine run. Ill try and find the email exchange later
 
Back
Top Bottom