3D printer considerations

GAP

G Scale Trains, HO Trains, 1:1 Sugar Cane trains
14 Jun 2011
4,059
943
Bundaberg Queensland, Australia
Country
Australia
ringbalin-light-railway.blogspot.com
Best answers
0
Country flag
OK cat amongst the pigeons time.
I am considering venturing into the 3D printing world as the cost of obtaining supplies of couplers and bogie/wheel boxes has become prohibitive and I am running out of my stashed items.
What would I need to consider when purchasing a relatively 3D printer?
I have see references to the different materials but so far have not delved into the details of them.
I am interested at present in making bogies w/ sideframes, axle boxes and coupler boxes for link and pin plus perhaps even the links and pins similar to the ones in the picture below.

pasidump coupler.jpg

I also understand that I will need to learn how to use some type of CAD program so any recommendations on that would be welcome.

Any advice no matter how small will be greatly appreciate, plus recommendations on a 3D printer also appreciated.
 
Last edited:

LGeoB

Registered
12 Dec 2017
187
34
Perth, Western Australia
Country
Australia
Best answers
0
Country flag
OK cat amongst the pigeons time.
I am considering venturing into the 3D printing world as the cost of obtaining supplies of couplers and bogie/wheel boxes has become prohibitive and I am running out of my stashed items.
What would I need to consider when purchasing a relatively 3D printer?
I have see references to the different materials but so far have not delved into the details of them.
I am interested at present in making bogies w/ sideframes, axle boxes and coupler boxes for link and pin plus perhaps even the links and pins similar to the ones in the picture below.

View attachment 287672

I also understand that I will need to learn how to use some type of CAD program so any recomendations on that would be welcom.

Any advice no matter how small will be greatly appreciate, plus recommendations on a 3D printer also appreciated.
I just got a Flashforge Adventure 3 one from Jaycar that works well. Easy to set up and Jaycar usually have them in stock along with spares and filament. I have printed the items you have mentioned as well as others, usually to replace missing LGB bits!

Geoff
 

JimmyB

Now retired - trains and fishing
23 Feb 2018
6,947
921
69
Weston-super-Mare
www.tumble-down-falls.co.uk
Best answers
0
Country flag
I don't have a 3D printer, but have considered one for some time, and for good resolution of small components the resin printers seem best, but are limited on the size you can print.
 

dunnyrail

DOGS, Garden Railways, Steam Trains, Jive Dancing,
Staff member
GSC Moderator
25 Oct 2009
26,168
4,992
75
St.Neots Cambridgeshire UK
Best answers
0
Country flag
I think there may well be more of us pondering the need for a 3D printer, certainly for me space is an issue in the workshop. Also the time taken for the drawing though I am competent enough with 2d drawing. The change may not be so bad as I fear. So be good to get some happy consensus with not too much gobbledegook tech talk.
 

Monty

Registered
16 Apr 2018
261
56
Springwood, NSW, Australia
Best answers
0
Country flag
Mr GAP,
A mate of mine uses AutoCad Fusion 360 and whilst it is restricted in the free version it seems to be quite powerful and not too daunting. The 3d side of it is quite clever and to my mind worth the work in getting it to sing for you.
See Autodesk Limits Functionality In Free Version Of Fusion 360 « Fabbaloo
Others in this parish might have more detail or other suggestions.
Good luck.
cheers.
Monty
 

LGeoB

Registered
12 Dec 2017
187
34
Perth, Western Australia
Country
Australia
Best answers
0
Country flag
I don't have a 3D printer, but have considered one for some time, and for good resolution of small components the resin printers seem best, but are limited on the size you can print.
I also have a couple of resin printers. Can get amazing resolution - I got it to print n-scale Farish gears. However it is a really nasty process. You can end up with resin everywhere! You need a decent mask, safety glasses and best to use it where there is very good ventilation. I got an Anycubic one which I almost wrecked by leaving resin in the bath for a few days. I didn't notice but there was a small crack in the bottom of the resin tank and resin leaked into the lcd screen, motor and electronics. I managed to get it going again but it looks like it has been through the wars.

Geoff
 

Degauss

Registered
9 Jun 2017
80
13
74
Australia
Best answers
0
Country flag
What detail do you want to get to. Printing the couplers, wagons and items of a larger size is ok on a filament printer. The pins for couplers are harder, I found that anything below 1 to 1.5mm the layer lines may not stick if the layer line is short like on a pin. Have done it but result not nice unless your printer is well tuned. A resin printer does them very nice, but as stated build volume is small but extremely detailed.
Both methods have advantages and problems, a filament print likes a large area to stick to the build plate but a resin printer does not, print may not lift, that's why resin prints are done at an angle with supports.
Filament printer goes by line so 1 coupler takes 10 minutes, 2 take 21 minutes etc. Print head needs to move between each item on every layer, this takes time. A resin printer goes by layer, the whole layer is printed at once thus 1 coupler takes say 30 minutes, 10 couplers take 30 minutes. Time depends on height of print.
I don't print flat surfaces but use ply or lolly sticks, take a long time to print although it can have details, assembly tabs included to make assemble easier and aligned. Big flats are not done on resin as it must be pulled off the build window for each layer and if the connection to the upper plate breaks this it but same for filament if print moves on build plate you get a large blob of strings.
Rik at Peckforton Light Railway has tuts on using software to print railway items.
I would like a resin printer but consider the work in cleaning resin and curing it plus fumes not worth the effort. I just use my $180 little filament printer and make a big enough mess with the little bits of filament that seen to multiply.
You need to work out what types of items you would like to make and at what size and detail level.
Things get more complicated from there on!!
 
Last edited:

LGB-Sid

Registered
19 Sep 2016
2,036
1,130
65
UK
Best answers
0
Country flag
I have three printers, One resin and two filament one open Bed and one fully enclosed bed. Filament printers can vary in the layer height they work down too, one of mine can go to 0.05mm which can produce some reasonable detail on G scale items but using that level takes a lot more time, so most things that I can see when finished are printed at 0.1mm. If its an internal part that's not visible then usually I use 0.2mm.
My Resin printer is the Anycubic one, great detail for printing your own figures and detail parts for builds but as others have said messy and can be smelly, but there are a variety of resins now , so strength of prints and flexibility required can be achieved , the smell can also be reduced depending on the Resin make I have found as well.
Filament printing you can buy cheap nasty filament and get results to match , I found using a reasonable quality filament and stick to the same make , works the best in my opinion, as you get to know what the printer and filament can and cant print and the quality you can expect from it.
I have now Printed 5 Loco conversions, 8 full wagons, 6 Signals 3 signal boxes etc. etc. and various buildings including 80% of a pub in G scale ( that took a long long time ). There are files online you can download and print but to get the best out of a printer you need to pick a 3D package and make your own files, there are a few on here now that have done that from scratch, so it's not that daunting a task :)
Which Printer is not one I can answer, the three I have are all good at different things, but the best way to start is as others have said, decide what you want to achieve with it. That will then give you an idea of the level of detail you need, the bed size you need etc, the advantage of drawing your own 3D parts is if it's going to be bigger than your print bed, you make it in parts that will fit your bed.


Once you buy one it's addictive :nerd:
 

ge_rik

British narrow gauge (esp. Southwold and W&LLR)
24 Oct 2009
10,701
1,244
Cheshire
www.riksrailway.blogspot.com
Best answers
0
Country flag
Creality Ender 3 usually gets good reviews. My mate has one and has been pleased with it.

As has been mentioned, I have some tutorials for TinkerCAD on my blog as it's dead easy to use.

Rik
 

GAP

G Scale Trains, HO Trains, 1:1 Sugar Cane trains
14 Jun 2011
4,059
943
Bundaberg Queensland, Australia
Country
Australia
ringbalin-light-railway.blogspot.com
Best answers
0
Country flag
Thank you all for the replies, I was not even aware of a resin printer just the filament type.
Didn't expect a use this one it's the best
The coupler pockets and the links were what I am most interested in at the moment, for the pins I can use metal split pins.
Now to look for something that suits my needs and a CAD program that is easy to learn that will probably be the killer if I can't learn to drive it correctly.
Creality Ender 3 usually gets good reviews. My mate has one and has been pleased with it.

As has been mentioned, I have some tutorials for TinkerCAD on my blog as it's dead easy to use.

Rik
Your blog is on the required reading list Rik
 
8 Mar 2014
7,806
972
San Diego
Country
Armenia
www.elmassian.com
Best answers
0
Country flag
Yes, although you might call it an SLA printer, it prints with resin, but the process makes all the difference, most use a laser to harden resin out of a pool of resin, as opposed to squirting small bits of heated, liquefied plastic through a moving nozzle.

The filament printers produce a surface that is never smooth enough for a car body without either sanding or filling, and small details go away.

If you read the thread on the 1:24 loco on the last video he posted he shows the same part (diesel cab) printed with these 2 technologies and is very clear about the amount of work to finish filament printed parts.

It all depends on what you want to do, but printing car bodies I would never recommend a filament printer, no way all that work to finish.

Greg
 

3 minutes of fame

3d printing, electronics and trams
14 Dec 2020
574
154
Lincolnshire
www.mgnr.uk
Best answers
0
Country flag
I have the holy trinity of SLA, FDM and laser cutter. All do very different jobs.

Most consumer SLA printers use UV light shone through an LCD screen. This creates the layer mask and the exposed resin then hardens to that shape. Great for making figures, small detail parts and anything where visible lines might be a problem to hide. There's a couple of common sizes of printers and something like an Elegoo Saturn will print quite large items, but the running costs will be high. Resin is currently around £30 per KG, and some wastage will occur. As others have said, its smelly, messy and really needs a dedicated workshop with artificial lighting to work well. Sunlight will set the resin instantly, but typical UV blocking glass will prevent this. You also need copious amounts of ipa to clean the prints and printer, along with either an electrical agitator or plenty of manual swirling and brushing of parts to clean up the excess resin. Gloves always required!

I have a Creality Ender 3 Pro and I'm very happy with it. Previously I had a dual extruder CTC 3D which I fully enclosed and got quite acceptable results with as well. A good surface finish is not just about resolution, but also accuracy and repeatability. A printer needs to deposit the next layer precisely upon the last and at exactly the right height to reduce the visible lines, ringing and surface imperfections. Painting with a high fill primer will improve things further, but a really good finish needs some elbow grease with the sander. While SLA is effectively 1 speed - the layer is exposed for the same amount of time irrespective of how large the or complex the layer is, FDM printers can be run at a variety of speeds. Increasing the layer height and print speed degrades quality, but for drafting an initial prototype, it's very useful.

While you are limited to a handful of different resins with a small range of colours and physical properties with SLA, FDM printers have a wider range of materials and a huge colour gamut to choose from. PLA is the most popular, being easy to print, ABS is generally a slightly stronger material but needs a heated bed and ideally an enclosed build chamber to prevent warping while printing, PETG is more flexible once printed and is excellent for functional parts like couplings while more exotic materials like Ninjaflex and Chopped Carbon may require modifications to the printer, but increase the range of components that can be made.

Laser cutting of thin ply using an LED laser is relatively easy to do and the design process is simpler as you are only working in 2D. A well ventilated space is a must, and I've added an air assist nozzle to mine, which increases cutting depth and finished part quality by reducing charring. I can cut up to 3mm ply, which is very useful for G Scale rolling stock and buildings etc. plus thick card and some perspex materials. Don't take any risks with open frame laser cutters. Momentary exposure to the direct or reflected beam could blind you permanently. Buy some safety glasses or build an enclosure.

I user Microsoft 3d Builder, Siemens Solid Cad 2D, Tinkercad and Light Burn for the majority of design tasks. I also have Inkscape for tracing images to vectors and various other tools for file conversion and manipulation. My only paid software is Simplyfy 3D for FDM slicing and Lightburn for basic laser 2d shapes and to control the cutter.

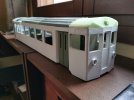
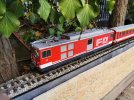
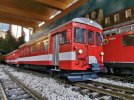
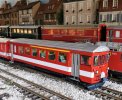
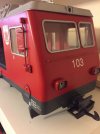
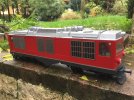
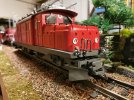
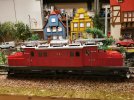
I've posted a few makes and files on this forum, so please just search my user name. All stock in the photo below with the exception of the MSS loco and 2 trams is either 3d printed or laser cut by me. The Wisbech and Upwell coach was drawn by me from images supplied by dunnyrail dunnyrail 20210609_181610.jpg
 
Last edited:

musket the dog

Registered
31 Oct 2009
787
143
Leicester
nlrr.webs.com
Best answers
0
I use an Creality Ender 5 for my prints, when I was doing my research Creality looked like they were offering the best value for money in terms of the quality and the size of the printer. The Ender 5 offers a taller build envelope than the Ender 3 at the expense of being physically quite a bit larger because it has a 4 post chassis.

As has been mentioned there is a lot of customisation available for FDM printers, I'm currently working with a 0.2 and 0.6mm nozzles as well as the standard 0.4mm to either gain resolution or increase strength and decrease build times. A good material can make all the difference to how successful a part prints and the quality of the final project. When you find one that you like buy the same again. The printer will need to be fine tuned to each material and finding the best settings is an iterative process. Even changing the colour might require minor tweaks to the settings.

I use a lot of the guides on this website: all3dp Googling most the common questions will usually bring you to one of their articles.

I currently use 2 3D CAD programmes, Autodesk Inventor and CREO. Autodesk is the simpler or the 2 and I think it is still possible to get a free version if you know someone involved with education. I finished university 5 years ago now but have managed to renew my license twice. CREO is a very powerful programme but quite complicated to learn. On the other hand there's TinkerCAD which is completely free and used quite successfully. The common link with all the CAD programmes is that they require practice. There's usually lots of guides online, if you pay for certain packages they supplier may even provide their own tutorials.
 

GAP

G Scale Trains, HO Trains, 1:1 Sugar Cane trains
14 Jun 2011
4,059
943
Bundaberg Queensland, Australia
Country
Australia
ringbalin-light-railway.blogspot.com
Best answers
0
Country flag

3 minutes of fame

3d printing, electronics and trams
14 Dec 2020
574
154
Lincolnshire
www.mgnr.uk
Best answers
0
Country flag
That does look like a good printer. You can however, add bed height sensing to any of the Creality printers for less than £40, so worth checking the premium you are paying for this.

I would also point out that this is one of the less common Creality printers, so you may find obtaining spares - particularly around the hot end and innovative but virtually unique bed levelling may become a challenge.

An Ender 3 V2 with a bed sensor is probably a little cheaper and is better supported, but the ultimate print quality will probably be much the same.
 
Last edited:

luigi.gitto

I'm New, Please Be Gentle
18 Aug 2015
35
27
Best answers
0
Country flag
If I can give my contribution, the models in the attached images are all made with my resin LCD printing.

I started with filament printers, but the surface of the pieces, with the characteristic lines, could not satisfy me, so I switched to an Anycubic resin printer, quite cheap, but with a 12 x 6.5 cm printing plate, a little too small.
I now use a Phrozen Mighty 4K printer, which I am very happy with (printing volume 20 x 12 x 22 cm).
As someone has already written if you use good quality resins, the smell of the print is insignificant, recently also resins that can be washed in water have come on the market, so you don't have to use isopropyl alcohol to clean pieces.
As 3D CAD design program, I started with Thinkercad, but it's a bit basic, so I switched to Autodesk's Fusion 360, which is very powerfull and get a license-free version for hobbyists; it's more complex, but it's really great, anything can be done.
Last thing as a slicing program to transform CAD drawings into printer-readable files I use Chitobox, of which there is a free version, simple, but complete and functional.
The models seem to be very stable for the moment, even outdoors they did not give me problems, for the duration I will know in 10 years.
 

Attachments

  • IMG_20210212_161303.jpg
    IMG_20210212_161303.jpg
    164.5 KB · Views: 0
  • IMG_20210315_154137.jpg
    IMG_20210315_154137.jpg
    459.6 KB · Views: 0
  • IMG_20210315_160034.jpg
    IMG_20210315_160034.jpg
    318.5 KB · Views: 0
  • IMG_20210605_131150.jpg
    IMG_20210605_131150.jpg
    304.2 KB · Views: 0
  • IMG_0627.jpg
    IMG_0627.jpg
    196.1 KB · Views: 0
  • IMG_1285.jpg
    IMG_1285.jpg
    214.5 KB · Views: 0
  • IMG_2007.jpg
    IMG_2007.jpg
    372.5 KB · Views: 0
  • IMG_20210113_192133.jpg
    IMG_20210113_192133.jpg
    327.1 KB · Views: 0
  • IMG_20210113_192153.jpg
    IMG_20210113_192153.jpg
    396 KB · Views: 0
  • Like
Reactions: 1 user
8 Mar 2014
7,806
972
San Diego
Country
Armenia
www.elmassian.com
Best answers
0
Country flag
I just researched the Phrozen 4K, seems pretty perfect for printing the longer stuff we need in this scale. For people printing rolling stock this should mean fewer joints, easier assembly, better final product.
 

jimmielx

45mm gauge track - approx 16mm scale (1:19)
24 Oct 2009
786
41
Hastings, UK
Country
United-Kingdom
Best answers
0
Country flag
If I can give my contribution, the models in the attached images are all made with my resin LCD printing.

I started with filament printers, but the surface of the pieces, with the characteristic lines, could not satisfy me, so I switched to an Anycubic resin printer, quite cheap, but with a 12 x 6.5 cm printing plate, a little too small.
I now use a Phrozen Mighty 4K printer, which I am very happy with (printing volume 20 x 12 x 22 cm).
As someone has already written if you use good quality resins, the smell of the print is insignificant, recently also resins that can be washed in water have come on the market, so you don't have to use isopropyl alcohol to clean pieces.
As 3D CAD design program, I started with Thinkercad, but it's a bit basic, so I switched to Autodesk's Fusion 360, which is very powerfull and get a license-free version for hobbyists; it's more complex, but it's really great, anything can be done.
Last thing as a slicing program to transform CAD drawings into printer-readable files I use Chitobox, of which there is a free version, simple, but complete and functional.
The models seem to be very stable for the moment, even outdoors they did not give me problems, for the duration I will know in 10 years.
Fantastic work. Those are some really good looking locos.
 

GAP

G Scale Trains, HO Trains, 1:1 Sugar Cane trains
14 Jun 2011
4,059
943
Bundaberg Queensland, Australia
Country
Australia
ringbalin-light-railway.blogspot.com
Best answers
0
Country flag
That does look like a good printer. You can however, add bed height sensing to any of the Creality printers for less than £40, so worth checking the premium you are paying for this.

I would also point out that this is one of the less common Creality printers, so you may find obtaining spares - particularly around the hot end and innovative but virtually unique bed levelling may become a challenge.

An Ender 3 V2 with a bed sensor is probably a little cheaper and is better supported, but the ultimate print quality will probably be much the same.
I have looked at an Ender 3 V2 and Pro with the BLTouch Sensor, it is a cheaper option but from what I have read not all Ender 3 boards have the socket to fit it.
The main reason I am looking at the CR6 is that the levelling is built in, as I cannot get one till after 14 Sep I will continue looking at reviews, with a mind on the Ender 3 with sensor, before making a decision.
The biggest thing is the setup where the user has to change the firmware, that is the part that I would not be comfortable with.
Maybe manual levelling might not be that bad.
 

3 minutes of fame

3d printing, electronics and trams
14 Dec 2020
574
154
Lincolnshire
www.mgnr.uk
Best answers
0
Country flag
My Ender 3Pro had the required socket and it was a simple job to plug in 1 connector and upload the firmware. That was as simple as find the correct version on the Creality site, copy it to the micro SD card and insert into the printer.

The initial calibration was relatively easy and I just needed to add a single additional command line to the gcode in the slicing program to initiate the bed levelling process.

Can I suggest you get either a v2 or a Pro and see how you get on? Setting the bed height is reasonably straightforward and if your printer is in a relatively stable temperature location, you shouldn't need to level it too often. If you do want upgrade, you can whip the cover off the motherboard to check the connections prior to ordering the right levelling kit. It's very simple with the Pro and V2, as the socket should be there and the bootloader for firmware flashes is built in. Older 3s need the bootloader USB connector, but this is included in the kit.